Virtuozzo Automator
- HostBill
- HostBill
Overview
Virtuozzo specializes in virtualization software that helps with server consolidation, disaster recovery, and server workload agility. Virtuozzo Automator is a flexible and easy-to-use administration tool for managing groups of physical servers running Virtuozzo. With Virtuozzo Automator, you can manage both physical servers and virtual environments hosted on those using a Web browser. HostBill integration with Virtuozzo Automator gives you the opportunity to sell single VPS, flexible or fixed cloud and use our various billing models to bill for disk size, OS templates, backups, CPUs and memory.
Important Note
In order for module to function properly HW_node must be registered in Virtuozzo Automator first.
Activating the module
- If the module is included in your HostBill edition you can download it from your client portal.
- If the module is not included in your HostBill edition you can purchase it from our marketplace and then download it from the client area.
- Once you download the module extract it in the main HostBill directory.
- Go to Settings → Modules → Hosting Modules, find and activate Virtuozzo Automator module.
Connecting HostBill with Virtuozzo Automator
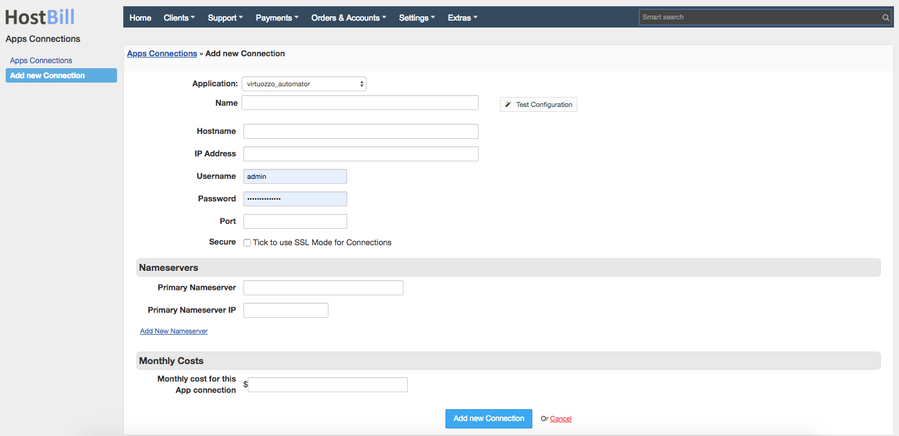
- Proceed to Settings → Apps → Add new App
- From Applications list select Virtuozzo Automator
- Enter:
- Name - Name of this connection
- Hostname
- IP Address
- Username
- Password
- Port
4. Verify entered credentials by clicking Test Connection to check if HostBill can connect. If its not possible, try enabling SSL mode and make sure that Parallels Agent is up and running on your node.
5. Save Changes
Adding Virtuozzo Automator product
- In HostBill go to Settings → Products & Services, and Add new order page
- From order types select VPS Accounts
- Enter your orderpage name, select orderpage template. Save Changes
- Add new product in the new orderpage. Provide product name and setup price and then Save Changes.
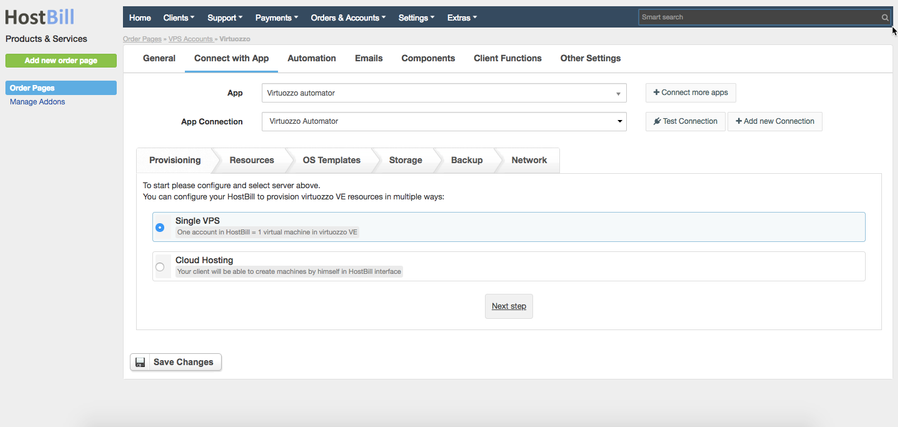
- In product configuration section proceed to Connect with App, select Virtuozzo Automator and App server created in previous steps.
- In the "Provisioning" section choose how HostBill should provision Virtuozzo VE resources:
- Single VPS - one account in HostBill = 1 virtual machine in virtuozzo VE
- Cloud Hosting - your client will be able to create machines by himself in HostBill interface
- In the "Resources" tab configure the limits for client's virtual machine
- Virtualization type - Virtual Machine or a Container
- VM template
- Memory
- CPUs cores
- CPU units
- CPU limit
- In the "OS Templates" tab you can limit access to OS templates available in your Virtuozzo, you can also add charge to selected images
- The "Storage" tab allows you to choose
- Disk size (in GB)
- Disk interface type (SCSI, SATA, VirtlO, IDE)
- Disk format (plan or expanding)
- In the "Backup" tab you can set:
- Backups limit
- Backup size (in GB)
- The "Network" tab allows you to set
- Network mode - bridged or routed
- Network model
- Save changes.
For more generic product configuration details including price, automation, emails settings refer to Product Configuration article.
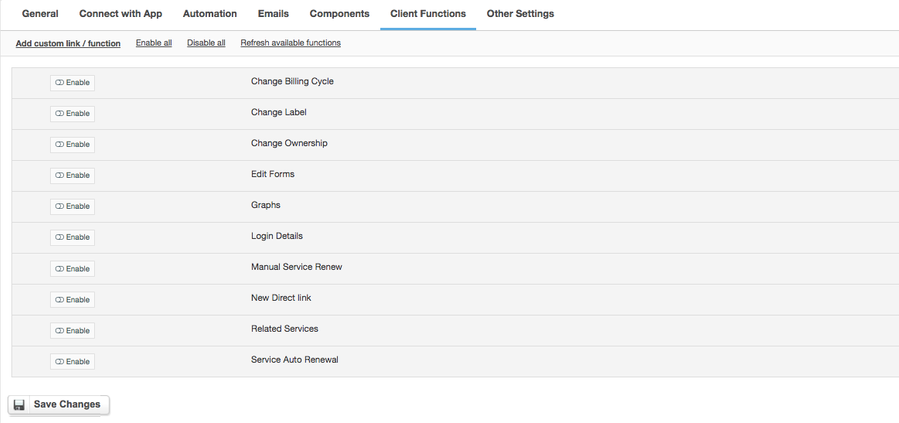
Configuring Client Functions
In Products & Services → Your Order Page → Your Product → Client Functions you can control what features customer will have access to in client portal, by clicking Enable/Disable next to the given option.
Use Edit button to adjust function appearance in the client portal.
For Virtuozzo Automator you can enable a number of standard client functions:
- Change Billing Cycle
- Change Label
- Change Ownership
- Edit Forms
- Graphs
- Login Details
- Manual Service Renew
- New Direct Link
- Related Services
- Service Auto Renewal