upCloud
- HostBill
- HostBill
- HostBill Support
Overview
UpCloud is a reliable cloud platform that enables you to deploy high performance cloud servers quickly and easily. Thanks to UpCloud integration with HostBill you can sell VPS Hosting by reselling UpCloud instances. With HostBill various billing models and flexible product configuration options you can charge your customers for OS templates, locations or VM plans. The whole account lifecycle is automated by HostBill. Clients are able to control and manage their resources from the client area. The access to client area functions is controled by the admin. Client can create, restart, start and stop their virtual machines, inject SSH keys, manage virtual machine’s firewall and access noVNC console. Admin area provides access and allows to manage billing details and account lifecycle.
Activating the module
- If the module is included in your HostBill edition you can download it from your client portal.
- If the module is not included in your HostBill edition you can purchase it from our marketplace and then download it from the client area.
- Once you download the module extract it in the main HostBill directory.
- Go to Settings → Modules → Hosting Modules, find and activate UpCloud module.
Connecting HostBill with UpCloud
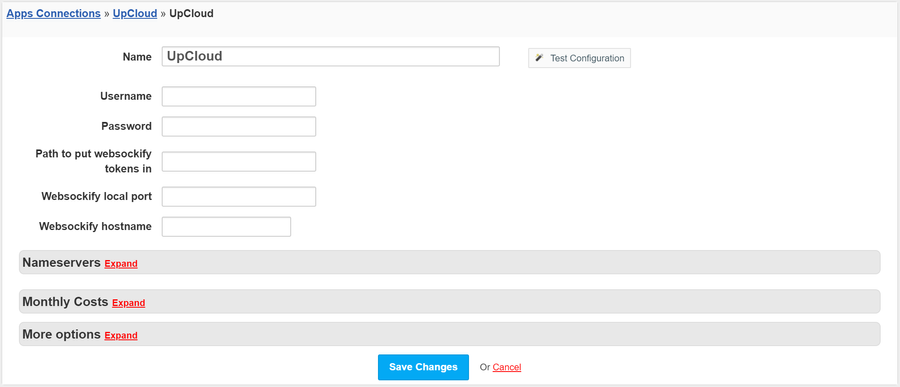
- Proceed to Settings → Apps → Add new App
- From Applications list select UpCloud
- Enter:
- Name - Name of this connection
- Username
- Password
- Path to put websockify tokens in - The path to the folder in which the tokens will be stored in order to be able to log in to the console (The field is necessary for proper operation of the console). This path needs to be writable both by HostBill user (its php process) and websockify user.
- Websockify local port - The port from which the console will be used (The field is necessary for proper operation of the console). Refer to section: Console Configuration for details
- Websockify hostname - Hostname after which we will connect to the console. Refer to section: Console Configuration for details
4. Verify entered credentials by clicking Test Connection to check if HostBill can connect
5. Save Changes
Console configuration
HostBill module for upCloud provide optional noVNC console for your clients. Since upCloud does not provide websocket, but novnc console through API it's important to setup a Websockify on server where HostBill resides.
Namely: https://github.com/novnc/websockify with configured https://github.com/novnc/websockify/wiki/Token-based-target-selection
Guide below provides sample websockify installation on CentOS 7:
Start by installing fortran & git:
yum -y install numpy python-devel gcc-gfortran git
Create new system user, clone websockify and grant permissions.
Replace {$path} with the value set in the "Path to put websockify tokens" in HostBill connection details. In this sample we've used: /home/websockify/target.conf.d)
adduser websockify
cd /home/websockify
git clone https://github.com/novnc/websockify.git
cd /home/websockify/websockify
python setup.py install --force
mkdir {$path}
chmod 0777 {$path}
chown -R websockify: /home/websockify
Create cronjob as websockify user (crontab -e -u websockify), with following line replacing variables:
*/5 * * * * /home/websockify/websockify/run {$console_port} --token-plugin TokenFile --token-source {$path}- {$path} - Value of the "Path to put websockify tokens in" field. Ensure to make it writeable to world (chmod 777)
- {$console_port} - Port on which the console will connect. Port used internally in the webserver (ie apache) configuration, should be different than {$port}
- Finish by configuring your webserver. Replace :
- {$hostname} - Value of the "Websockify hostname" field set in steps above.
- {$port} - Value of the "Websockify local port" field
Note
On server running websockify ensure to open TCP out ports 20000-65535 (as its being used by actual console)
Webserver configuration: Nginx
If your HostBill is installed using enterprise install script, or you're using Nginx in your setup:
Create file: /etc/nginx/conf.d/websockify.conf
with contents:
 upstream websocket {
        server 127.0.0.1:{$console_port};
    }
server {

    listen {$port} ssl;
    server_name {$hostname};
    server_tokens off;

    charset                     utf-8;
    sendfile                    on;
    tcp_nopush                  on;
    tcp_nodelay                 off;
    reset_timedout_connection   on;


    include /etc/nginx/ssl.conf;

 	location / {
        proxy_http_version 1.1;
        proxy_pass http://websocket;
        proxy_set_header Upgrade $http_upgrade;
        proxy_set_header Connection "upgrade";


        proxy_set_header X-Real-IP $remote_addr;
        proxy_set_header X-Forwarded-For $proxy_add_x_forwarded_for;
        proxy_set_header Host $host;
        proxy_set_header X-NginX-Proxy true;

        proxy_buffers 8 32k;
        proxy_buffer_size 64k;

        proxy_redirect off;
        proxy_read_timeout 61s;

    }
    ssl_certificate /etc/letsencrypt/live/{$hostname}/fullchain.pem; # replace with path to actual certificate your installation is using
    ssl_certificate_key /etc/letsencrypt/live/{$hostname}/privkey.pem; # replace with path to actual certificate key your installation is using
}
Ensure to restart nginx afterwards (systemctl restart nginx)
Webserver configuration: Basic Apache (using default cert):
In your apache configuration file:
<VirtualHost *:{$port}>
ServerName {$hostname}

ProxyPass / ws://127.0.0.1:{$console_port}/
ProxyPassReverse / ws://127.0.0.1:{$console_port}/

SSLEngine on

</VirtualHost>
Restart/reload webserver
Webserver configuration: cPanel/WHM server:
If your HostBill is installed on cPanel server:
- Ensure you're apache have mod_proxy_wstunnel installed (you can check/add this module in WHM→EasyApache)
Create custom apache file (replace username and hostbill.domain with your actual username/domain) /etc/apache2/conf.d/userdata/ssl/2_4/username/hostbill.domain/custom.conf:
ProxyPass /wss ws://127.0.0.1:{$console.port}/ ProxyPassReverse /wss ws://127.0.0.1:{$console.port}/- Rebuild httpd config & restart webserver using:
/usr/local/cpanel/scripts/rebuildhttpdconf
/usr/local/cpanel/scripts/restartsrv_httpd - Edit HostBill file: includes/modules/Hosting/upcloud/user/console.tpl
Replace line:
path = WebUtil.getQueryVar('path', '?token={/literal}{$console.token}{literal}');
with:
path = WebUtil.getQueryVar('path', 'wss?token={/literal}{$console.token}{literal}'); - Ensure file above would not be overwritten by autoupdate plugin
Adding UpCloud Product
- In HostBill go to Settings → Products & Services, and Add new order page
- From Order Types select "VPS Accounts"
- Enter your orderpage name, select orderpage template. Save Changes
- Add new product in new orderpage. Provide product name, setup price, Save Changes.
- In product configuration section proceed to "Connect with App", select "UpCloud" and App server created in previous steps.
- Setup Package Limits:
- Plan- Select plan that will be used to to create vm
- Custom Memory - When plan is set to Custom you can define custom memory (or let client decise of it)
- Custom CPU - When plan is set to Custom you can define custom CPU amount (or let client decise of it)
- Template- Select os template to be used for vm.
- Location - Select region that will be used to deploy client vm.
- Storage size - storage size in GBs
- Storage tier - storage device tier
- Server name source - pick from where HostBill should use server name
- Default username - optional username that will be used when creating machine
- Staff SSH Key 1 - additional SSH key to auto-inject to every machine using this product
- Staff SSH Key 2 - additional SSH key to auto-inject to every machine using this product
- SSH key - If this box is checked then you allow the client to add SSH keys.
- Firewall - enable/disable firewall
- Initialization script - custom initialization script to be used with machine using this product
- Enable backups - enable/disable automated backups
- Backup time - time for automated backups
- Backup cycle - how often automated backups should be taken

Note:
You can optionally use "Allow to select by client during checkout" checkbox.
This will automatically add new form items under Components → Forms allowing your client to configure server location, size or os template during order.
You can apply additional charges to those items.
For more generic product configuration details including price, automation, emails settings refer to Product Configuration article.
Defining custom plans in Plan selector
In related product configuration, if you decide to let customer decide which plan to select using "Allow to select by client during checkout" next to Plan option, you can define your own custom plans.
To do so, edit related form element in Components → Forms section, and in Values define your own custom plan by adding / editing existing value

- Enter your custom plan name
- In "Value passed to App" of related value, enter:
- custom:{N}xCPU-{M}GB where:
- N is amount of custom CPU
- M is amount of custom RAM
- custom:{N}xCPU-{M}GB where:
- If you also want to set custom storage size, In "Value passed to App" of related value, enter:
- custom:{N}xCPU-{M}GB-{P}GB where:
- N is amount of custom CPU
- M is amount of custom RAM
- P is custom disk size
- custom:{N}xCPU-{M}GB-{P}GB where:
Example:
Variable passed to App set to "custom:3xCPU-8GB-100GB" will create vm with:
- 3 CPU
- 8 GB RAM
- 100 GB disk size
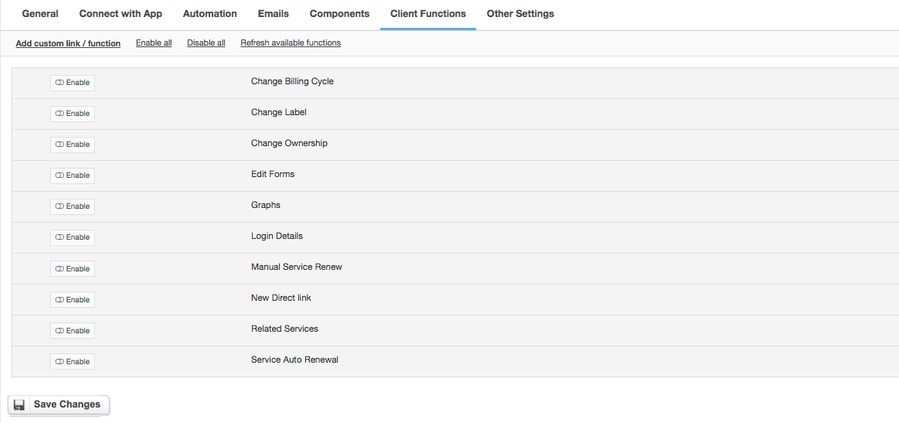
Configuring Client Functions
In Products & Services → Your Order Page → Your Product → Client Functions you can control what features customer will have access to in client portal, by clicking Enable/Disable next to the given option.
Use Edit button to adjust function appearance in the client portal.
For UpCloud you can enable a number of standard client functions:
- Change Billing Cycle
- Change Label
- Change Ownership
- Edit Forms
- Graphs
- Login Details
- Manual Service Renew
- New Direct Link
- Related Services
- Service Auto Renewal