/
DNS Import
DNS Import
- HostBill
- HostBill
Owned by HostBill
Last updated: Dec 17, 2018 by HostBill
Overview
DNS Import is a free plugin shipped with most of HostBill DNS modules. It allows you to:
- Import DNS zones you manage remotely into HostBill
- Migrate DNS zones upon import - ie. import from cPanel DNS to PowerDNS
Activating the module
- This module is a part of HostBill DNS modules, select one you have access to within your HostBill Editions
- Once you download the DNS module extract it in the main HostBill directory.
- Go to Settings → Modules → Plugins, find and activate DNS Import module.
- Module uses/requires Queue, make sure it's enabled under Plugins → HostBIll queue
Using Module - Importing Zones
- Proceed to Extras → DNS Import
- Select DNS App configured in Settings → Apps Connections that you will be importing zones to manage from.
Click Continue for HostBill to fetch available zones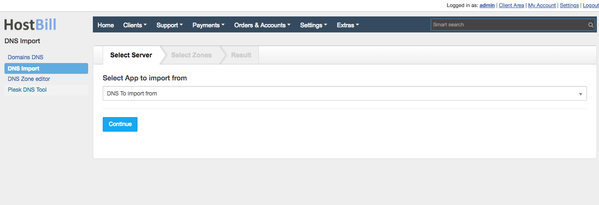
- Select zones you wish to import. Module will list only those zones that are not already managed by HostBill.
- From Zone, select one or multiple zones you will be importing for given client / product
- Select Client that zone should be assigned to (type in client name/id to search)
- Select Product that zone should be assigned to.
Important:
If you select product which uses different App Connection (DNS module) the one you're importing from, a Migration will take place (zone will be added to HostBill + exported to new DNS app).
Note: When zone is migrated existing NS records are not auto-updated, if Product configured in target contains default NS set, those will be added to newly created zone in target DNS app. - Click add Item to add import into queue. Import will not start immediately at this point.
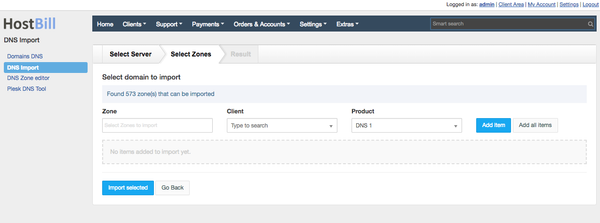
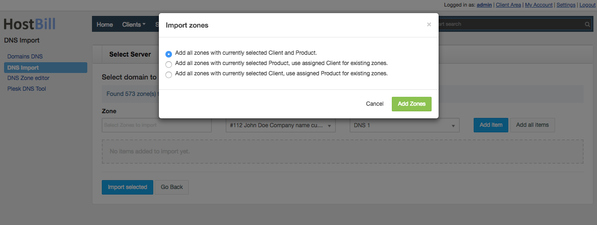
- You can use Add all items to add all available zones at once under current configuration:
- Repeat steps a-d for all zones you wish to import in given run.
- Click on Import selected to start import
- Import starts as background task in HostBill queue. You can track progress on plugin page:

Related content
Domain DNS Automation
Domain DNS Automation
More like this
Hetzner DNS
Hetzner DNS
More like this
Domains: DNS automated zone creation
Domains: DNS automated zone creation
Read with this
PowerDNS
PowerDNS
More like this
Migration from Hexonet to CentralNic Reseller module
Migration from Hexonet to CentralNic Reseller module
More like this
It.com
It.com
More like this