Cloud Monitoring
- HostBill (Unlicensed)
- HostBill
- HostBill
Overview
The Cloud Monitoring module allows you to:
- Create monitoring node - a VPS/Cloud node with CentOS/AlmaLinux 8.x/9.x x86_64
- Install monitoring node software (comes with the plugin)
- Connect your HostBill to monitoring node
- Configure paid/free monitoring package in HostBill
Activating the module
- If the plugin is included in your HostBill edition you can download it from your client portal.
- If the plugin is not included in your HostBill edition you can purchase it from our marketplace and then download it from the client area.
- Once you download the plugin extract it in the main HostBill directory.
- Go to Settings → Modules → Hosting Modules, find and activate Cloud Monitoring (HBmonitoring) plugin.
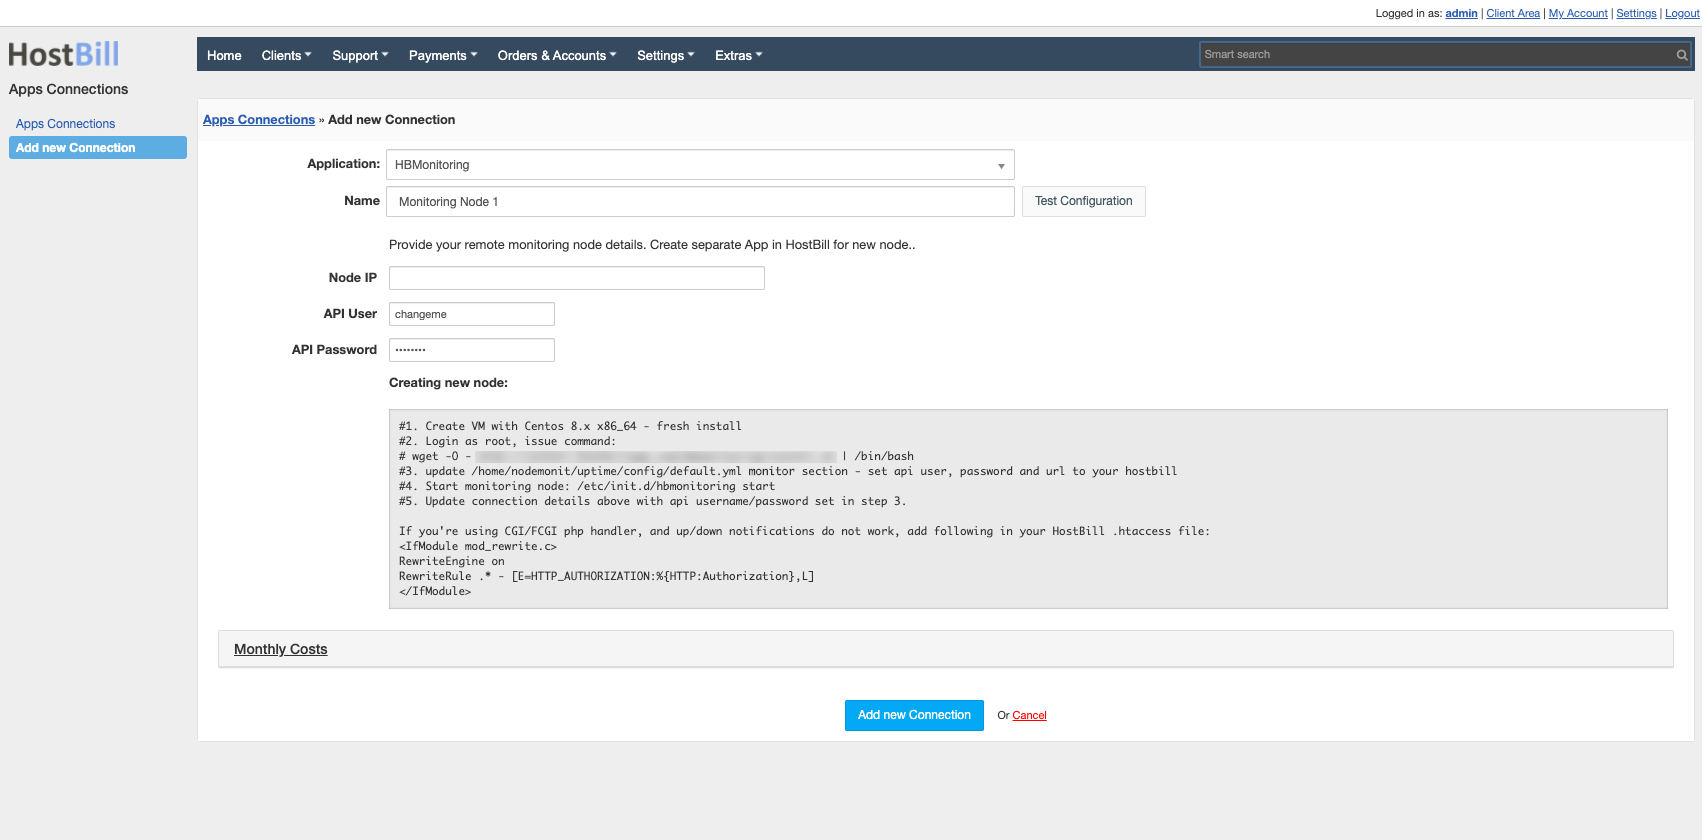
- Once the plugin is activated you will be directed to Settings→ Apps to configure the plugin.
Configuring monitoring node
After monitoring node is installed, edit file (login as root):
vi /home/nodemonit/uptime/config/default.yml
Update "monitor" section:
monitor:
hbURL: 'http://your-hostbill-main-url.com/'
api_username: --enter-here--
api_password: --enter-here--
Where:
hbURL - enter url to your HostBill (client section) - make sure to end this URL with trailing slash "/"
api_username - enter random string, copy it to use in your HostBill Apps section. Ensure its unique / non-repeating across all your monitoring nodes!
api_password - enter random string, copy it to use in your HostBill Apps section
After saving configuration file, restart your monitoring node:
systemctl restart hbmonitoring
Adding Cloud Monitoring Product
- In your HostBill go to: Settings → Products & Services, and Add new order page.
- From Order Types select Other Services.
- Enter your order page name, select order page template. Save changes.
- Add new product in the new order page. Provide product name, setup price, save changes.
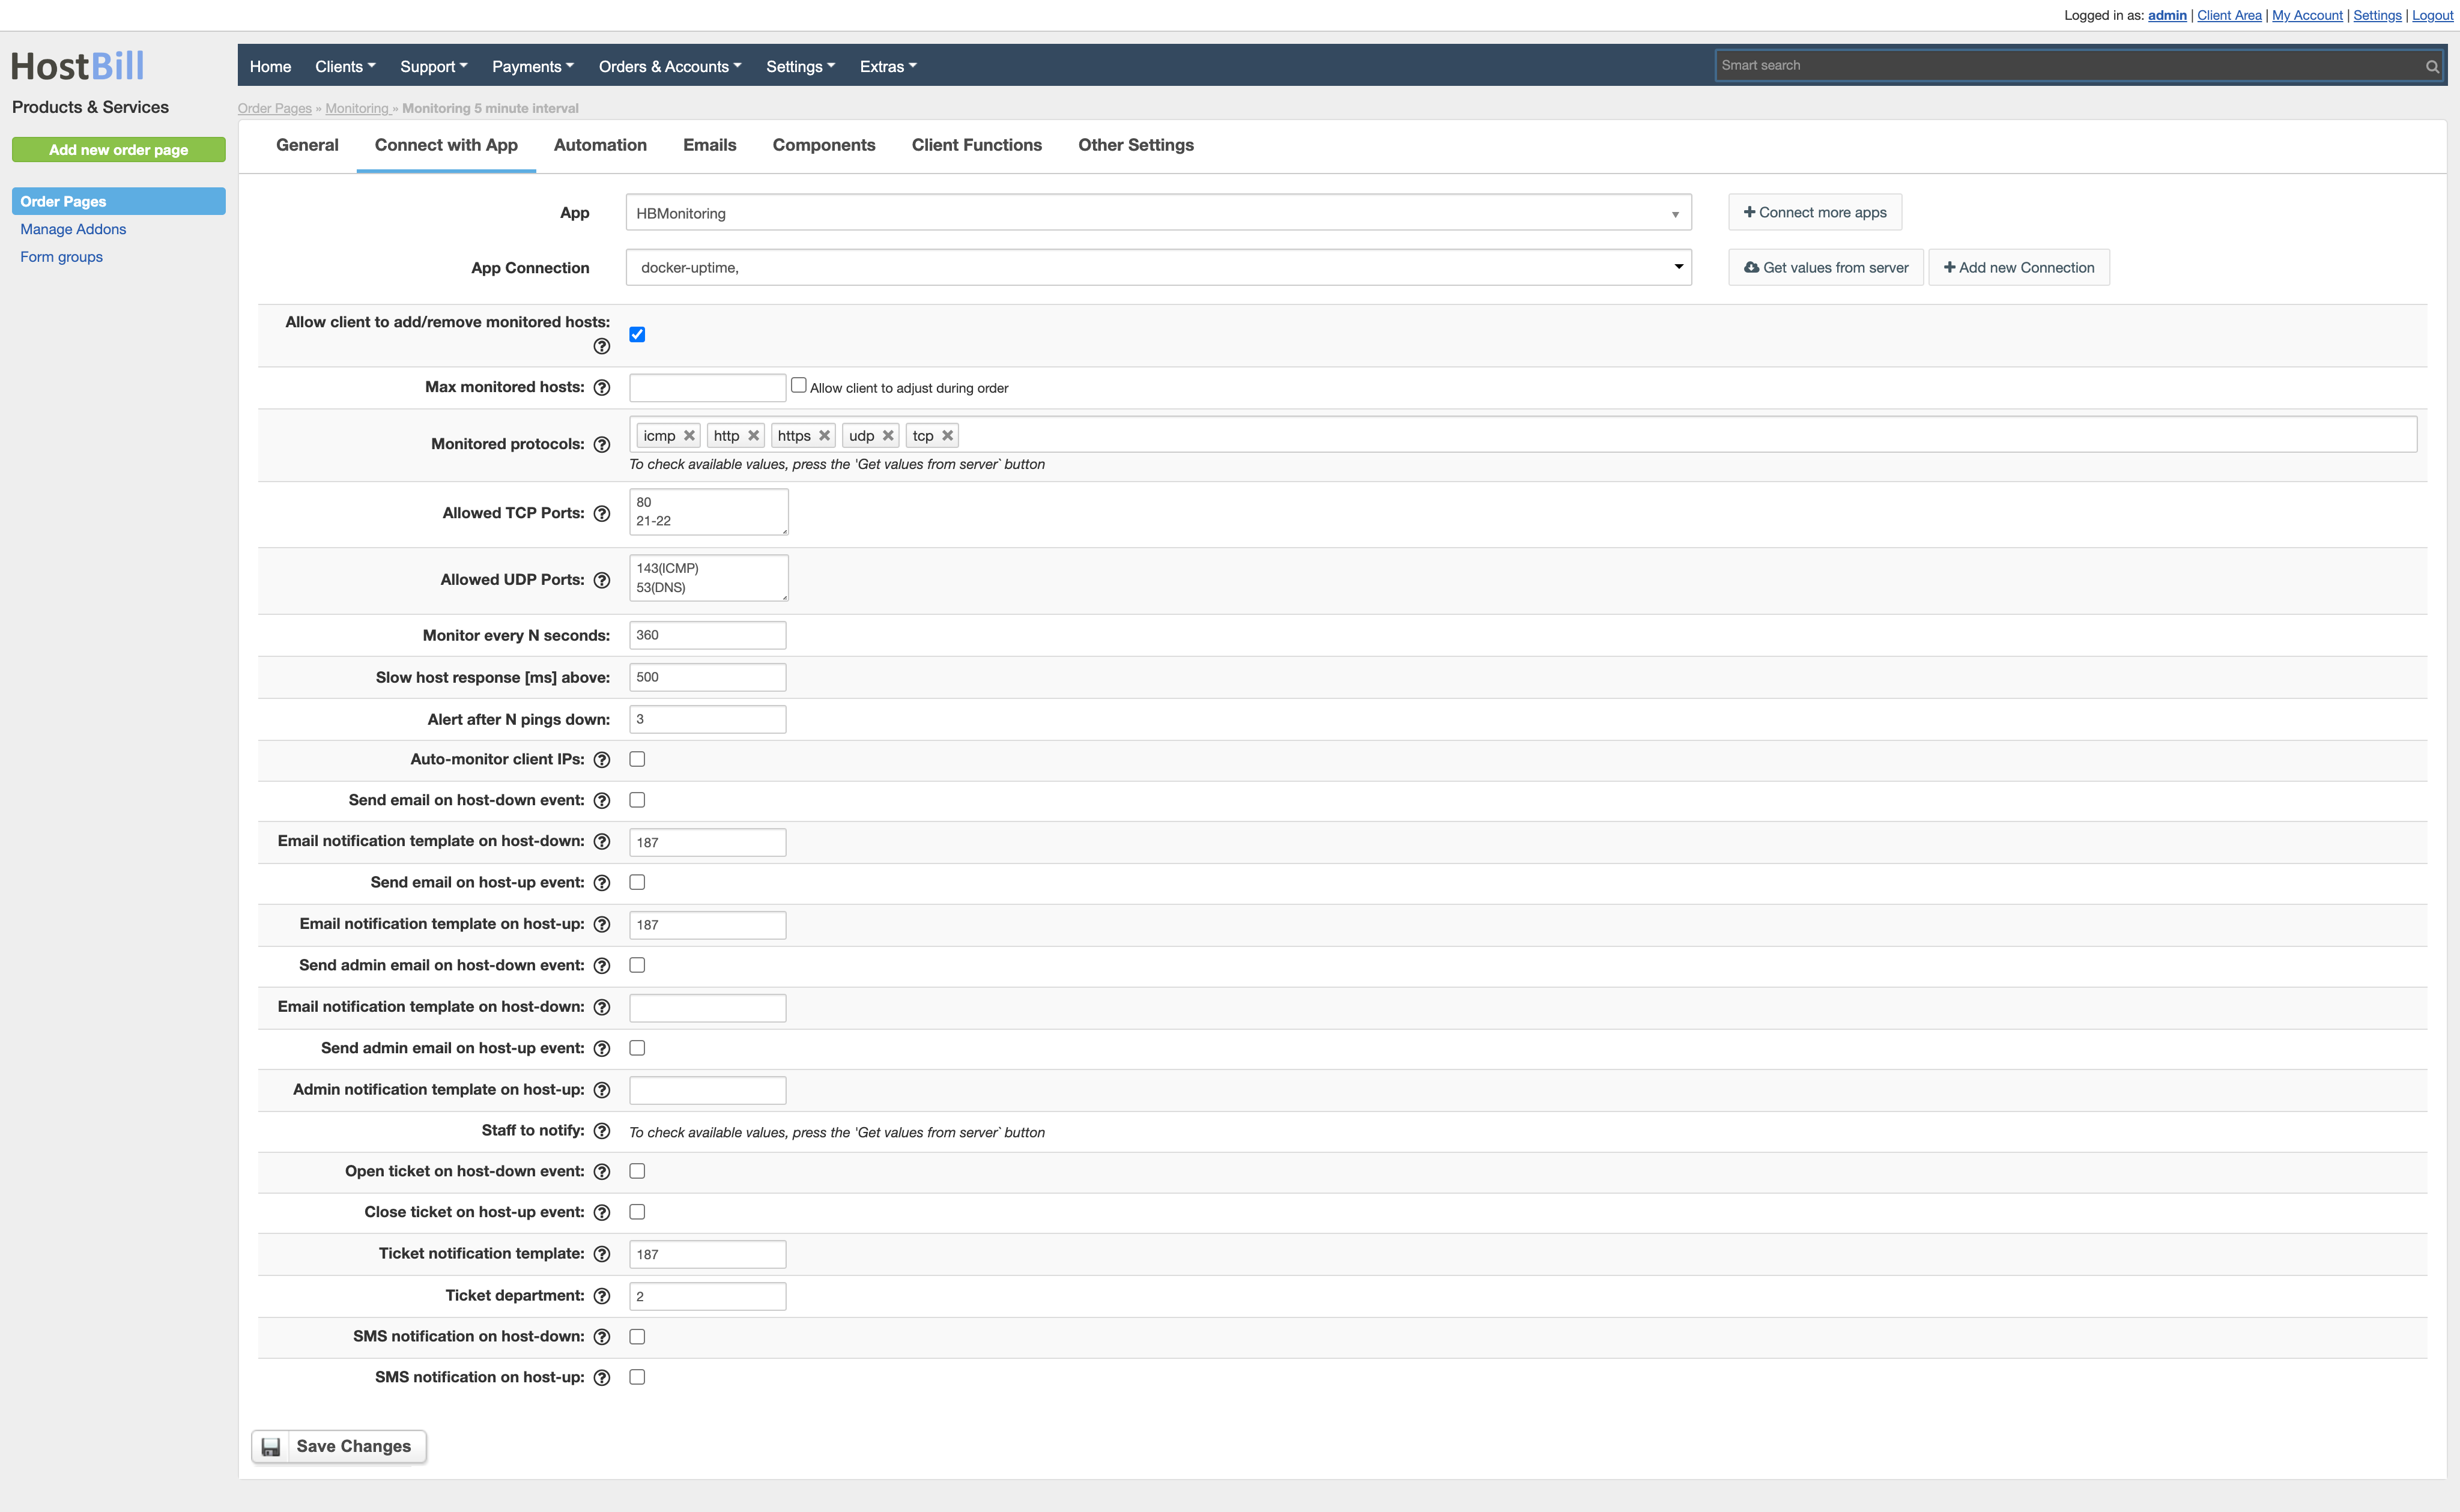
- In product configuration section proceed to Connect with App, select HBMonitoring and App server created in the previous steps.
- Setup Package Limits:
- Allow client to add/remove monitored hosts - define if customer should add his own hosts to monitor in client portal. If this is disabled make sure to enable "hostname" field for this product in Components→Domains tab
- Max monitored hosts - limit of hosts customer can monitor using this product. Use "Allow client to adjust during order" to let client decide during order/add pricing to this option
- Monitoring Protocol - select protocols customer will be able to monitor, like:
- icmp (ping)
- HTTP
- HTTPS
- TCP
- UDP
Allowed TCP Ports
Enter list of ports allowed to monitor, one per line or in ranges. Put optional port description in brackets. Example:80 20-21 25(SMTP) 465(SMTP over SSL)
- Allowed UDP Ports
Enter list of ports allowed to monitor, one per line or in ranges. Put optional port description in brackets. Refer for above example. - Monitor every N seconds - define polling interval (how often to check for host presence)
- Slow host response [ms] above - define max time after which monitored host will be considered slow
- Alert after N pings down - after this many subsequent "down" pings customer will receive alert
- Auto-monitor client IPs - when enabled, Main IP for each new account created for customer owning this package will be added to monitor
- Open ticket on host-down event - Choose if new ticket should be auto-opened on host-down event
- Send email on host-down event - Choose if email to client should be sent on host-down event
- Send email on host-up event - Choose if email to client should be sent on host-up event
- Close ticket on host-up event - if ticket was opened for host-down event, this option can auto-close it
- Email notification template on host-down - Email template to be used on host-down event
- Email notification template on host-up - Email template to be used on host-up event
- Ticket notification template - Email template to be used for ticket body on host-down event
- Ticket department - Department to open notification tickets in
- SMS notification on host-down - Notify client with SMS/Mobile using Mobile:HostDown sms template
- SMS notification on host-up - Notify client with SMS/Mobile using Mobile:HostBackUp sms template
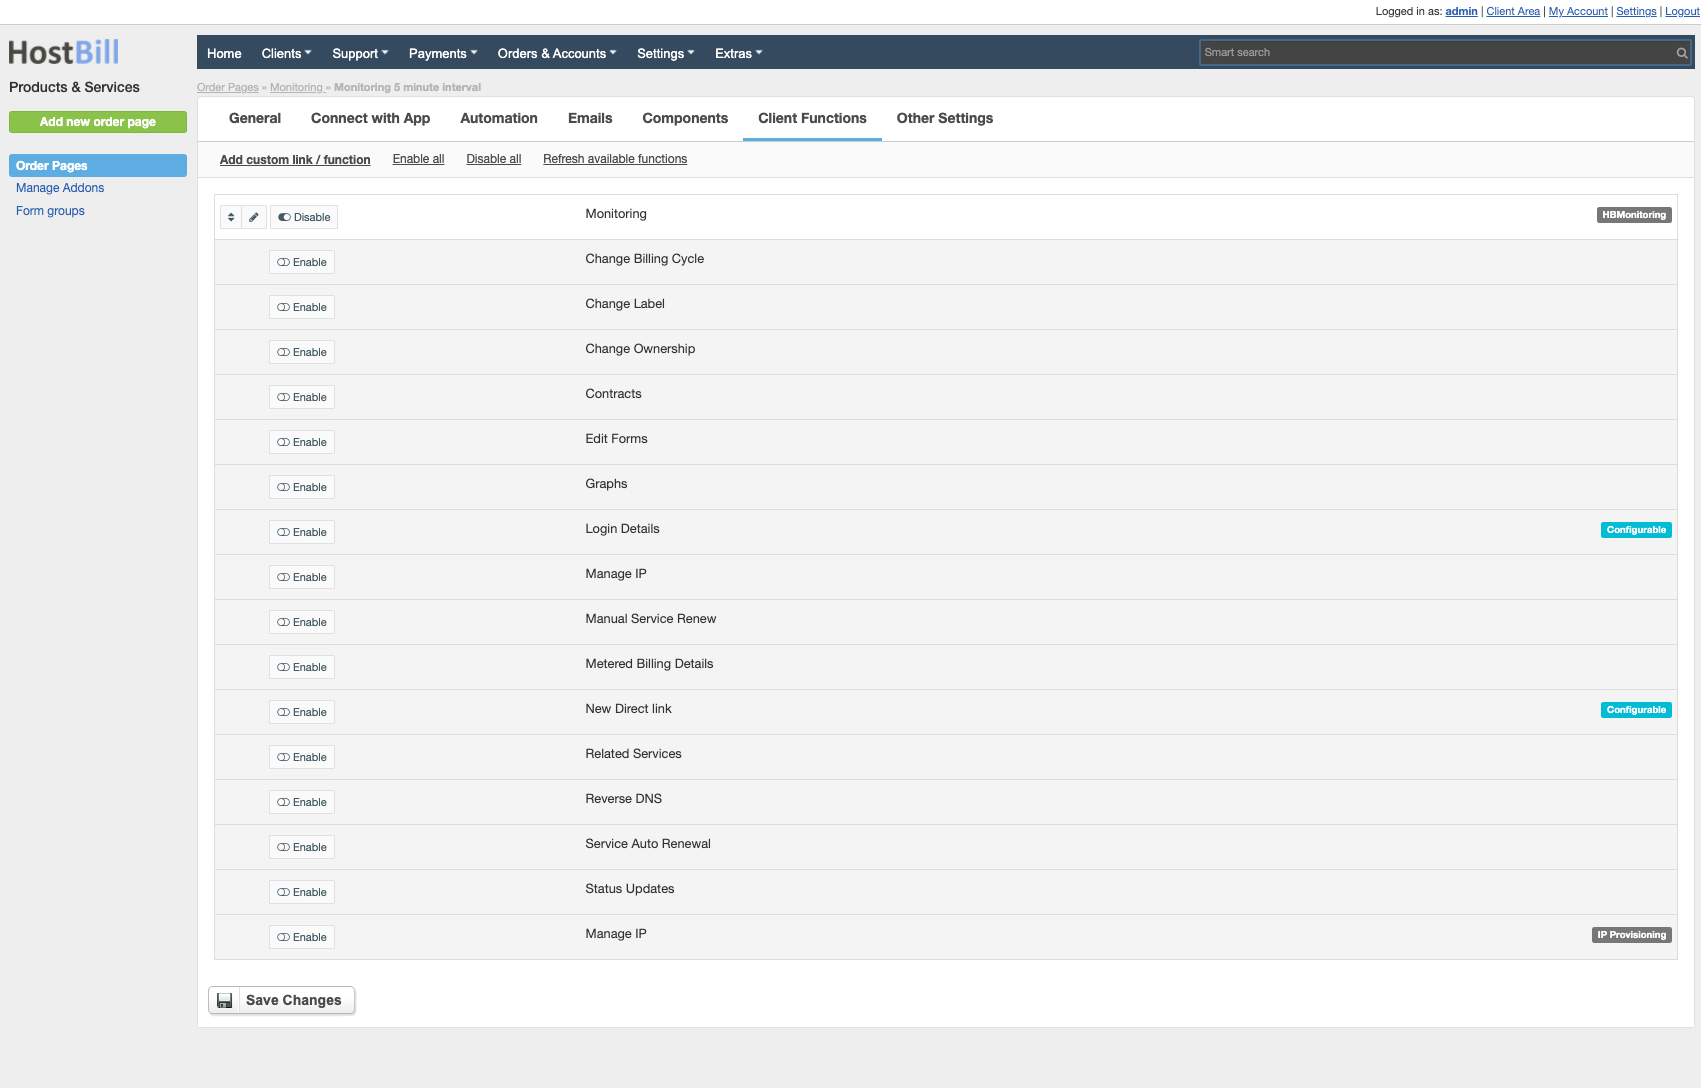
Configuring Client Functions
In Products & Services → Your Order Page → Your Product → Client Functions you can control what features customer will have access to in client portal, by clicking Enable/Disable next to the given option.
Use Edit button to adjust function appearance in the client portal.
For Cloud Monitoring next to a number of standard client functions you can enable: Monitoring function to allow client add/monitor his hosts
Fixing connection problems
If you're using CGI/FCGI php handler, and up/down notifications do not work, add following in your HostBill .htaccess file:
<IfModule mod_rewrite.c>
RewriteEngine on
RewriteRule .* - [E=HTTP_AUTHORIZATION:%{HTTP:Authorization},L]
</IfModule>
Make sure that your HostBill URL (hbURL) is configured properly in /home/nodemonit/uptime/config/default.yaml
If you're using nginx + php_fpm and up/down notifications do not work add:
fastcgi_pass_header Authorization;
to your nginx configuration file, near fastcgi_pass line
I.e. if using HostBill Enterprise edit file:
/etc/nginx/locations/hostbill.conf
And add:
fastcgi_pass_header Authorization;
below:
location ~ \.php$ {
FAQ
Question: Do monitoring nodes simply work as individual monitoring nodes with signups spread across them or are they used in a cluster for monitoring?
Answer: Monitoring nodes work as individual monitoring nodes. You can configure multiple nodes in your Settings->Apps and distribute your customer accounts across them, by selecting App in accounts section before provisioning.