Inventory & Asset Manager

Inventory & Asset Manager

Overview


Inventory and Asset Manager module helps you to keep track of every single item your company owns and sell and categorize assets into main categories / item types. With Inventory Manager you can track every item by its manufacturer, vendor, serial number and even physical location in your company. It helps you to create your own structures and manage/resell any asset like software, licenses, hardware, services.

Activating the module


  1. If the plugin is included in your HostBill edition you can download it from your client portal.

  2. If the plugin is not included in your HostBill edition you can purchase it from our marketplace and then download it from the client area.

  3. Once you download the plugin extract it in the main HostBill directory.

  4. Go to Settings → Modules, find and activate Inventory & Asset Manager plugin.

  5. Once the plugin is activated you will be directed to Settings→ Modules→ Plugins to configure the plugin.

Installing demo data


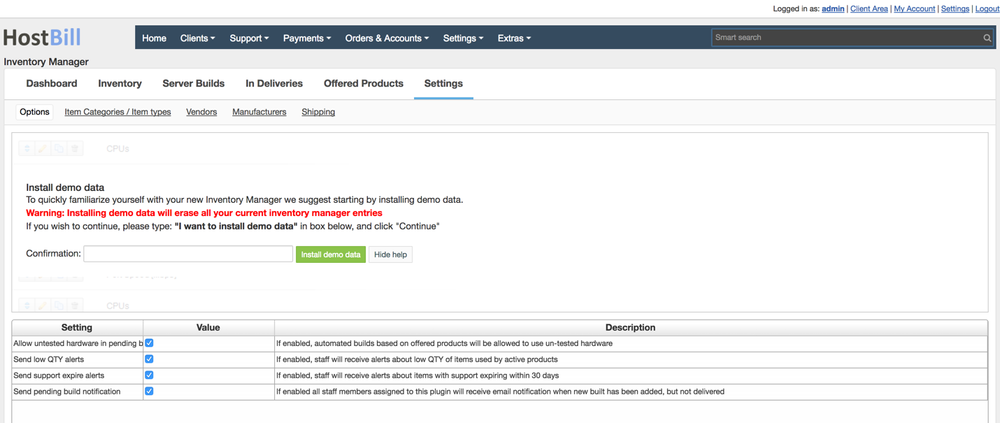
 To understand module concepts it's a good idea to play with some pre-entered data. You can install demo data set with just one click of a button.

  • Proceed to Extras → Inventory Manager → Settings

  • Click on Install demo data

  • For security purposes you will be prompted to enter sentence in the input box

  • Confirm by clicking Install demo data button
Adding items/categories/vendors


Check video guide on how to provide basic entries to Inventory Manager

Setting up provisioning module


Inventory Manager Provisioning is a Hosting/Provisioning module shipped with Inventory Manager plugin. It is built to be used with HostBill products and connect product offering available to customer in cart with inventory manager stock. Product using Inventory Manager Provisioning module can be configured in two ways:

  • To make use of Offered Products/Server builds feature in Inventory manager

  • To reserve items selected by client in cart from Inventory 


To connect provisioning module to a product:

  1. Proceed to Settings → Modules.

  2. Search and activate inventory_manager_provisioning module.

  3. Proceed to Settings → Apps → Add new app.

  4. Select previously activated provisioning module from Application list, provide arbitrary name, save changes.

  5. Proceed to Settings → Products & Services, Add new orderpage, from Order type select: Other or Colocation.

  6. Add new product, setup its pricing, proceed to Connect with app, select activated provisioning module and app.

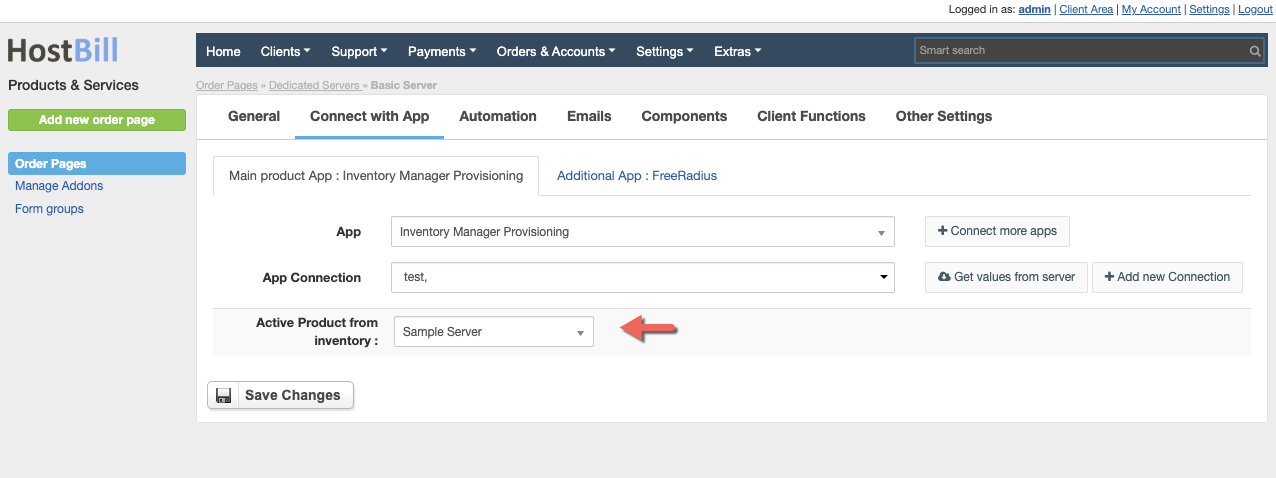
To make use of Server Builds:

  • In product configuration, Connect with App tab, click "Get values from server"

  • in Active Product from Inventory option select Offered Product from Inventory manager you wish to connect your product to
 

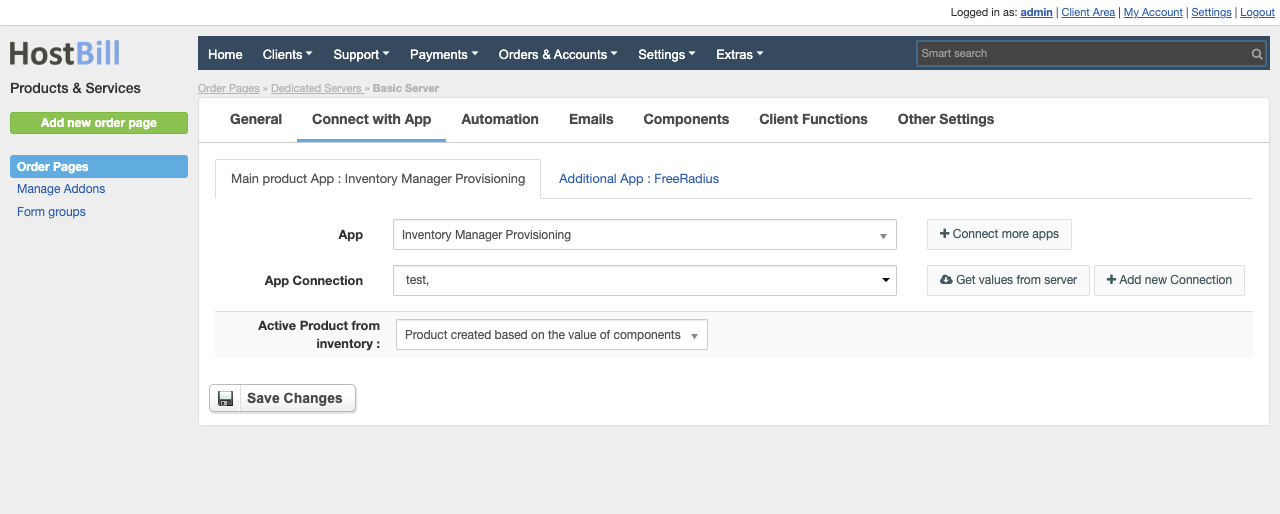
To allow client select available items from inventory:

  • In product configuration, Connect with App tab, click "Get values from server"

  • in Active Product from Inventory select Product created based on the value of components
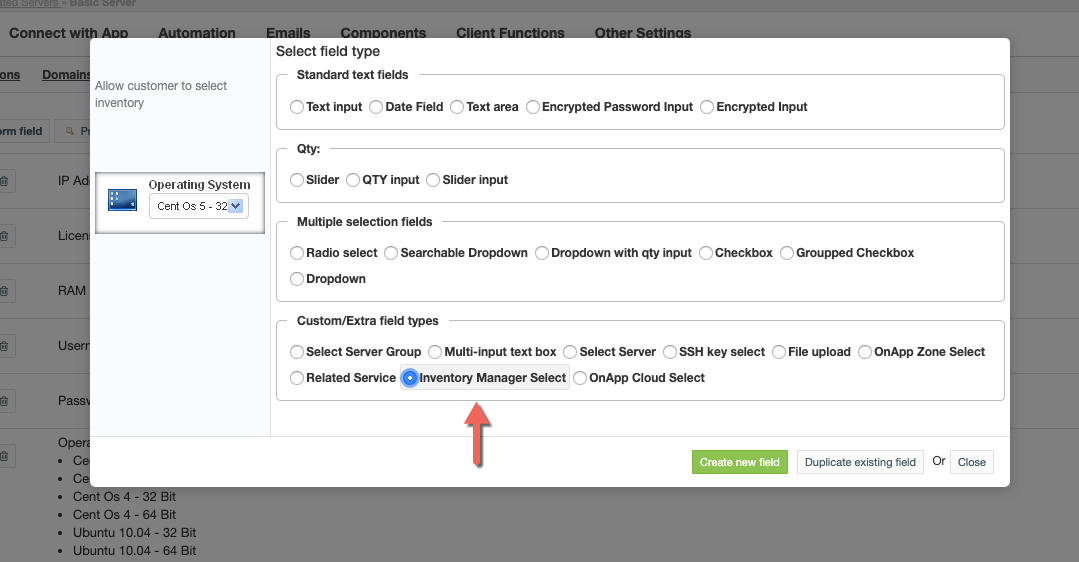
  • Proceed to Components → Forms tab 

  • Add new component, from available types select: Inventory Manager Select
  • Name component, setup dafault options, save changes

  • In Inventory Manager tab click "Load available inventory categories"

  • Select Inventory category to connect items with this field, confirm by clicking "Add values"
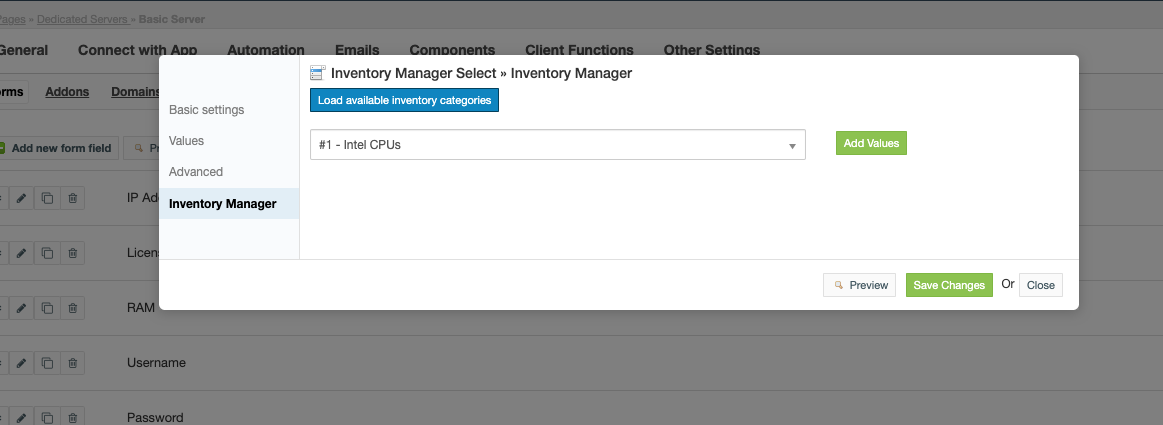
  • Available CPU item types will now appear in Values tab, you can setup pricing options, enable/disable option availability:

Note: Any change of related item category/item availability in Inventory Manager plugin will automatically be reflected in your Components created in product using Inventory Manager plugin.
So ie: if certain CPU will be out of stock in Inventory Manager, it will not be available to select by client during order.


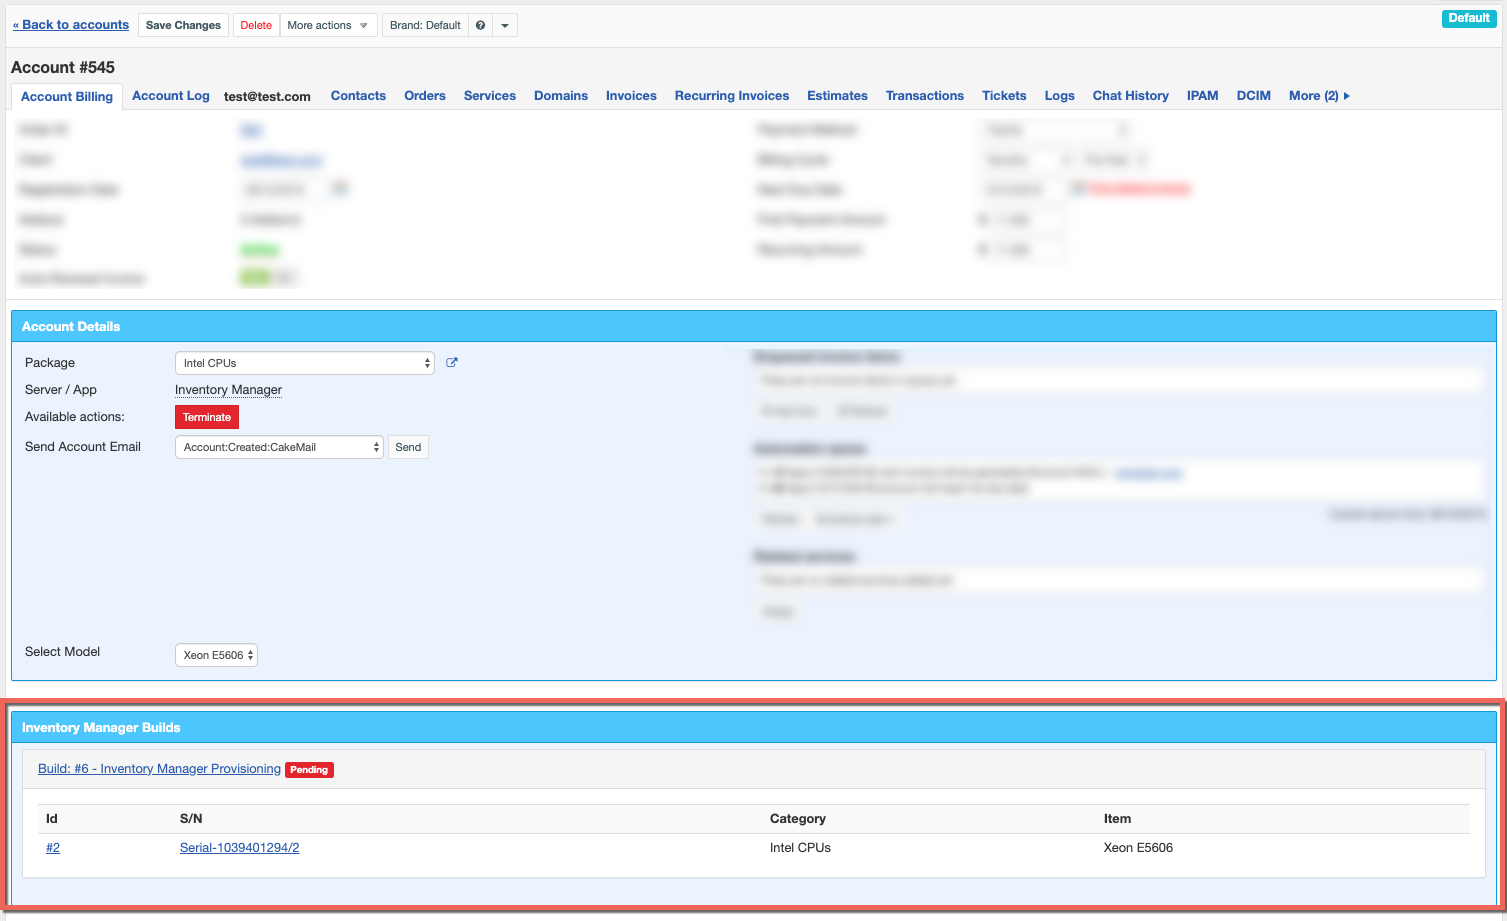
Items assigned from Inventory manager will appear in separate tab in account details:


Maintenance


The Maintenances feature lets you plan and track recurring service events (maintenances) for any item in your inventory. Each item can have its own maintenance schedule, a list of owners who are notified ahead of an upcoming maintenance, and a full history of maintenance entries with statuses, notes and uploaded documents.

A typical flow looks like this:

  1. You assign one or more Owners to an item (clients, staff members or staff teams).

  2. You configure the item's maintenance schedule (recurring period, next maintenance date, notification options).

  3. The daily cron automatically creates a "Scheduled" maintenance entry shortly before the next maintenance date, and e-mails the item owners.

  4. Staff handle the maintenance from the Maintenances tab: change its status, add notes, attach documents and - once finished - schedule the next maintenance.


image-20260611-184558.png

Owners define who is responsible for an item and who should be notified before a scheduled maintenance.

To manage owners:

  • Open an inventory item (Inventory Manager → Inventory -> edit an item).

  • Go to the Ownership tab.

  • Under "Add Owner", select the owner type:
    Client - an existing client account
    Staff - a single staff member (admin)
    Staff Team - a whole staff team (every member is notified)

  • Pick the specific owner from the list and click Add Owner.

  • Existing owners are listed on top and can be removed at any time with the Remove button.

image-20260611-185056.png

Each item has its own maintenance configuration. Open an inventory item and go to the Maintenance tab.

Available settings:

  • Recurring Period - how often the maintenance repeats. Enter a number and choose a unit: Days, Weeks, Months or Years. This value is also used to propose the next maintenance date after a maintenance is finished.

  • Next Maintenance Date - the date of the upcoming maintenance.

  • Notify item owners before maintenance - when enabled, item owners receive an e-mail before the maintenance.

  • Notify owners N days before - how many days before the Next Maintenance Date the notification e-mail is sent.

  • Create maintenance entry N days before date - how many days before the Next Maintenance Date the cron should automatically create a "Scheduled" maintenance entry.

Click Save Maintenance Settings to store the configuration.

Below the settings, the Maintenance History table lists every maintenance entry created for this item with a link to open its details.

image-20260611-185538.png

The Maintenances tab (Inventory Manager -> Maintenances) lists all maintenance entries across your whole inventory.

You can sort the list, and open any entry for details with the edit (pencil) icon.

A maintenance entry can have one of the following statuses:

  • Scheduled - planned, not started yet (status used when the entry is auto-created by cron).

  • Current - maintenance is in progress.

  • Finished - maintenance has been completed.

  • Cancelled - maintenance was cancelled.

image-20260611-184558.png

Opening a maintenance entry shows its details and the actions available to staff:

  • Status - change the maintenance status from the dropdown and click Save.

  • Schedule next maintenance - once a maintenance is set to Finished, a prompt appears with a proposed next date (calculated from the item's Recurring Period). Click Schedule Next to create the following Scheduled maintenance and update the item's Next Maintenance Date.

  • Notes - add notes to the maintenance. Each note keeps the author and timestamp and can be deleted.

  • Documents - upload one or more documents related to the maintenance. Files can be downloaded or deleted.

Note: Uploaded documents are validated against the allowed attachment extensions (Settings -> General Settings -> Support, "Attachment extensions"). Files with a disallowed extension are rejected and not stored.

image-20260611-193110.png


For maintenance notification e-mails to be sent, the following must be in place:

  1. An e-mail template is selected in the module configuration. Proceed to Extras -> Plugins, open the Inventory Manager configuration and set "Maintenance Notification Email" to the template you want to use.

  2. On the item's Maintenance tab: "Notify item owners before maintenance" is enabled, a Next Maintenance Date is set and "Notify owners N days before" is greater than zero.

  3. The item has at least one owner with a valid e-mail address.

The daily cron sends the notification on the day that equals (Next Maintenance Date) minus (Notify owners N days before).

image-20260611-191249.png

When the plugin is installed/upgraded it adds a default e-mail template named "InventoryManager:Maintenance Notify" (Settings → Message Templates -> Admin Emails). You can edit this template or create your own and select it in the module configuration under "Maintenance Notification Email".

The following variables can be used in the maintenance notification template:

{$item.item_name} - the item (item type) name
{$item.sn} - the item serial number (may be empty)
{$item.id} - the inventory item id
{$maintenance_date} - the maintenance date