Configuring ISC-DHCP for IPAM
Overview
This module is made to work with ISC-DHCP-server package (previously named dhcp3-server ) from https://www.isc.org/downloads/dhcp/
Once you setup at least one DHCP app you will be able to assign it to IP lists in IPAM. This will allow you to automatically update DHCP server configuration on changes to IP MAC field.
App configuration
Fill in the configuration fields:
- Hostname - your server IP address or hostname.
- SSH Port - port used for SSH connection, if left empty we will use default port (22).
- Username - user that will be used to carry out configuration updates.
- SSH Key location - path to your private key used for SSH authorization.
- Restart command - command used to reload DHCP configuration. It will be different depending on your server version and OS.
- Configuration mode:
- Dedicated files - settings will be written to path specified in configuration, overwriting previous files. You are expected to
includethose files in your DHCP configuration. - Injected configuration - files specified in configuration will be updated, DHCP settings will be injected between special comment tags
bof:ipam-v4andeof:ipam-v4for IPv4 andbof:ipam-v6andeof:ipam-v6for IPv6.
- Dedicated files - settings will be written to path specified in configuration, overwriting previous files. You are expected to
- DHCPDv4 Configuration file - path to the file with IPv4 configuration, eg. /etc/dhcp/dhcpd.conf
- DHCPDv6 Configuration file - path to the file with IPv6 configuration, eg. /etc/dhcp/dhcpd6.conf
User used for SSH connection will require permissions to write the selected files and to execute restart command.
You will need to specify at least one configuration file per app, both IPv4 and IPv6 files are not required.
Authentication Issue with SSH Keys
Users have reported difficulties authenticating with SSH keys that are functional via the SSH. If you encounter this issue, consider changing your key type to ECDSA, as it has resolved the problem for many.
Dedicated files
This example shows how to setup DHCP configuration in two files. New configuration will be uploaded to path specified in DHCPDv4 Configuration file. You will need to include that file in your main configuration file.
If you setup your app to save configuration in /etc/dhcp/ipam.conf
subnet 192.168.100.0 netmask 255.255.255.0 {
  range 192.168.100.50 192.168.100.150;
}

#generated by IPAM
include "/etc/dhcp/ipam.conf";

(...)
Injected configuration
This example shows how to setup your server configuration if you want to use inject method. This will require you to include special comments in your configuration file.
For IPv4 you need to open your block with #bof:ipam-v4 and end it with #eof:ipam-v4
Similar for IPv6 you need to open your block with #bof:ipam-v6 and end it with #eof:ipam-v6
subnet 192.168.100.0 netmask 255.255.255.0 {
  range 192.168.100.50 192.168.100.150;
}

#generated by IPAM
#bof:ipam-v4
host smpt.host.mail     { hardware ethernet 02:31:0F:D9:3C:E3; fixed-address 192.168.100.4; }
host v1.proxmox.local   { hardware ethernet 2A:D7:F7:64:E2:E4; fixed-address 192.168.100.254; }
host addr8293           { hardware ethernet AA:AA:AA:AA:AA:F3; fixed-address 192.168.100.248; }
#eof:ipam-v4

(...)
Assigning DHCP app to IP list
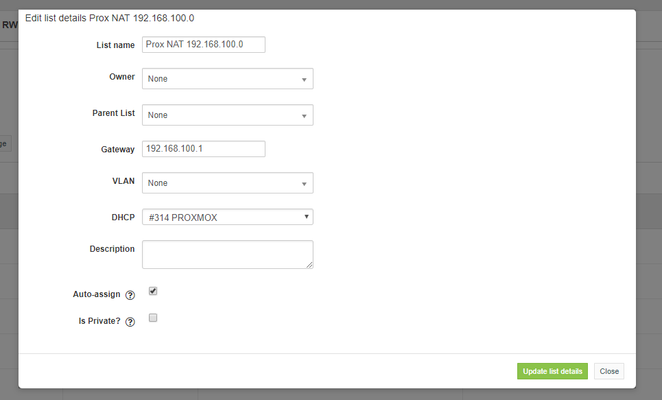
Once your app is configured you will be able to assign it to the IPAM list. To do that navigate to list details and click on the pencil icon. Under DHCP select desired app and save.
DHCP server configuration will be updated with all IPs that have a MAC address and are included in list/sublist assigned with related app.
