Cloud Signup Form
- HostBill (Unlicensed)
- HostBill
- HostBill Support
- HostBill
Overview
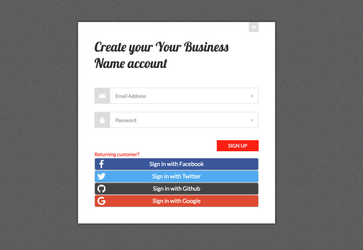
Cloud Signup Form v2 module was created to make signup process fast and easy for your customers.
With this module, instead of providing full credentials during signup your customer is required to provide minimal credentials:
- Email Address
- Password
You will be in control of what happens with customer after signup - should the email be verified? Should the customer provide some funds first? Should the customer visit a specific page first? Should the customer have some service auto-ordered first?
Cloud Signup v2 Module is shipped with following sub-plugins for even more powerful and user-friendly signup process:
- Posting form values to auto-added product through Cloud Signup
- Registering customer from your website using Cloud Signup
- Log-in with Facebook
- Log-in with Github
- Log-in with Google
- Log-in with Twitter
- Log-in with LinkedIn
- Log-in with PayPal
- Log-in with Steam
- Log-in with Discord
- Log-in with Dropbox
- Log-in with Wordpress
- Log-in with Twitch
Activating the module
- If the plugin is included in your HostBill edition you can download it from your client portal.
- If the plugin is not included in your HostBill edition you can purchase it from our marketplace and then download it from the client area.
- Once you download the plugin extract it in the main HostBill directory.
- Go to Settings → Modules, find and activate Cloud Signup plugin.
- Once the plugin is activated you will be directed to Settings→ Modules→ Plugins to configure the plugin.
Module configuration
For the Cloud Signup module the following configuration options are available:
- Allow external signups - use this option to allow posting registration data from your website to this form.
- Default template - template that will be displayed by default
- Require full details – require customer to update their client profile with full credentials (firstname, lastname), before they can perform any other action.
- Require full details when placing an order - require customer to update their client profile with full credentials (first name, last name) before they can place an order
- Redirect after providing full details - an optional URL to redirect the customer after completing all the required details.
- Require payment card - require customer to update their client profile with payment card information before they can perform any actions
- Redirect after providing payment card - URL to redirect customer after the customer will complete payment card details from the profile
- Require adding funds – require customer to add funds to their account before they can perform any other action.
- Charging the card - charging the card immediately after ordering the product
- Redirect non-registered clients - if this option is active, Cloud Signup will disable cart for non-registered users, redirecting visitors from cart to Cloud Signup page.
This way services can be purchased only by positively verified customers. - Product to add after verification – enter default product ID to automatically create account once customer will be positively verified (funds added to the account).
This product would be overridden by signing up through orderpage configured to work with Cloud Signup. - Verify additional fields - comma separated list of field variable names (from Clients → Registration fields) that were custom added to signup template (ie company name) and should be validated
- Redirect after signup - optional URL to redirect customer after successful signup.
- Use same password - once enabled, password that customer has used to sign up their profile will also be used for service/product auto-added to the account.
- Allow coupon usage - once enabled, you will be able to pass coupon codes through input/POST field named "coupon". This coupon will be applied to customer auto-order.
- Allow staff members logins - enable this option if you want to allow the administrators to login to the admin panel using SSO modules
- Orderpage IDs that require credit card - enter comma separated list of orderpage IDs, that ordering products from will require customer to have a card on file first
- Widgets above signup form - when enabled social login buttons of a related SSO modules will render in client area (for supported themes) in selected locations
- Widgets below signup form - when enabled social login buttons of a related SSO modules will render in client area (for supported themes) in selected locations
- Product to add after verification: 2019 - enter default product ID to be added when customer signs up from page: 2019
- Redirect after signup: 2019 - URL to redirect customer after successful signup from page: 2019


You can also enable Cloud Signup as an orderpage under Settings → Products & Services → [Order Page] → Edit.
Adding custom signup / landing pages
New versions of Cloud Signup module allow you to create multiple pages that differ by design.
Default page template is located in: includes/Modules/Other/cloudsignup/template/default.tpl and is being displayed after visiting http://yourhostbillurl.com/?cmd=cloudsignup
To create different "landing" signup page, copy default.tpl file to the new name (ie.: newpage.tpl), adjust its html code contents to match new page requirements.
This newly created signup page will be accessible from http://yourhostbillurl.com/?cmd=cloudsignup&page=newpage
You can create unlimited landing page variations by creating multiple tpl files in includes/modules/Other/cloudsignup/template/ directory.
- Each landing page can have separate product that will be added to customer profile after signup. Configuration option to set product ID appears in module configuration (in adminarea) after creating tpl file.
- Each landing page can redirect to other 'Welcome page'. Configuration option to set custom url appears in module configuration (in adminarea) after creating tpl file.
Adding Social Signup buttons in your HostBill template.
If you've enabled one of the Login with .. social media sign-on modules shipped with Cloud Signup v2, you can also render those buttons in any section of your HostBill client portal template by adding following snippet to your template code:
{clientwidget module="login" section="widgets"}
Consider adding this snippet to files like:
- templates/[YourThemeName]/login.tpl
- templates/[YourThemeName]/ajax.login.tpl
Checking verification process in client template
In your client portal template you can check {$clientdata._verifieddetails} variable to determine if client account requires verification by Cloud Signup plugin through Require full details feature.
If this variable equals to 0, it means that customer did not entered all their client portal details.
Ie. in your client details edit form template you can use:
{if $clientdata._verifieddetails===0}
 Display information about full details required for verification
{/if}
If customer signed up through Cloud Signup form, and he/she is required to enter credit that they did not entered yet, variable {$clientdata._verifyfunds} will not be set.
So in your add-funds template page you can add similar snippet:
{if !$clientdata._verifyfunds}
 Display information about funds being required for adding to account
{/if}