cPanel
Overview
cPanel is the premier control panel for automating and simplifying server configuration, email, and website management. Now you can impress your customers with cPanel management fully integrated with billing portal. HostBill integration keeps your hosting service management and invoices all in one place. Your customers can manage all aspects of cPanel hosting, including cPanel-based email, domains, cron jobs, backups, SSL Certificates, DNS Records and more directly from a single pane of glass billing interface, without the need of separate login.
Activating the module
- If the module is included in your HostBill edition you can download it from your client portal.
- If the module is not included in your HostBill edition you can purchase it from our marketplace and then download it from the client area.
- Once you download the module extract it in the main HostBill directory.
- Go to Settings → Modules → Hosting Modules, find and activate cPanel module.
Connecting HostBill with cPanel
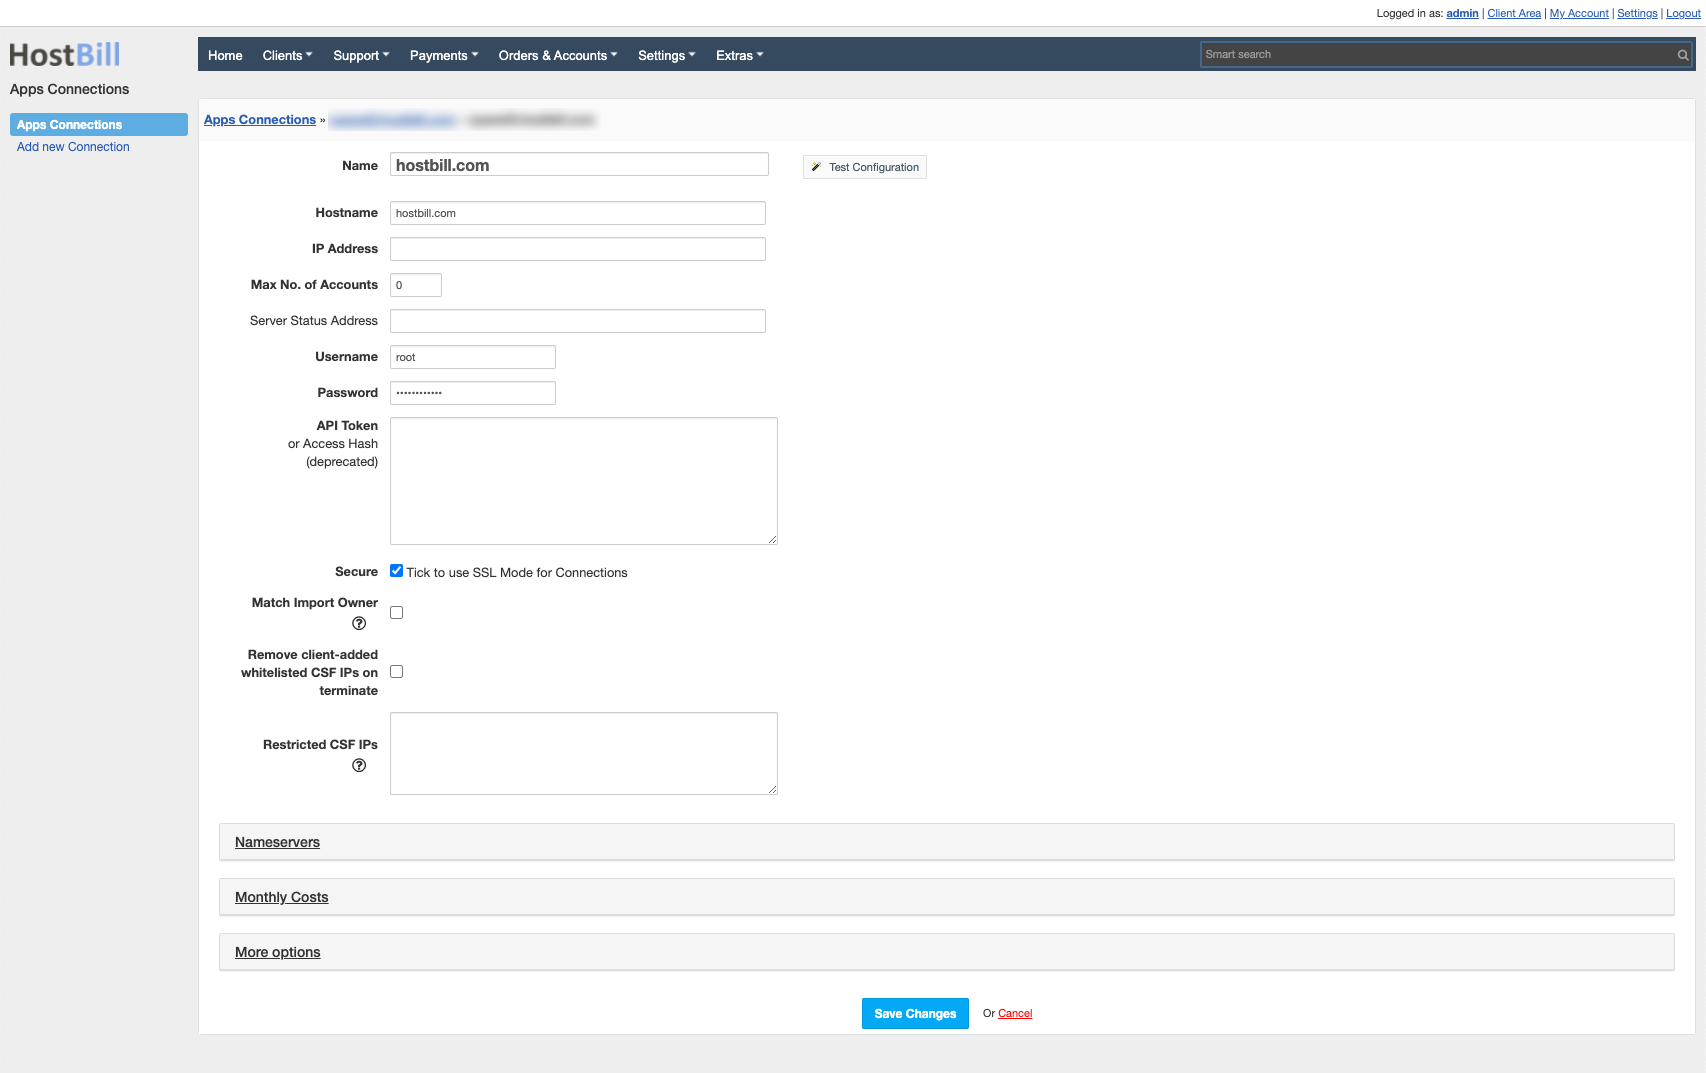
- Proceed to Settings → Apps → Add new App
- From Applications list select cPanel
- Enter:
- Name - Name of this connection
- Hostname - WHM/cPanel hostname
- IP Address - WHM/cPanel IP (use if no hostname is present)
- Max no of Accounts - max number of accounts this install can hold (used for auto-assigning new orders to server)
- Server Status Address - deprecated
- Username - WHM username (ie: root)
- Password - WHM password
- API Token - Use when no password is set
- Secure - tick to use https to connect to cPanel API
- Match Import Owner - When enabled, only accounts with owner matching username set here will be shown to import in Extras->Import services
- Remove client-added whitelisted CSF IP's on terminate - in Client Functions you can enable Unblock IP Address feature and configure it to allow clients adding whitelisted IPs by themselves. When this this option is enabled those IP's will be auto-removed during termination
- Restricted CSF IPs - provide a list of IPs/ranges/subnets that customers would not be able to whitelist/unblock using Unblock IP Address client function
4. Verify entered credentials by clicking Test Connection to check if HostBill can connect
5. Save Changes
Adding cPanel Product
- In HostBill go to Settings → Products & Services, and Add new order page
- From order type select either Shared Accounts or Reseller Accounts.
- Enter your orderpage name, select orderpage template. Save Changes
- Add new product in the new orderpage. Provide product name and setup price and then Save Changes.
- In product configuration section proceed to Connect with App, select cPanel and App server created in previous steps.
- You will be presented with the configuration options:
Configuration Guide for Shared Hosting
| Plan Name: | Use "Get values from server" button to load possible values from your cPanel. |
| Reseller Account: | Set to No to create normal account |
| Disk Quota [MB]: | Set total disk size your client can use. |
| Bandwidth Limit [MB]: | Monthly data transfer limit for created accounts. |
| Max Ftp Accounts: | Set TOTAL number of FTP accounts your client can create. Leaving this empty will mean unlimited. |
| Max Mail Accounts: | Number of E-Mail accounts your client can create. Leaving this empty will mean unlimited. |
| Max Mail Lists: | Number of Mailing lists your client can use. Leaving this empty will mean unlimited. |
| Max SQL Databases: | Set TOTAL number of Databases your client can create. Leaving this empty will mean unlimited. |
| Max Subdomains: | Maximum number of subdomains the user can create. Leaving this empty will mean unlimited. |
| Max Parked Domains: | Maximum number of parked domains the user can create. Leaving this empty will mean unlimited. |
| Max Addon Domains: | Maximum number of addon domains the user can create. Leaving this empty will mean unlimited. |
| Dedicated IP: | Check this option to assign dedicated ip to new accounts |
| Shell Access: | Check this option if you want to grant access to shell command line. |
| Frontpage Extensions: | Check this option if you want to install FrontPage extensions on created accounts. |
| CGI Access: | Check this option if you want to grant access to CGI. |
| cPanel Theme: | cPanel theme name. Example: x3 |
Configuration Guide for Reseller Hosting
| Plan Name: | Use "Get values from server" button to load possible values from your cPanel. |
| Reseller Account: | Set to Yes to create Reseller account |
| ACL : | Name of the Account Creation Limits list. |
| Number of allowed accounts: | Total number of accounts this reseller can create. |
| Reseller Disk Space [MB]: | Amount of disk space allocated to the reseller. |
| Reseller Bandwidth [MB]: | Amount of bandwidth allocated to the reseller. |
| Allow Overselling: | Allows a reseller to oversell bandwidth and/or disk space. |
| Allow to Setup Custom ns1/ns2 Nameservers: | You can set your own nameservers, or let your clients specify them by using custom fields. |
| Add additional IPs: | Number of IPs that will be delegated for that account. |
| Reseller Ownership: | Whether or not the reseller will own his or her own account. Users who own their accounts are able to modify them. |
| Suspend reseller users: | Whether or not suspend reseller's users when suspending reseller account. |
| Disk Quota [MB]: | Set total disk size your client can use. |
| Bandwidth Limit [MB]: | Monthly data transfer limit for created accounts. |
| Max Ftp Accounts: | Set TOTAL number of FTP accounts your client can create. Leaving this empty will mean unlimited. |
| Max Mail Accounts: | Number of E-Mail accounts your client can create. Leaving this empty will mean unlimited. |
| Max Mail Lists: | Number of Mailing lists your client can use. Leaving this empty will mean unlimited. |
| Max SQL Databases: | Set TOTAL number of Databases your client can create. Leaving this empty will mean unlimited. |
| Max Subdomains: | Maximum number of subdomains the user can create. Leaving this empty will mean unlimited. |
| Max Parked Domains: | Maximum number of parked domains the user can create. Leaving this empty will mean unlimited. |
| Max Addon Domains: | Maximum number of addon domains the user can create. Leaving this empty will mean unlimited. |
| Dedicated IP: | Check this option to assign dedicated ip to new accounts |
| Shell Access: | Check this option if you want to grant access to shell command line. |
| Frontpage Extensions: | Check this option if you want to install FrontPage extensions on created accounts. |
| CGI Access: | Check this option if you want to grant access to CGI. |
| cPanel Theme: | cPanel theme name. Example: x3 |
For more generic product configuration details including price, automation, emails settings refer to Product Configuration article.
Configuring Metered Billing
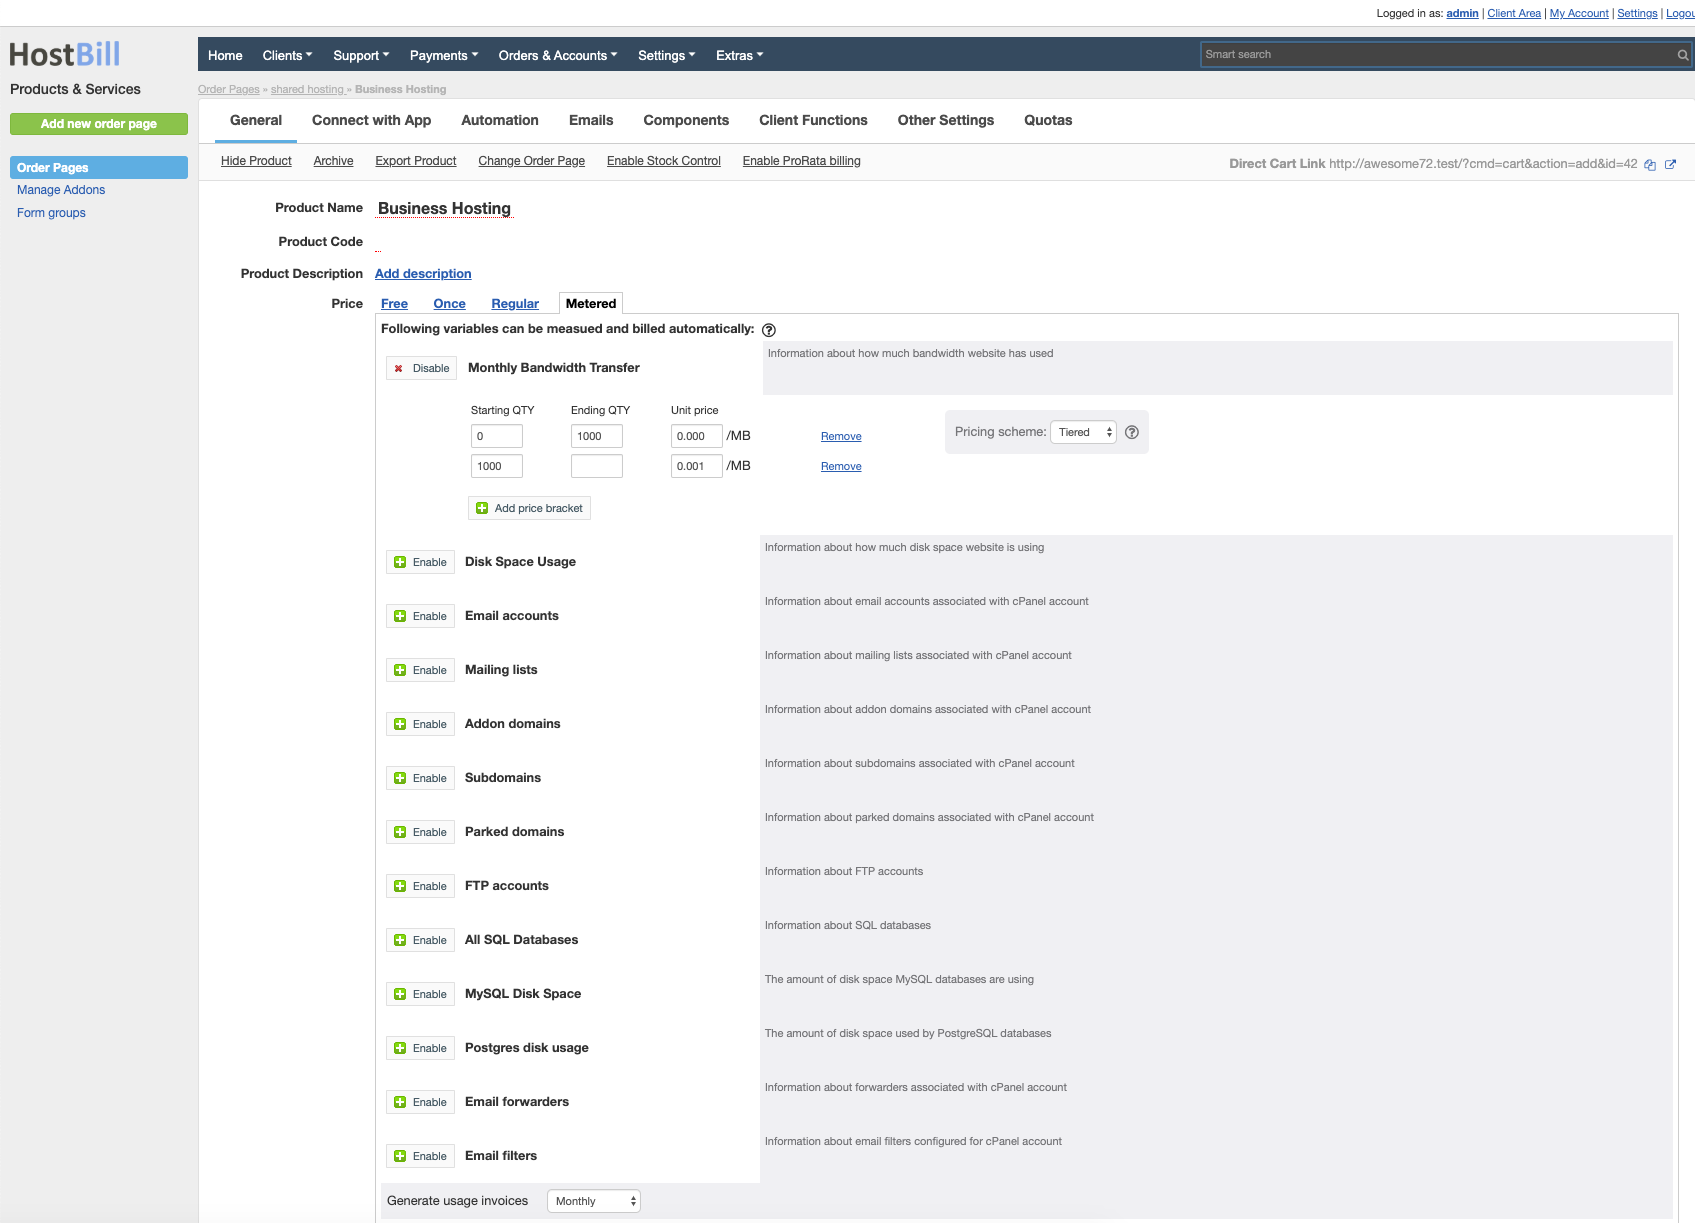
cPanel module supports metered billing feature. To configure your metered billing package in product configuration in "General" tab select "Metered" under Price. Following variables can be measured and bill automatically:
Badwidth
Disk usage
Email accounts
Mailing Lists
Addon domains
Subdomains
Parked domains
FTP accounts
Databases
Configuring Client Functions
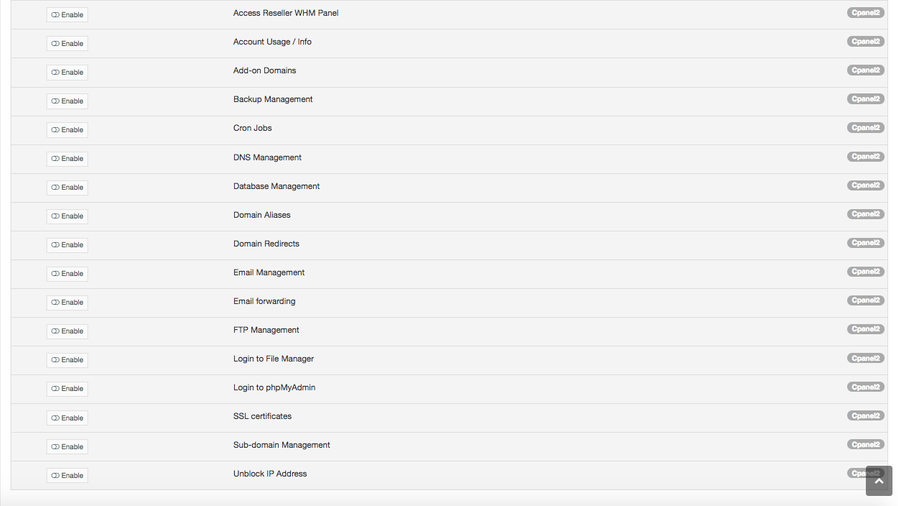
In Products & Services → Your Order Page → Your Product → Client Functions you can control what features customer will have access to in client portal, by clicking Enable/Disable next to the given option.
Use Edit button to adjust function appearance in the client portal.
For CPanel you can enable the following client functions dedicated to this module:
- Access Control Panel - with one mouse-click customer will be able to login into Control Panel from client area.
- Access Webmail - with one mouse-click customer will be able to login into Webmail from client area.
- Reset Password - allow customer to reset the service password, new value will be sent to the customer over email.
- Access Reseller WHM Panel
- Account Usage / Info
- Add-on Domains
- Backup Management
- Cron Jobs
- DNS Management
- Database Management
- Domain Aliases
- Domain Redirects
- Email Management
- Email forwarding
- FTP Management
- Login to File Manager - requires valid cPanel account password stored in HostBill
- Login to cPanel - requires valid cPanel account password stored in HostBill
- Login to phpMyAdmin - requires valid cPanel account password stored in HostBill
- SSL certificates
- Sub-domain Management
- Imunify 360 - allow clients to remove IP blocks from Imunify 360 plugin, whitelist IPs - This feature comes with additional configuration options available under "Options" tab (as below)
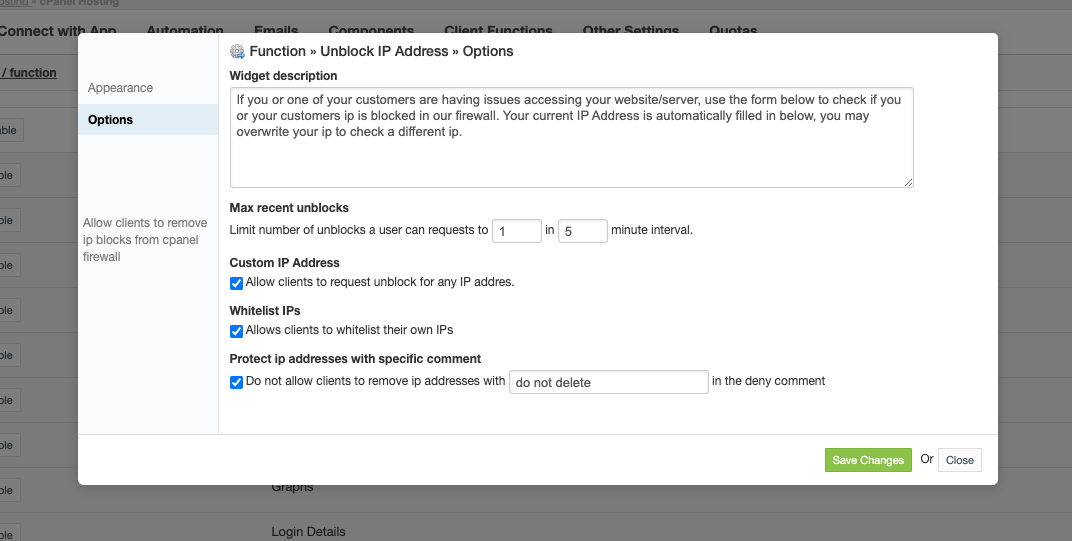
- Unblock IP Address - allow clients to remove IP blocks from cPanel firewall (CSF), whitelist IPs
This feature comes with additional configuration options available under "Options" tab- Widget description - will appear in client area
- Max recent unblocks - limits number of unblocks customer can perform in defined interval
- Custom IP address - when enabled client will be able to specify IP he wants to unblock, otherwise it will default to his current/browser IP address
- Whitelist IPs - when enabled client will have option to whitelist his own IPs
- Protect IP addresses with specific comment- when enabled IPs blacklisted with comment containing configured phrase would not be available for unblock to customer
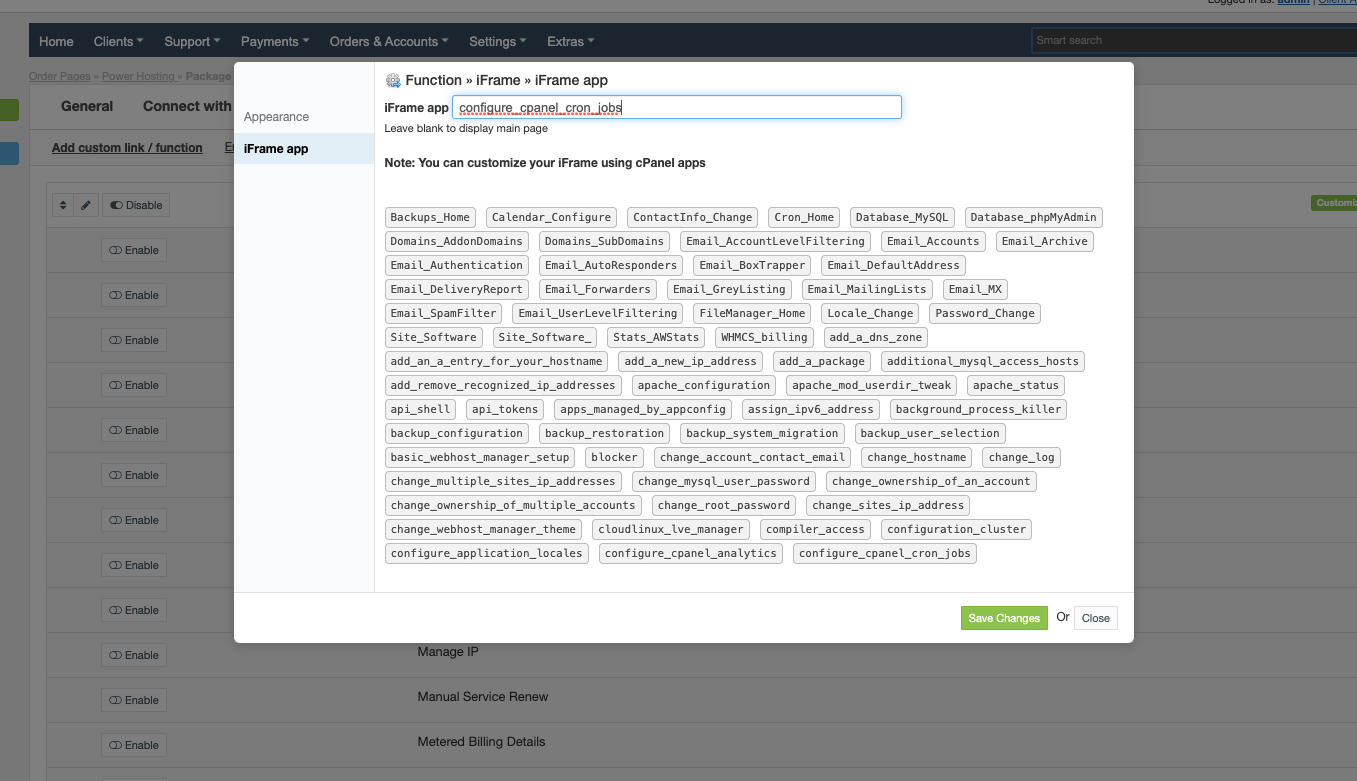
iFrame - embeds cPanel feature in a client portal frame - this function can be enabled multiple times for each feature.
Supported Browsers
This feature works only on: Firefox, Safari. Chromium-based browsers (GoogleChrome / MS Edge) are currently not supported
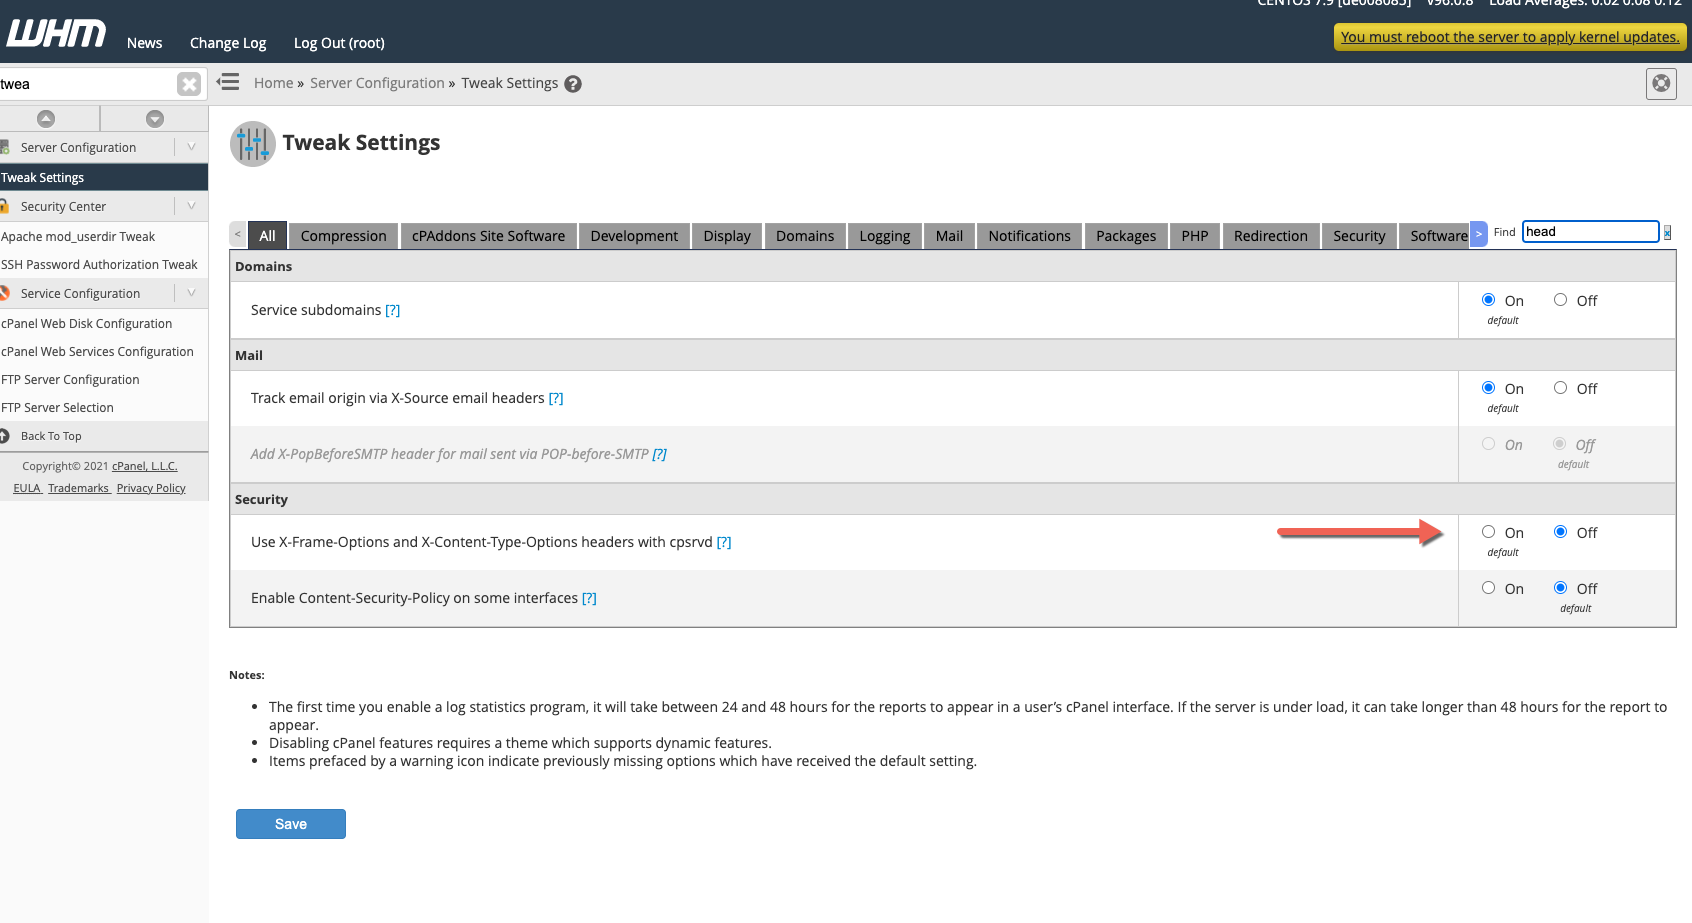
To use iFrame function, option "Use X-Frame-Options and X-Content-Type-Options headers with cpsrvd" needs to be Off in WHM Tweak settings
As well as number of standard client functions, such as
- Change Billing Cycle
- Change Label
- Change Ownership
- Edit Forms
- Graphs
- Login Details
- Manual Service Renew
- New Direct Link
- Related Services
- Service Auto Renewal
How to
- Q: How to migrate from cPanel to cPanel2?
- A: To migrate from the cPanel module to cPanel2, refer to Migration from cPanel to cPanel2
- Q: cPanel complains about weak password during provisioning with error like: Sorry, the password you selected cannot be used because it is too weak and would be too easy to guess.
- A: Ensure to increase your random password complexity in HostBill Password settings
