Hetzner DNS
- HostBill
- HostBill
Overview
Hetzner Online is a professional web hosting provider and experienced data center operator. The company provides high-performance hosting products as well as the necessary infrastructure for the efficient operation of websites. With the Hetzner DNS module for HostBill you sell DNS services and charge your customers per DNS Zone or offer free DNS management as an addition to other services you sell. HostBill DNS features allow you to automatically import existing zones to HostBill, import/export DNS templates and manage predefined DNS Templates. HostBill automation takes care of the account lifecycle, from automatically creating the account, managing upgrades and downgrades (with automatically calculated pro-rata etc), to suspension and terminations, which can be performed upon pre-defined conditions. Clients can easily manage their DNS Records and Zones (create, clone DNS records; add, edit, delete DNS entries and more) in their client area. The availability of client functions depends fully on you - client functions can be enabled/disabled in the admin panel, which also gives you control over billing details, account lifecycle and allows to manually manage DNS Zones and records.
Activating the module
- If the module is included in your HostBill edition you can download it from your client portal.
- If the module is not included in your HostBill edition you can purchase it from our marketplace and then download it from the client area.
- Once you download the module extract it in the main HostBill directory.
- Go to Settings → Modules → Hosting Modules, find and activate Hetzner DNS module.
Connecting HostBill with Hetzner DNS
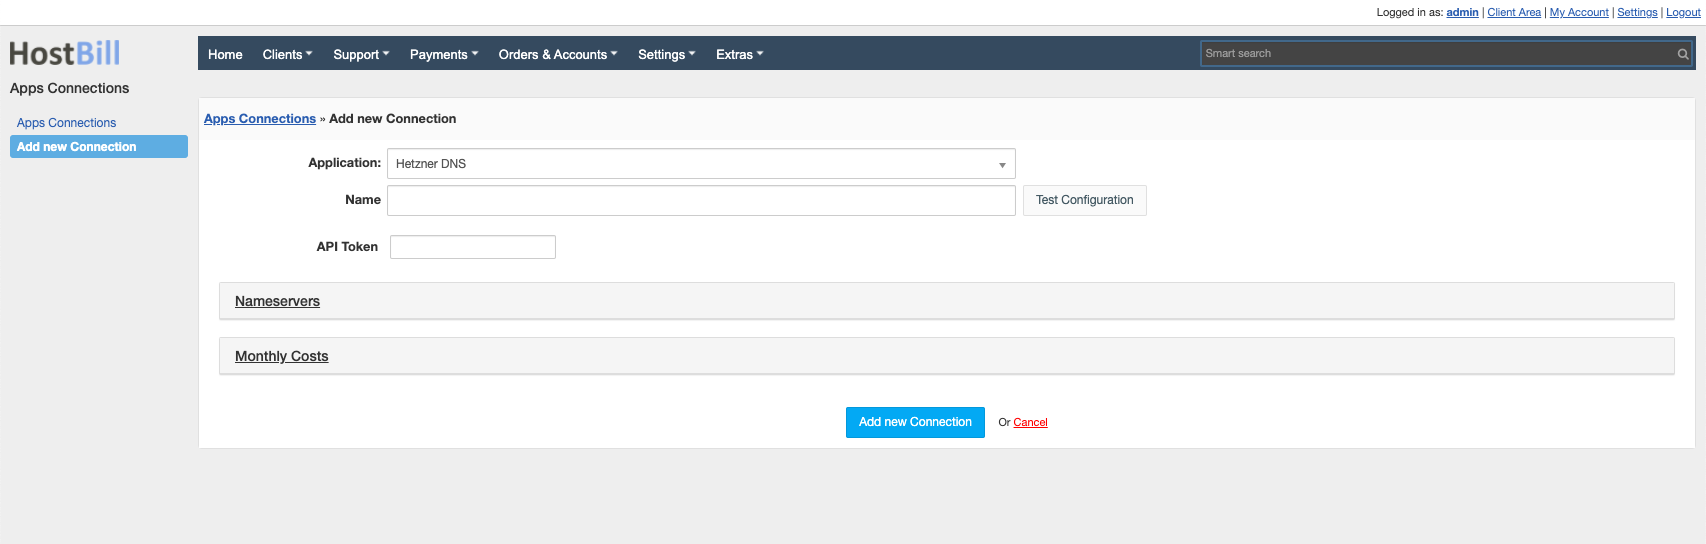
- Proceed to Settings → Apps → Add new App
- From Applications list select Hetzner DNS
- Enter:
- Name - Name of this connection
- API Token - The API Token is a unique authentication key used to communicate with the Hetzner DNS platform API. It is used to authorize and secure queries to the API, allowing developers and applications to automate activities related to managing DNS zones, records and other functions. The API token is confidential and should be stored securely to prevent unauthorized access to DNS resources.
4. Verify entered credentials by clicking Test Connection to check if HostBill can connect
5. Save Changes
Obtaining API Token from Hetzner
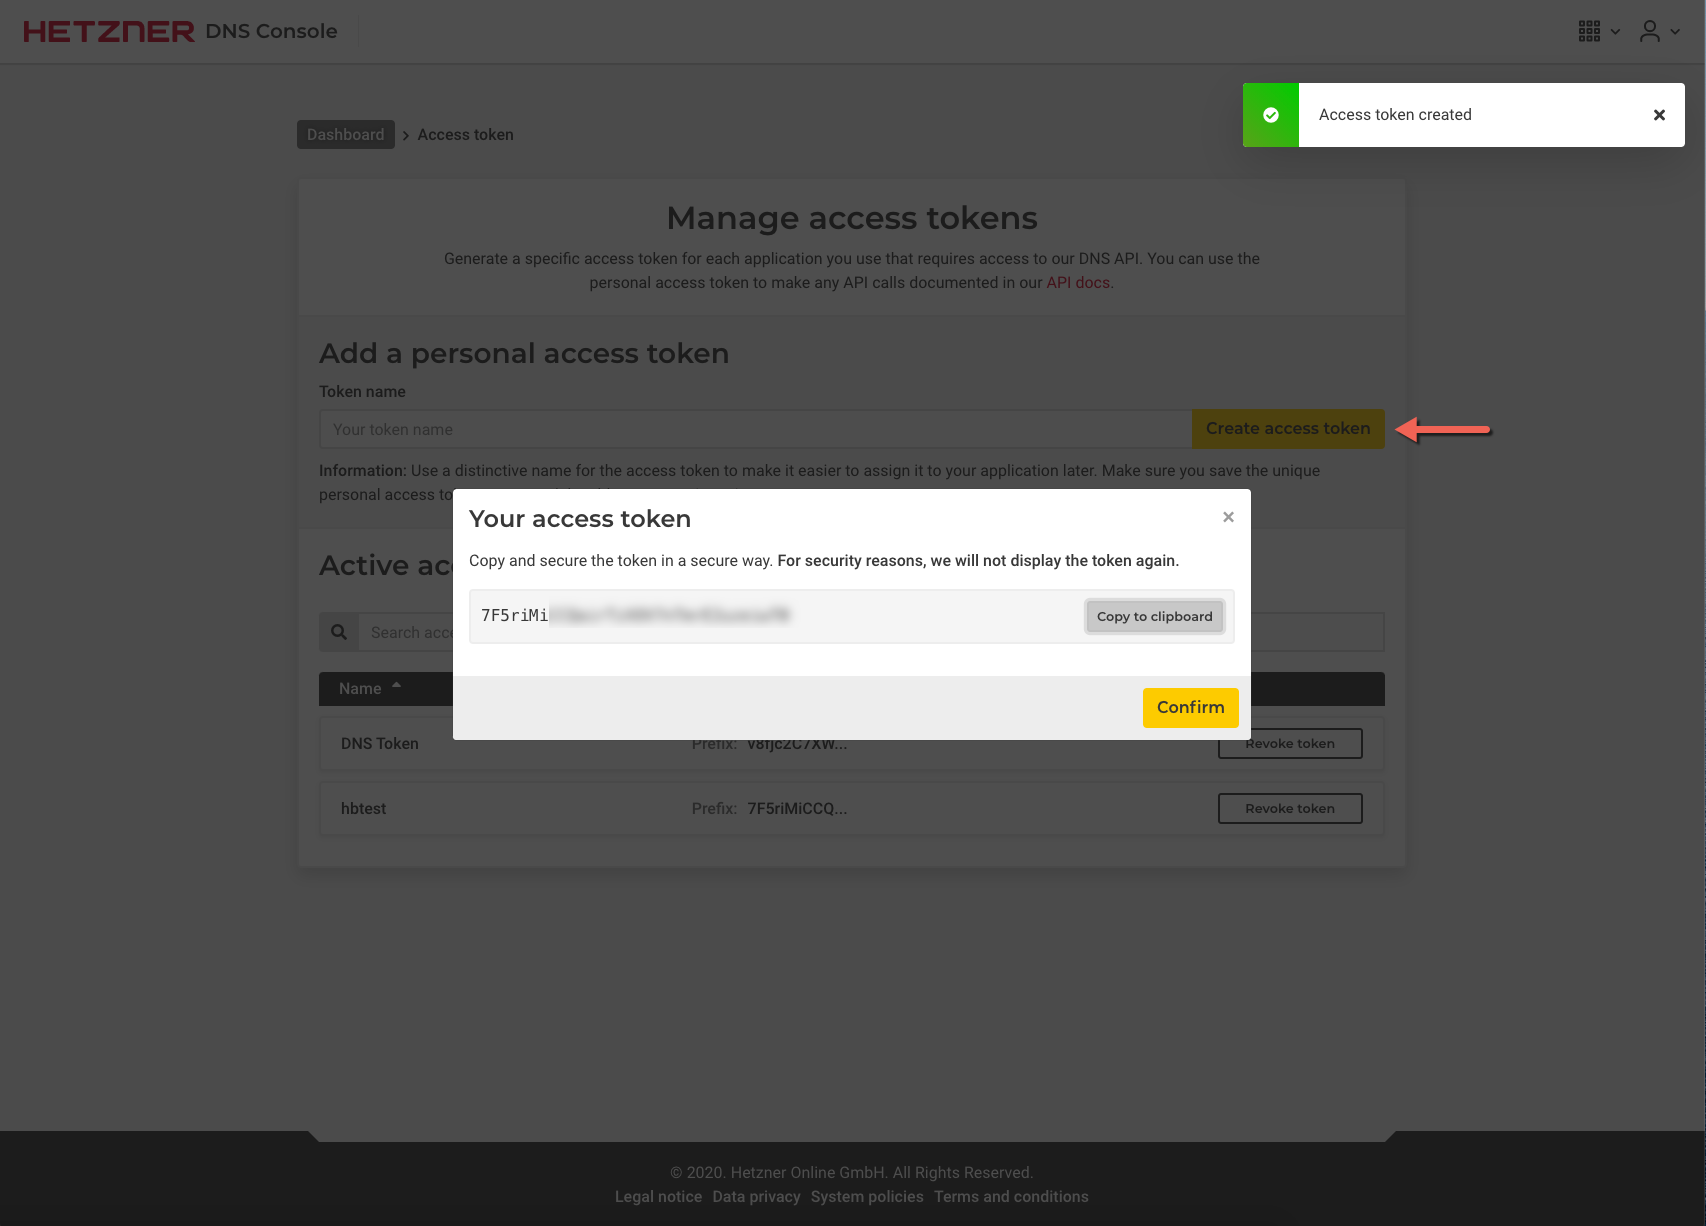
Log in to your Hetzner account.
To obtain your API Token:
- From applications menu select DNS Console
- Click the Manage API tokens button
- Enter the Token name and click the Create access token button
- Copy your Access token and enter it in the appropriate field in the app connection configuration

Adding Hetzner DNS product
- In HostBill go to Settings → Products & Services, and Add new order page
- From Order Types select DNS Services
- After creating order page add new product in it, provide name & Save changes
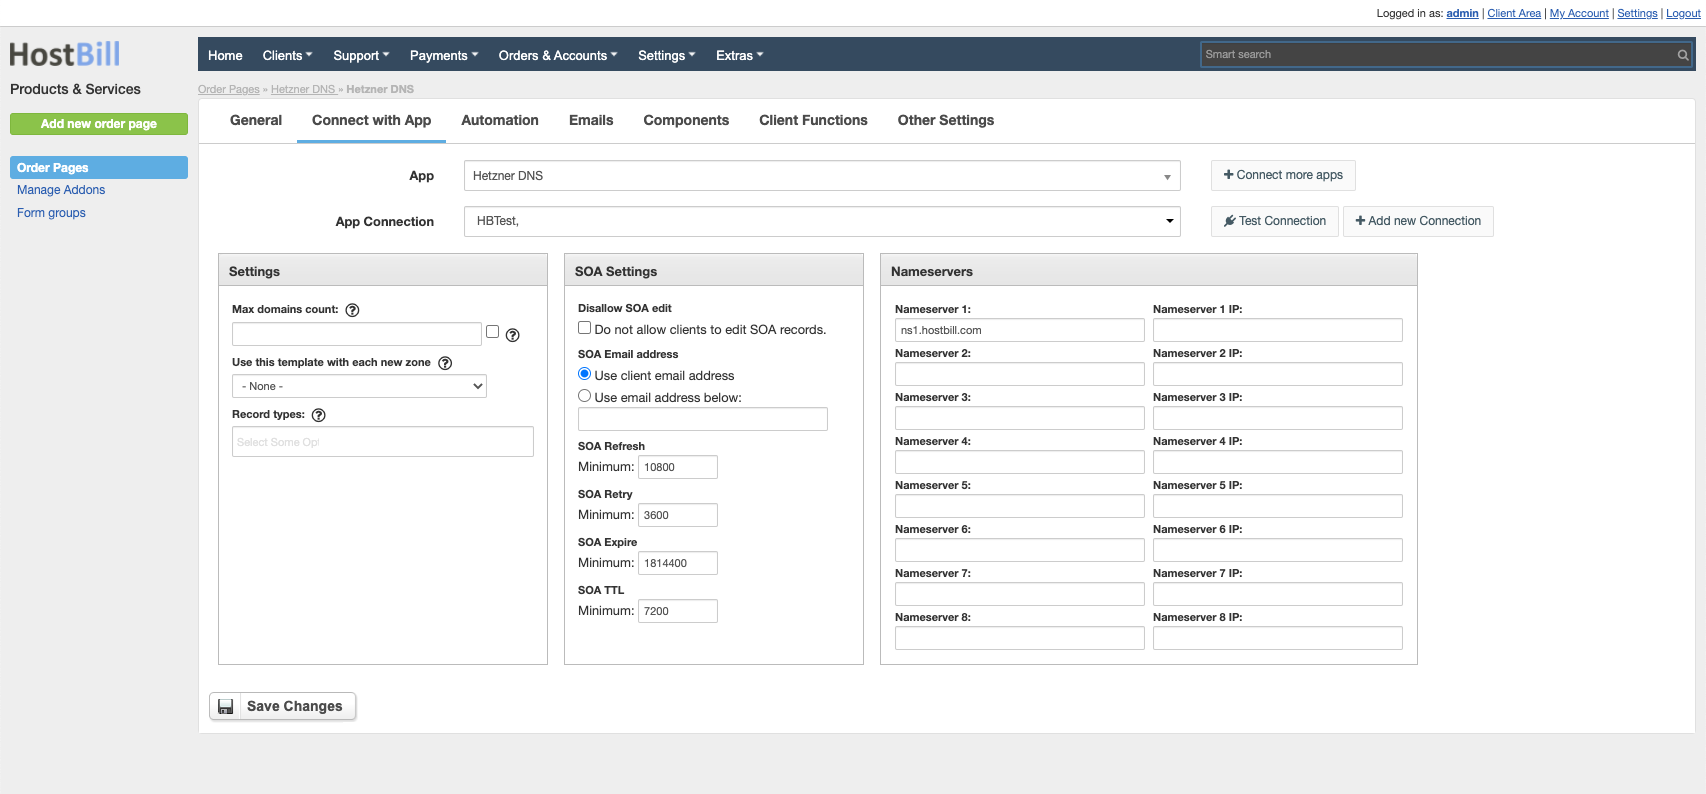
- In product configuration section proceed to Connect with App, select Hetzner DNS module and App server created in previous steps.
- Enter number of domains your client can add, provide nameservers that will be used with new zones and appear in clientarea.
Configure module connection settings:
- Max domains count - The maximum number of domains determines how many domains can be managed within a DNS account on the Hetzner platform. This value can be set based on the selected plan or package.
- Use this template with each new zone - This option allows you to apply a predefined template to each newly created DNS zone. Selecting the appropriate template will automatically configure the new zones according to the set settings.
- Record types - Record types allow you to specify what types of DNS records (e.g. A, AAAA, CNAME, MX) can be created and managed within a DNS zone.
- Hide billing info from DNS product - Hide billing information is an option that allows you to hide cost and billing data related to DNS product from the customer.
- Hide ability to add new zones manually - Hide ability to add new zones manually is a setting that restricts users from adding new DNS zones manually. This can be useful to maintain control over DNS configuration.
- Disallow SOA edit - Disallow SOA edit is an option that blocks users from editing SOA (Start of Authority) records in DNS zones. The SOA record contains key information about the zone, such as the root name server and update data.
- SOA Email address - The SOA email address is the contact address used in SOA records for reporting DNS problems. You can choose whether to use the client's email address or specify another address manually.
- SOA Refresh - SOA refresh time is a value that determines how many seconds the name servers should refresh their copies of the DNS zone. The minimum value is 10800 seconds (3 hours).
- SOA Retry - SOA retry time is the time in seconds after which the name server will retry the DNS zone if the previous attempt failed. The minimum value is 3600 seconds (1 hour).
- SOA Expire - The SOA expiration time is the time in seconds after which a DNS zone is considered invalid if it has failed to refresh. The minimum value is 1814400 seconds (21 days).
- SOA TTL - The SOA lifetime (TTL) is the time in seconds that the data in an SOA record is stored in the name server cache. The minimum value is 7200 seconds (2 hours).
- Nameserver 1-8 - Nameservers are the addresses of DNS servers that are authorized to handle DNS queries for a given zone. Up to eight different Nameservers can be defined for redundancy and reliability.
- Nameserver 1-8 IP - Nameserver IP addresses are the IP addresses assigned to each DNS server. Specifying the IP addresses may be required to accurately define the DNS configuration and ensure that the zone is properly supported.
- Submit changes, your package is ready
For more generic product configuration details including price, automation, emails settings refer to Product Configuration article.
Configuring Client Functions
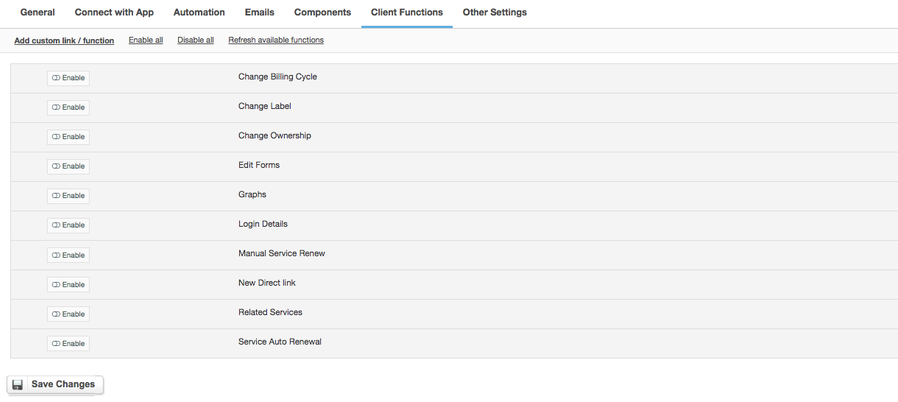
In Products & Services → Your Order Page → Your Product → Client Functions you can control what features customer will have access to in client portal, by clicking Enable/Disable next to the given option.
Use Edit button to adjust function appearance in the client portal.
For Hetzner DNS you can enable a number of standard client functions:
- Change Billing Cycle
- Change Label
- Change Ownership
- Edit Forms
- Graphs
- Login Details
- Manual Service Renew
- New Direct Link
- Related Services
- Service Auto Renewal