Overview
PowerDNS Slave module allows you to create slave zones only on your PowerDNS installation, either automated (i.e.: using Plesk DNS Helper) or manually by customers in client portal.
Note: This module, unlike regular PowerDNS plugin, uses PowerDNS rest API.
PowerDNS Slave module requires:
- PowerDNS ( version 4.0 or higher )
- PowerDNS Webserver - Documentation
- PowerDNS API - Documentation
Activating the module
- If the module is included in your HostBill edition you can download it from your client portal. This module is shipped with regular PowerDNS module.
- If the module is not included in your HostBill edition you can purchase it from our marketplace and then download it from the client area.
- Once you download the module extract it in the main HostBill directory.
- Go to Settings → Modules → Hosting Modules, find and activate PowerDNS Slave module.
Connecting HostBill with PowerDNS
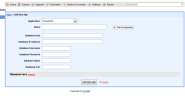
- Proceed to Settings → Apps → Add new App
- From Applications list select PowerDNS Slave
- Enter:
- Name - name for this connection
Connecting HostBill with PowerDNS
- In HostBill go to Settings > Modules, find and activate PowerDNS hosting module
- You will be redirected to Settings > Apps to set connection with PowerDNS
- Enter PowerDNS database credentials, choose from PostgreeSQL and MySQL backend, use Test Connection to check if HostBill can connect
Creating your first Managed DNS package
- In HostBill go to Settings > Products & Services, and Add new order page
- From Order Types select PowerDNS
- After creating order page add new product in it, provide name & Save changes
- In product configuration section proceed to Connect with App, select PowerDNS module and App server created in previous steps.
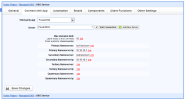
- Enter number of domains your client can add, provide nameservers that will be used with new zones and appear in clientarea.
- Submit changes, your package is ready