Skip to end of metadata
Go to start of metadata
You are viewing an old version of this page. View the current version.
Compare with Current
View Page History
« Previous
Version 2
Next »
Connecting HostBill with Dyn DNS
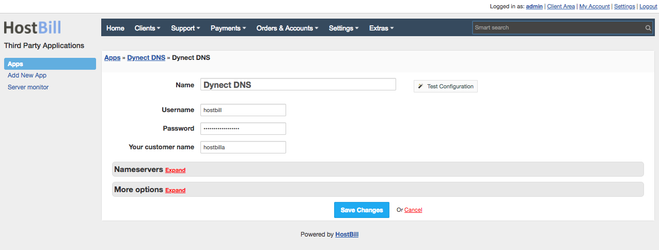
- In HostBill go to Settings > Modules, find and activate DynECT DNS hosting module
- You will be redirected to Settings > Apps to set connection with DynECT
- Enter:
- Your DynECT customer name
- Your DynECT User Name
- Your DynECT Password
- You can verify connection status by clicking on Test Connection
- After saving changes you can define list of NameServers this app should use.
It's crucial to set those if you plan to use Domain DNS automated zone creation
Creating your first Managed DNS package
- In HostBill go to Settings > Products & Services, and Add new order page
- From Order Types select DNS Services
- After creating order page add new product in it, provide name & Save changes
- In product configuration section proceed to Connect with App, select Dyn DNS module and App server created in previous steps.
- You can configure following Managed DNS account settings:
- Template used for new zone creation - under Components→DNS Templates you can create/manage DNS templates that customer can use in this product. You can select template to be used by default when adding new zone using this product.
- Max domains count: determines maximum amount of domains/zones customer can add/create under account using this product
- Setup default SOA record settings for newly created zones:
- Setup SOA email as either registered customer address, or provide your custom email address that should be used for SOA record
- Setup default SOA record TTL
- Define list of nameservers domains under this zone would use. It's crucial to set those if you plan to use Domain DNS automated zone creation
- Setup client access options:
- Whether customer can only see zone / records, or if customer should also add/edit/remove records
- Setup records that customer is allowed to add