Installing HostBill
HostBill installation is fully automated and takes just seconds, more info at Installation
Installing PowerDNS
PowerDNS installation guide can be found at //doc.powerdns.com/.
You need to install and configure PowerDNS with MySQL backend.
You can use our quick PowerDNS installer for CentOS 6.6, 64bit - Install PowerDNS with MySQL Backend on CentOS 6.6 x64
To learn how to manage DNSSEC with PowerDNS module, visit DNSSEC with PowerDNS module for HostBill
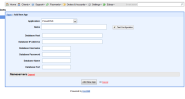
Connecting HostBill with PowerDNS
- In HostBill go to Settings > Modules, find and activate PowerDNS hosting module
- You will be redirected to Settings > Apps to set connection with PowerDNS
- Enter PowerDNS database credentials, choose from PostgreeSQL and MySQL backend, use Test Connection to check if HostBill can connect
Creating your first Managed DNS package
- In HostBill go to Settings > Products & Services, and Add new order page
- From Order Types select PowerDNS
- After creating order page add new product in it, provide name & Save changes
- In product configuration section proceed to Connect with App, select PowerDNS module and App server created in previous steps.
- Enter number of domains your client can add, provide nameservers that will be used with new zones and appear in clientarea.
- Submit changes, your package is ready
