- In HostBill go to Settings > Products & Services, and Add new order page
- From Order Types select VPS Accounts
- After creating order page add new product in it, provide name & Save changes
- In product configuration section proceed to Connect with App, select Proxmox module and App server created in previous steps.
Provisioning Section
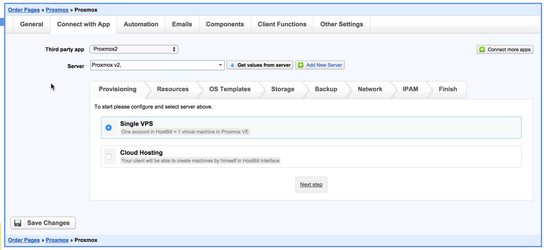
Select "Single VPS"
One account in HostBill = 1 virtual machine in Proxmox VE
Under Resources Tab
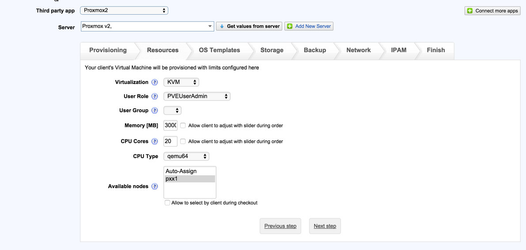
Virtualization
- Select virtualization method for this package. This will affect other options, like templates / ISO loaded under OS Templates tab
User Role
- Select PVEVMUser
User Group
- Optionally select user group to assign customer in Proxmox
Memory [MB]
- Enter total amout of memory customer can allocate
- Optionally use "Allow client to adjust with slider during order" to let client adjust this limit during signup
CPU Cores
- Enter Number of cores per socket.
- Optionally use "Allow client to adjust with slider during order"
Available nodes
- Select nodes customer VM will be created on.
- If more than one selected, HostBill will provision VM on least used Node
- Optionally use "Allow to select by client during checkout"
OS Templates Section
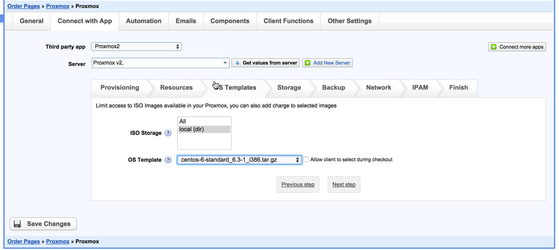
ISO Storage:
Select storage your clients will be able to choose ISO / OS templates from.
Note:
iso stores should share name/id across nodes, HostBill will assume that selected ISO is available on all nodes configured with this product
OS Template
Your client VM will be automatically provisioned with this template
Use "Allow client to select during checkout" to set prices for templates, and let customer pick his OS template durign signup.
HostBill will load OS Templates / ISO Images depending on Virtualization selected in 'Resources tab'.
For OpenVZ - it will load OS Templates
For KVM - it will load ISO images or disk images to clone
Storage Section
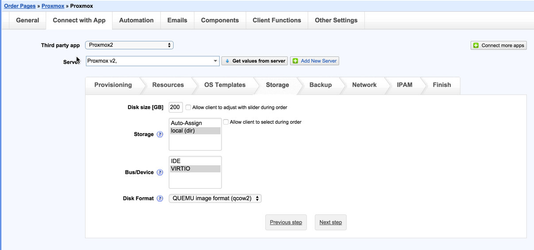
Disk size [GB]
- Enter total amount customer virtual machines will allocate
- Optionally use "Allow client to adjust with slider during order" to set prices per GB
Storage
- Customer VM disk will be created on selected storage.
- Use Auto-assign to assign random storage
- Optionally use "Allow client to select during order" to let client decide during order / apply charge per storage
Bus/Device
Select bus/device available for client.
Disk Format
If KVM Virtualization is selected under "Resources tab" select format for customer VM storage
- Raw disk image (raw)
- QUEMU image format (qcow2)
- VMWare image format (vmdk)
Backup Section
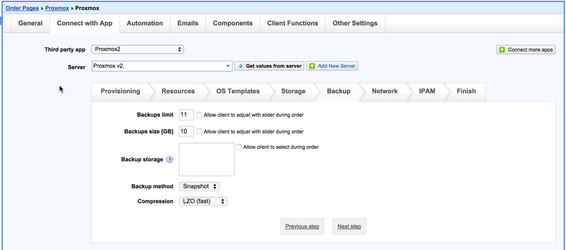
Backups limit
- Enter number of backups customer can take.
- Optionally enable "Allow client to adjust with slider during order"
Backups size [GB]
- Enter total amount of disk space customer backups can take
- Optionally use "Allow client to adjust with slider during order"
Backup Storage
- Backup will be saved to selected storage. Selecting multiple options will use random storage for each backup
- Optionally use "Allow client to select during order"
Backup method
Select from available backup methods:
- Snapshot
- Suspend
- Stop
Compression
Select from available backup compression methods:
- raw (none)
- LZO
- GZIP
Network Section
.png?version=1&modificationDate=1427121774380&cacheVersion=1&api=v2&width=604&height=250)
Port Speed [Mbps]
- Leave blank to unlimited.
- This value will be used for client Virtual Machine
- Optionally use "Allow client to select during order"
Options below are used with OpenVZ virtualization only.
Network mode
Options available:
- Bridged
- Routed (venet) - this option requres IPAM plugin to assign IP address to VM
Network bridge [For Bridged Setup only]
- Client VM will be connected trough this bridge.
- When using multiple nodes make sure your bridge names are the same across all nodes
Model
- Select network device models available.
- Selecting more than one for cloud will allow client to choose from during VM setup
IPAM Section
.png?version=1&modificationDate=1427122177539&cacheVersion=1&api=v2&width=499&height=250)
If IPAM plugin is installed in HostBill you can enable this feature to automatically assign IP addresses to client virtual machine.
Use "Enable IPAM" to enable this feature.
How it works?
- Enable IPAM with "Enable IPAM" checkbox
- Select IP pool from IPAM with "IPAM Pool" option, to use with this product
- Each time client creates virtual machine HostBill will get free IP from IPAM, and mark it as assigned to this virtual machine
- IP will be displayed in clientarea interface, and set as admin comment to client VM
- Use those IPs as reference when configuring networking for client VM's
If OpenVZ is used with Routed networking, IP will be used as Container IP Address