Activating Module
- Download Module archive from HostBill Licenses Portal
- Extract archive contents in your main HostBill directory
- In your HostBill: Proceed to "Settings -> Modules -> Hosting Modules -> Inactive"
- Click "Activate" next to "TCAdmin 2" module
Ensure you have billing API enabled in your TCAdmin 2 Settings - learn more
Connecting HostBill with TCAdmin 2
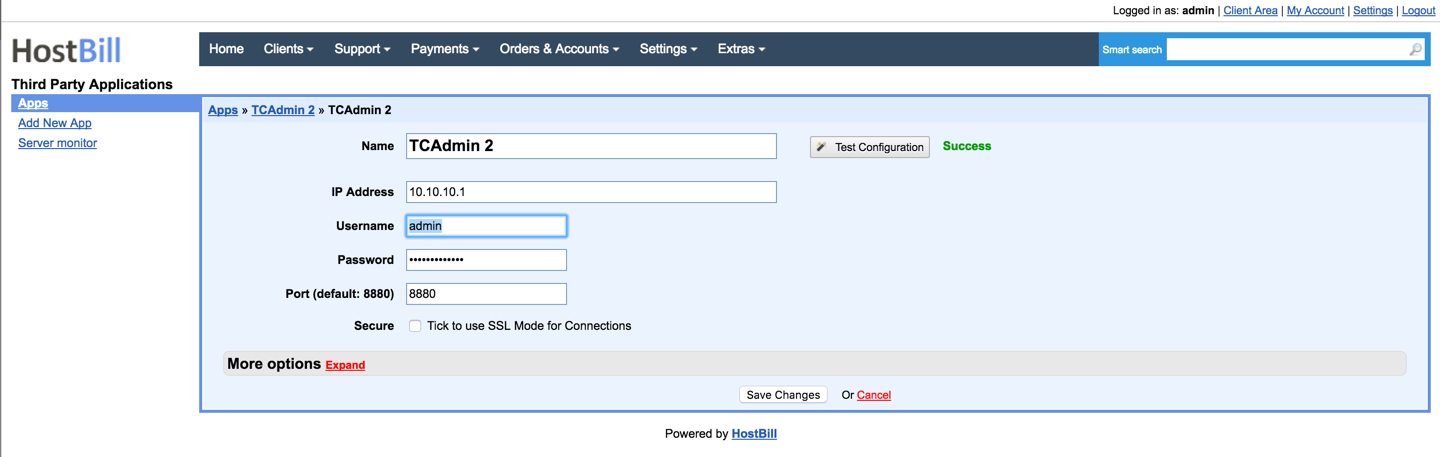
- Proceed to "Settings -> Apps -> Add new App"
- From Applications list select "TCAdmin 2"
- Enter your admin username, password, TCAdmin 2 server IP and TCAdmin 2 port.
- Verify entered credentials by clicking "Test Connection"
- Save Changes
Adding TCAdmin 2 Product
1. In HostBill go to Settings > Products & Services, and Add new order page
2. From Order Types select "Other Services"
3. Enter your orderpage name, select orderpage template. Save Changes
4. Add new product in new orderpage. Provide product name, setup price, Save Changes.
5. In product configuration section proceed to "Connect with App", select "TCAdmin 2" and App server created in previous steps.
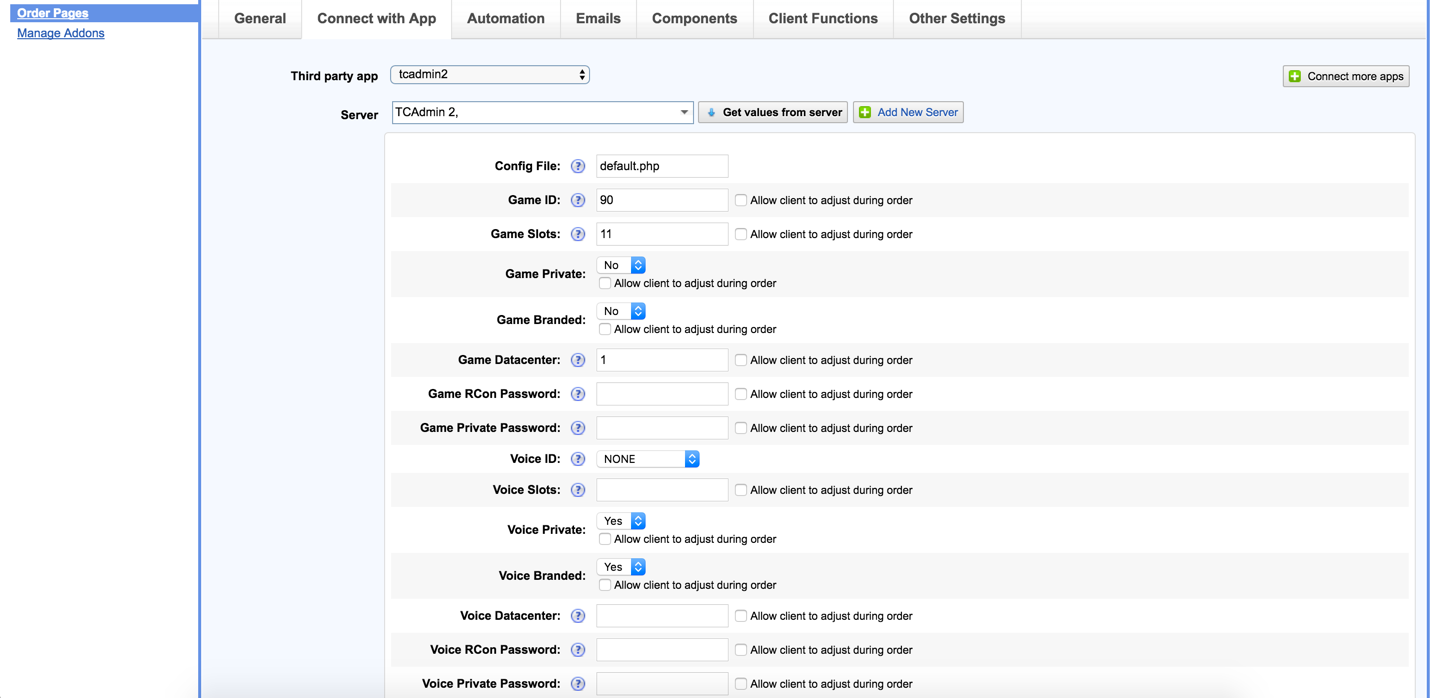
6. Setup configuration values for this product:
Config File
The file that contains the default values used for the TCAdmin billing API. This file contains more options not shown (commandline parameters, service level, game switching, etc). The default file is default.phpGame ID
The game id that will be created. If sent blank a game server will not be created. Use "Get values from server" to load available games. You can also use "Allow client to adjust during order" option to auto-add Component::Form that can be filled/selected by customer during Order + optionally add charge to certain values.Game Slots
The number of slots that the game server will have. If sent blank a game server will not be created. You can also use "Allow client to adjust during order" option to auto-add Component::Form that can be filled/selected by customer during Order + optionally add charge to certain values.Game Private
"Yes" if the game server is private. "No" if the game server is public. Default value is 0. You can also use "Allow client to adjust during order" option to auto-add Component::Form that can be filled/selected by customer during Order + optionally add charge to certain values.Game Branded
"Yes" if the game server is branded. "No" if the game server is not branded. Default value is 0. You can also use "Allow client to adjust during order" option to auto-add Component::Form that can be filled/selected by customer during Order + optionally add charge to certain values.Game Datacenter
The datacenter id where the game server will be created. This is required if creating a game server, can be set blank if in related config file skip_page is set to 1. You can also allow customer to select Datacenter/Location during order by ticking "Allow client to adjust during order" optionGame Hostname
The game server's hostname. If the hostname is not specified it will be generated automatically. To enable hostname field for this product, set it in Components::DomainsGame RCon Password
The game server's RCon password. If the RCon password is not specified it will be generated automatically. You can also use "Allow client to adjust during order" option to auto-add Component::Form that can be filled/selected by customer during Order + optionally add charge to certain values.Game Private Password
The game server's private password. If the private password is not specified it will be generated automatically. You can also use "Allow client to adjust during order" option to auto-add Component::Form that can be filled/selected by customer during Order + optionally add charge to certain values.Voice ID
The voice id that will be created. To create a Teamspeak 2 virtual server the value must be TEAMSPEAK. To create a Teamspeak 3 virtual server the value must be TEAMSPEAK3. If sent as NONE a voice server will not be created. If the value sent is TEAMSPEAK3 you can also send values for upload and download quotas in config file (voice_upload_quota and voice_download_quota)Voice Slots
The number of slots that the voice server will have. If a valid voice id is sent and this value is sent blank it will use the value of Game Slots. You can also use "Allow client to adjust during order" option to auto-add Component::Form that can be filled/selected by customer during Order + optionally add charge to certain values.Voice Branded
"Yes" if the voice server is private. "No" if the voice server is public. Default value is 0. You can also use "Allow client to adjust during order" option to auto-add Component::Form that can be filled/selected by customer during Order + optionally add charge to certain values.Voice Datacenter
The datacenter id where the voice server will be created. This is required if creating a game server. This is required if creating a game server, can be set blank if in related config file skip_page is set to 1. You can also allow customer to select Datacenter/Location during order by ticking "Allow client to adjust during order" optionVoice Hostname
The voice server's hostname. If the hostname is not specified it will be generated automatically.Voice RCon Password
The voice server's RCon password. If the RCon password is not specified it will be generated automatically. You can also use "Allow client to adjust during order" option to auto-add Component::Form that can be filled/selected by customer during Order + optionally add charge to certain values.Voice Private Password
The voice server's private password. If the private password is not specified it will be generated automatically. You can also use "Allow client to adjust during order" option to auto-add Component::Form that can be filled/selected by customer during Order + optionally add charge to certain values.
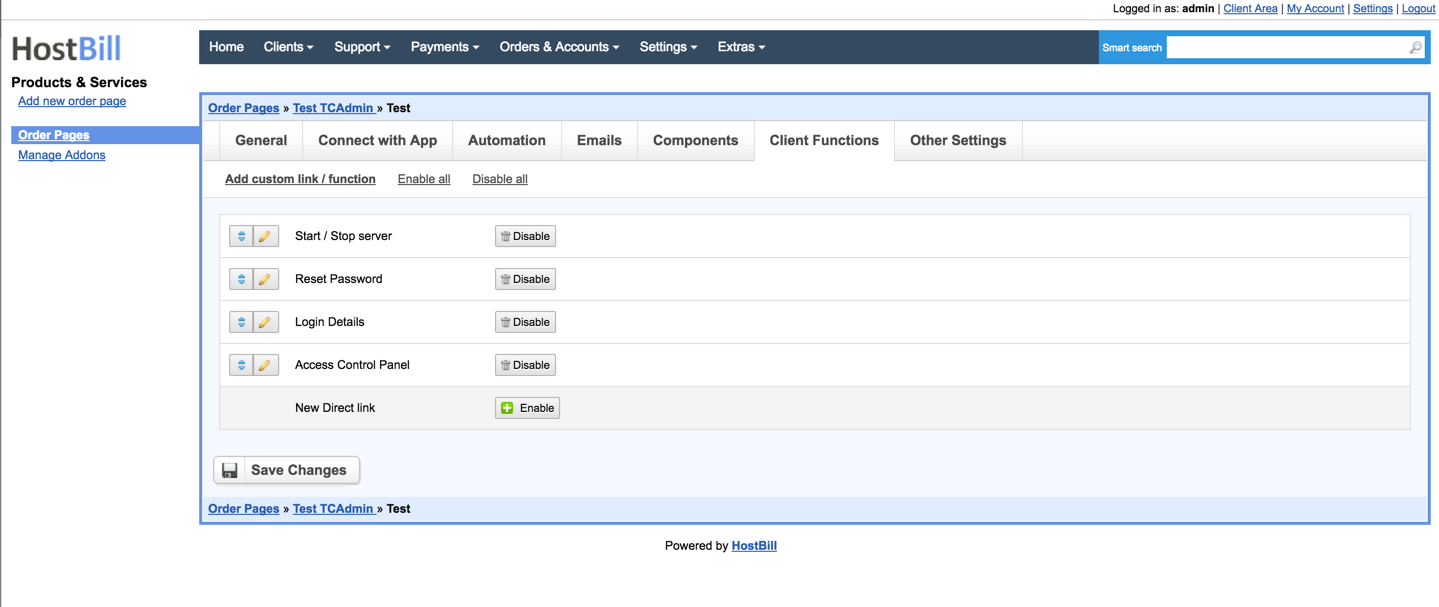
7. Setup Client Functions:
Under Client Functions you can control what features customer will have access to in client portal, by clicking "Enable/Disable" next to it.
Use "Edit" button to adjust function appearance in client portal.
Custom Config File, custom API values
In some cases you might need to set different API values or execute custom code for a specific game. To use different config files for a game you can create a new text file with .php extension in the includes/modules/Hosting/tcadmin2/configs directory
<?php
  include('default.php');
  //Your code here
?>
For game servers:
$data["gamevar_VariableName"] = "value";
For voice servers:
$data["voicevar_VariableName"] = "value";
Minecraft example:
$data["gamevar_Xms"] = "2048";
$data["gamevar_Xmx"] = "2048";
The following example sends a different game id depending the location selected by the client
<?php
include('default.php');
switch ($data["game_datacenter"])
{
case "1":
  $data["game_id"] = 11;
  break;
case "2":
  $data["game_id"] = 12;
  break;
}
?>
Reseller Packages
To create reseller packages leave all the game and voice information blank. Create new config file as described above with these lines:
<?php
  include('default.php');
 $data["role_id"]="3"; //The reseller role id to assign to the user.
 $data["package_id"]="1"; //The reseller package id to assign to the user.
Troubleshooting
- The values sent to TCAdmin are saved in the log file /home/tcadmin/Logs/Web/BillingApi.LastCommand.log or C:\Program Files\TCAdmin2\Logs\Web\BillingApi.LastCommand.log Make sure TCAdmin is receiving the correct values. The values required to create a game server are: game_id, game_slots, game_datacenter.
- If TCAdmin accepts the values a scheduled task is created. If the game server is never created go to System > General Settings > Scheduled Tasks. Select the Day view and click on the task that was created. You should see the error message preventing the game server from being created. Correct the problem and start the task again. You don't need to send the command again.