Installing HostBill
HostBill installation is fully automated and takes just seconds, more info at Installation
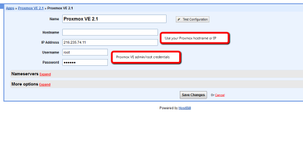
Connecting HostBill with Proxmox VE
- In HostBill go to Settings > Modules, find and activate Proxmox hosting module
- You will be redirected to Settings > Apps to set connection with Proxmox
- Enter Proxmox VE admin credentials, use Test Connection to check if HostBill can connect
Creating your first Cloud Hosting package
- In HostBill go to Settings > Products & Services, and Add new order page
- From Order Types select VPS Accounts
- After creating order page add new product in it, provide name & Save changes
- In product configuration section proceed to Connect with App, select Proxmox module and App server created in previous steps.
- Proceed to configuration wizard and set your package limit for each step.
- Submit changes, your package is ready
Configuring noVNC console
Proxmox v2 module allows you to use NoVNC console. To enable it, copy file _upload_proxmox/vncconsole.html from module directory and upload to your Proxmox servers into directory:
/usr/share/novnc-pve/
Now your customers will be able to access noVNC console.
Important: Make sure to install valid SSL certificate for your Proxmox server, otherwise your customers will not be able to see noVNC console.