Overview
IPAM (IP Address Management) is designed to organize and track IP addresses in your organization/company/department.
Activating the module
- If the plugin is included in your HostBill edition you can download it from your client portal.
- If the plugin is not included in your HostBill edition you can purchase it from our marketplace and then download it from the client area.
- Once you download the plugin extract it in the main HostBill directory.
- Go to Settings → Modules, find and activate IPAM plugin.
- Once the plugin is activated you will be directed to Settings→ Modules→ Plugins to configure the plugin.
Basic IPAM settings
IPAM comes with easy to understand options, with two major components:
- Email Notifications - when enabled on each IP/list action taken IPAM can notify certain staff members for audit and/or security purposes. You can select staff members you wish to notify under Options → Send emails on IP list updates
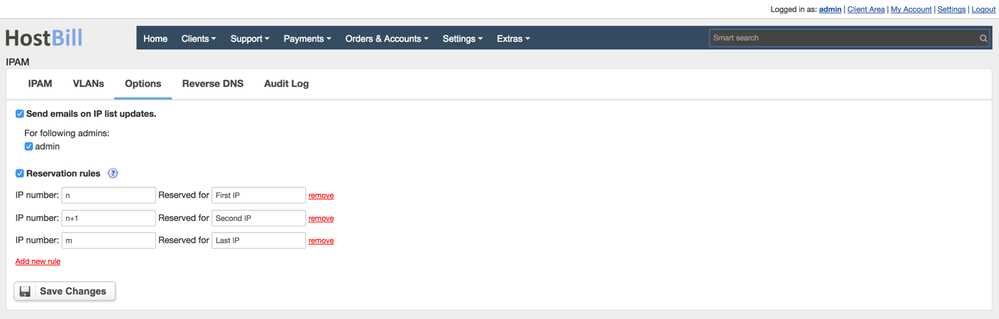
2. Reservation rules- when enabled it will automatically apply certain rules to IP list on subnet provisioning.
When assigning whole IP list this option will automatically reserve IPs based on rules below. You can use 'n' and 'm' variables to define list starting & end points, example:
- 'n+1' will reserve second ip
- 'm' will reserve last ip
Setting up Reverse DNS
IPAM module can work with PowerDNS module, allowing your colocation/dedicated customers to manage their PTR records directly from clientarea.
To enable rDNS management in HostBill
- Go to Settings → Modules and enable PowerDNS module
- Configure connection to your DNS server in Settings → Apps
- Enable Reverse DNS in Product → Client functions for your Colo/Dedi packages
- Visit Extras → IPAM → Reverse DNS
- Under your dedicated servers/colocation products enable Reverse DNS client function in product configuration
- Create general DNS zone for in-addr.arpa or /24 subnet specific (like 3.2.1.in-addr.arpa for 1.2.3.0/24)
- Clients that have packages with IPs assigned in (Account details) → IPAM tab will now be able to manage their rDNS records
- Additionally, anytime you'll edit rDNS column in IPAM plugin, it will send updated record to DNS module
Setting up IP Provisioning
To enable IP Provisioning:
- Visit Settings → Modules and activate IP_Provisioning module
- You will be redirected to Settings → Apps to setup new connection (it's for informational purposes, only name is required)
- Proceed to Settings → Products & Services, add new Order Page for IP addresses, product type: Other
- Add new product in newly created orderpage
- Under Connect With App tab select IP_Provisioning module
- Setup subnet sizes you wish your client receive after purchasing this package