Overview
Google Workspace (previously G Suite) is a set of intelligent cloud computing, productivity and collaboration apps developed by Google. With G Suite Google Workspace module for HostBill you can sell G Suite sell Google Workspace services charging your customers per number of seats.
Activating the module
- If the module is included in your HostBill edition you can download it from your client portal.
- If the module is not included in your HostBill edition you can purchase it from our marketplace and then download it from the client area.
- Once you download the module extract it in the main HostBill directory.
- Go to Settings → Modules → Hosting Modules, find and activate GSuite module.
Connecting HostBill with G Suite
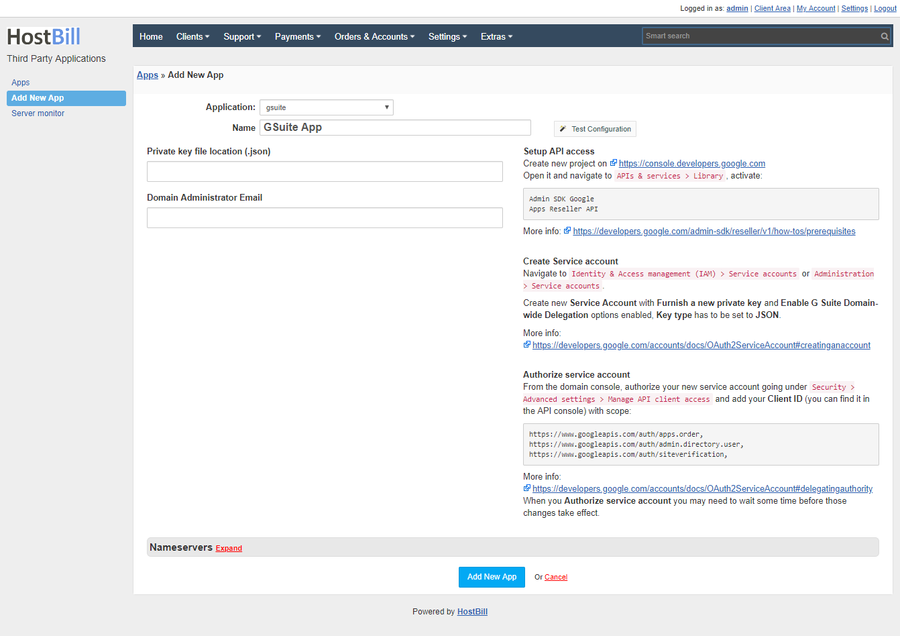
- Proceed to Settings → Apps → Add new App
- From Applications list select GSuite
- Follow instruction on that page to prepare your private key and authorize service account.
- Update Private key file location with the location of the json file downloaded from google and provide your Domain Administrator Email
- Verify entered credentials by clicking Test Connection to check if HostBill can connect
- Save Changes
Creating your
first G Suitefirst Google Workspace package
- In HostBill go to Settings → Products & Services, and Add new order page
- From Order Types select Other Services
- After creating order page add new product in it, provide its name and Save changes
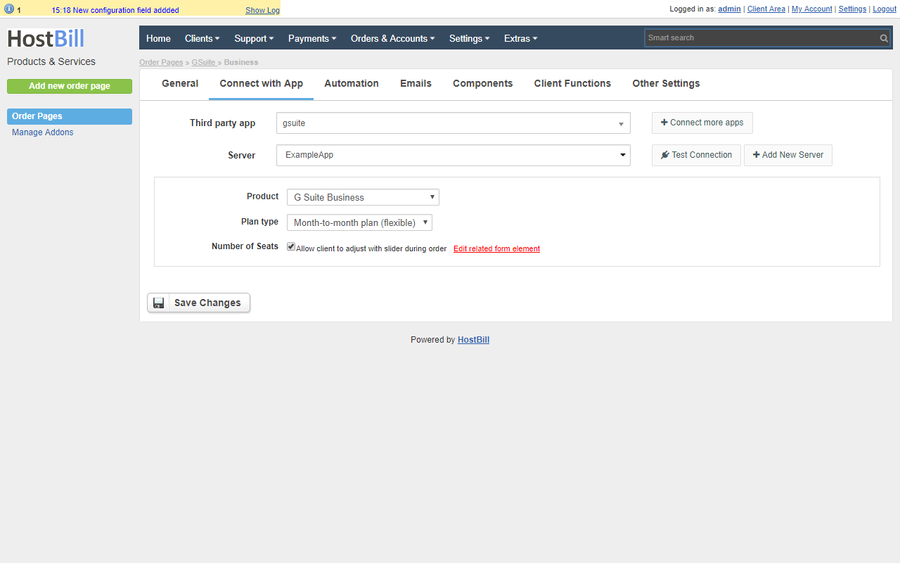
- In product configuration section proceed to Connect with App, select G Suite module and App server created in previous steps.
- Select G Suite Product that you want to provision with this package.
- Select your Plan Type (more info) :
Annual monthly pay— Annual commitment with monthly paymentsAnnual yearly payFlexible— Non-commitment plan with monthly paymentsTrial— Free trial plan
- Select the Number of Seats for your package, or allow clients to select it during order.
- Under Components→Domains ensure to enable hostname requirement
- Submit changes - your package is ready.
| Info | ||
|---|---|---|
| ||
If username set in account contains "@" it will be used as admin email for signup, otherwise it will be generated from user-supplied hostname using: admin@{domain} pattern Optionally, You can add input field in Components→Forms with variable name customemail - value of this field will be used as username/email instead. |
For more generic product configuration details including price, automation, emails settings refer to Product Configuration article.
Configuring Client Functions
In Products & Services → Your Order Page → Your Product → Client Functions you can control what features customer will have access to in client portal, by clicking Enable/Disable next to the given option.
Use Edit button to adjust function appearance in the client portal.

