Overview
...
Xero.com module for HostBill enables data export from HostBill billing platform to Xero.com accounting software. The module allows to seamlessly export existing customers, transactions and issued invoices information and set automation rules to export new customers, new recurring invoices and new transactions into Xero.com accounting software.
Activating the module
...
- If the plugin is included in your HostBill edition you can download it from your client portal.
- If the plugin is not included in your HostBill edition you can purchase it from our marketplace and then download it from the client area.
- Once you download the plugin extract it in the main HostBill directory.
- Go to Settings → Modules, find and activate Xero.com plugin.
- Once the plugin is activated you will be directed to Settings→ Modules→ Plugins to configure the plugin.
...
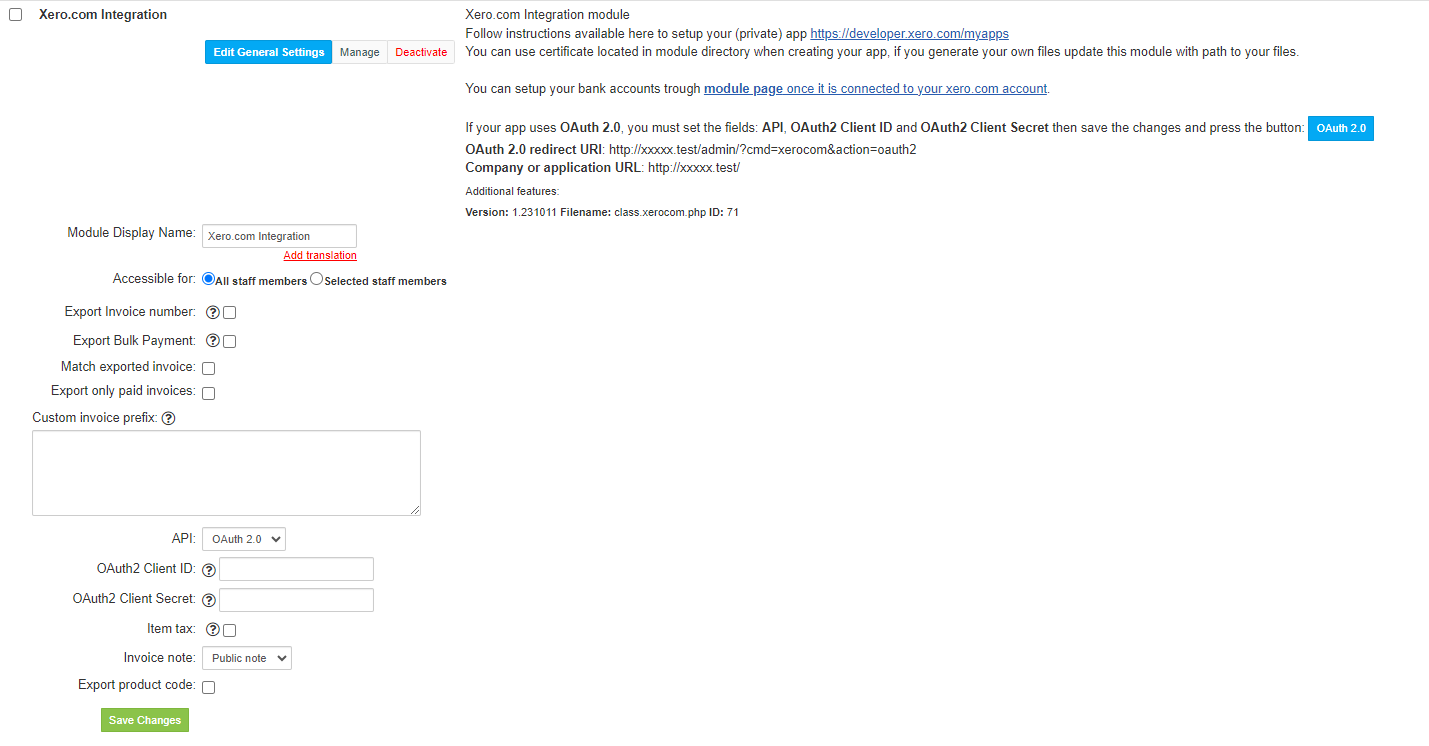
Fill in the configuration fields
- Consumer Key - used by Oauth 1 (deprecated)
- Consumer Secret- used by Oauth 1 (deprecated)
- Sales Account Code - will be used on invoice item as AccountCode in Xero
- Bank account ID - will be used as AccountID when registering payment in Xero
- Private key file - used with OAuth 1 (deprecated)
- Certificate file
- Tick if you want to Export Invoice number
...
- - used with OAuth 1 (deprecated)
- Export Invoice number - Use Invoice number generated by hostbill when exporting invoices. Reference is always set with hostbill invoice number
- Export Bulk Payment - When enabled module will export bulk-payment invoices
- Match exported invoice - If an invoice with the same ID exists at Xero.com, it assigns an existing invoice
- Export only paid invoices - When enabled, only invoices that are paid in HostBill will be exported
- Custom invoice prefix - Prefix that will be added to the invoice number. The maximum length of the prefix, including the invoice number, cannot exceed 255 characters.
- API - Select API connection method, OAuth 2 → is current, Oauth 1 → deprecated
- OAuth2 Client ID - Required field for OAuth 2.0, see below for how to obtain it
- OAuth2 Client Secret - Required field for OAuth 2.0
- Item tax - If checked, it sends information about item tax when exporting an invoice
- Invoice note - where to store information about exported Xero invoice number (in HostBill invoice)
- Export product code - When enabled product codes will be exported/created in Xero during each invoice export
Obtaining credentials from Xero
...
First of all you must have an active Xero account.
Log in to your Xero developer account.
For App configuration you can use certificate located in module directory, if you generate your own files update appropriate fields in the module's configuration with path to your files.
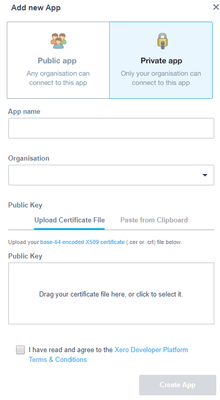
To use the Xero service you must have a create Code Flow app:
- Go to the top menu of the page My apps
- Click on the New App button
- Enter the App name and Organisation
- Upload your certificate (.cer or .crt) file
- Next select the checkbox "Agree Terms" and click on the Create app button
- Copy the Consumer Key and enter it in the appropriate field in the module's configuration
- Copy the Consumer Secret and enter it in the appropriate field in the module's configuration

...
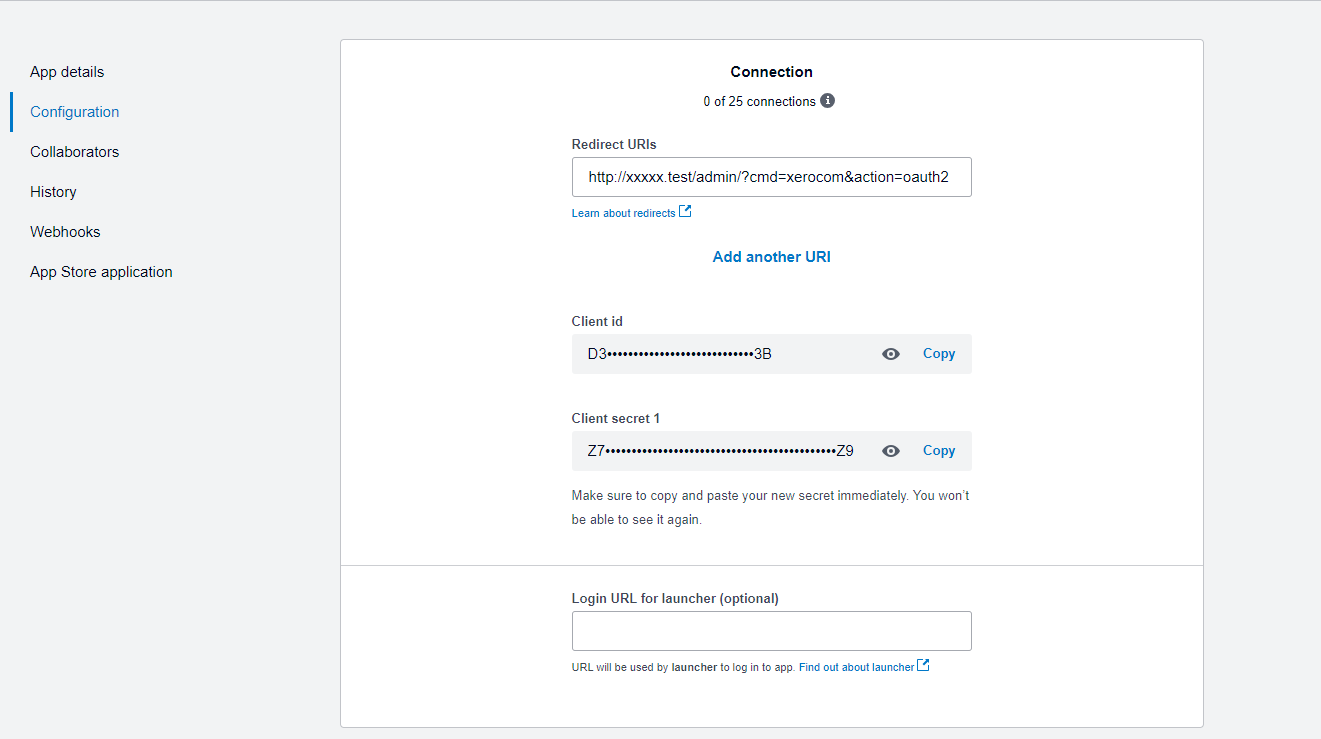
- select Integration type
- Set Company or application URL to the value provided in the module description
- Set Redirect URI to the value provided in the module description
- Accept the Terms & Conditions and Create app
- Go to the Configuration tab (make sure the Redirect URI is the same as in the module description)
- Press Generate a secret
- Set the generated Client id and Client secret in the module configuration as OAuth2 Client ID and OAuth2 Client Secret
- In the module configuration, set the API to OAuth 2.0 and save the changes
- In the module description, press the OAuth 2.0 button and after the page redirection, log in to your Xero.com account

Clearing out locally stored data
...