Installing HostBill
HostBill installation is fully automated and takes just seconds, more info at Installation
Download & install
- After module purchase visit https://hostbillapp.com/clientarea/, log-in and proceed to "Services->HostBill Plugins->Colocation Manager v5" and from left-hand menu choose Download This Product
- After downloading, unzip archive contents in your main HostBill directory
- Log-in into your HostBill adminarea, proceed to Settings->Modules, locate your newly uploaded module and choose"Activate"
Initial Configuration
...
Overview
...
Colocation Manager one of most powerful HostBill modules and an extremely rich-featured tool to help you store and manage Servers, Switches, PDUs, KVMs, Blade Systems, Zero-U devices and more.
Activating the module
...
- If the plugin is included in your HostBill edition you can download it from your client portal.
- If the plugin is not included in your HostBill edition you can purchase it from our marketplace and then download it from the client area.
- Once you download the plugin extract it in the main HostBill directory.
- Go to Settings → Modules, find and activate Dedicated Servers Manager plugin.
- Once the plugin is activated you will be directed to Settings→ Modules→ Plugins to configure the plugin.
Initial Module Configuration
...
- Choose module display name
- Select if you want the module to be accessible for all staff members or only selected staff members
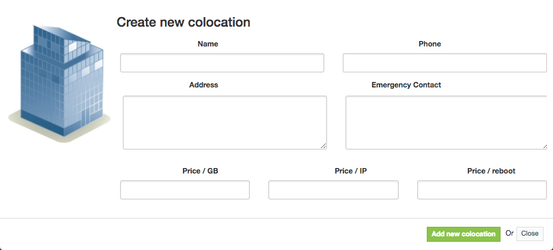
Then you can proceed to adding your olocations:
Adding PDU control to customer account
...
- Under settings->modules Settings → Modules find and activate PDU_SNMP module
- Proceed to Settings ->Apps → Apps and define SNMP connection using PDU_SNMP module
- From the list of supported device manufacturers select your device
- Provide SNMP read & write community
- Use Test Connection to check , whether HostBill can connect to your PDU
- Repeat the steps above for each PDU you wish to control
- Proceed to Plugins ->Dedicated → Dedicated Servers Manager ->Inventory → Inventory templates
- Select inventory items that will represent your PDUs
- Ensure those items have PDU App as an additional atribute
- Proceed to Plugins ->Dedicated → Dedicated Servers Manager ->→ [Your Rack]
- Select/Add PDU item on your rack
- From Hardware Tab, select App defined in previous steps
- Use Load ports to load ports from your device
- Save changes for your item
- Proceed to Orders & ACcounts->AccountsAccounts → Accounts, select customer account of Type: Colocation/Dedicated server
- Under PDU tab, select PDU & ports that this account/server is attached to
- You will now have control over customer PDU ports
| Widget Connector | ||
|---|---|---|
|
Adding PDU reboots to client portal
...
- Connect PDU ports to customer accounts using steps above
- Proceed to Settings ->Products → Products & servicesServices
- Select product of type Type: Colocation / Dedicated Servers
- Proceed to Client Functions tab
- Enable PDU Reboots Client function
Adding Switch control to customer account
...
- Under settings->modules Settings → Modules find and activate Switch_SNMP or Switch_Telnet module
- Proceed to Settings ->Apps → Apps and define SNMP connection using Switch_SNMP or Switch_Telnet module
- From the list of supported device manufacturers select your device
- Provide SNMP read & write community (for SNMP) or username/password for Telnet
- Use Test Connection to check , whether HostBill can connect to your Switch
- Repeat the steps above for each Switch you wish to control
- Proceed to Plugins ->Dedicated → Dedicated Servers Manager ->Inventory → Inventory templates
- Select inventory items that will represent your Switches
- Ensure those items have Switch App as an additional atribute
- Proceed to Plugins ->Dedicated → Dedicated Servers Manager ->→ [Your Rack]
- Select/Add Switch item on your rack
- From Hardware Tab, select App defined in previous steps
- Use Load ports to load ports from your device
- Save changes for your item
- Proceed to Orders & ACcounts->AccountsAccounts → Accounts, select customer account of Type: Colocation/Dedicated server
- Under Switch tab, select Switch & ports that this account/server is attached to
- You will now have control over customer Switch ports
Connecting to Cacti / Observium for bandwidth billing
...
- Under settings->modules Settings → Modules find and activate Cacti or Observium module
- Proceed to Settings ->Apps→ Apps, add new Cacti or Observium App connection
- Make sure to follow oncreen guide to upload API file to your Cacti or Observium server
- Provide admin username & password
- Use Test Connection to check , whether HostBill can connect to your Cacti or Observium app
- Proceed to Settings ->Products → Products & Services
- Select product of type Type: Colocation / Dedicated Servers
- Under General tab configure your Bandwidth/Overage billing settings
- Under Connect with App select Cacti or Observium and connection defined in previous steps
- Under Client Functions you can enable Bandwidth usage graphs For for clients to track graphs in client portal
- Save changes
- Proceed to Orders & ACcounts->AccountsAccounts → Accounts, select customer account of Type: Colocation/Dedicated server
- Under Bandwidth Tab click enable, and select Device/Ports to assign graphs to account & (optionally) bill for them
Connecting to Nagios
...
- Under settings->modules Settings → Modules find and activate Nagios module
- Proceed to Settings ->Apps→ Apps, add new Nagios App connection
- Provide Nagios username & password
- Provide URL to your Nagios (URL to cgi-bin directory)
- Use Test Connection to check , whether HostBill can connect to your Nagios
- Proceed to Plugins ->Dedicated → Dedicated Servers Manager ->→ [Your Rack]
- Using [Refresh] function you can fetch latest monitoring outputs from Nagios
- Hostbill HostBill tries to match devices from nagios Nagios using hostname/labels, so make sure those match in Colocation manager Manager and nagiosNagios
- If you wish your clients to have access to nagios Nagios output as well:
- Proceed to Settings ->Products → Products & Services, Select select your colo/dedi product
- Under Connect with App add new connection, select Nagios module & app
- Under Client functions enable Monitoring function
- Proceed to customer account details in Orders & Accounts
- Under Dedicated Srv Manager Assign assign item related to the customer account
Image uploads for Inventory Templates
...
If image/item icons uploads in Inventory Templates is not working for you, please ensure that/includes/modules/Other/Dedimgr/admin/images/hardware have chmod 777
Enabling Top Bandwidth usage list plugin
...
- Ensure that guides above regarding Cacti/Observium are finished
- Under settings->modules Settings → Modules find and activate Top Bandwidth usage list module
- Module will now be accessibe from Plugins menu
...