Creating and Managing Orders
You can find this section in HostBill Admin → Orders & Accounts → Orders
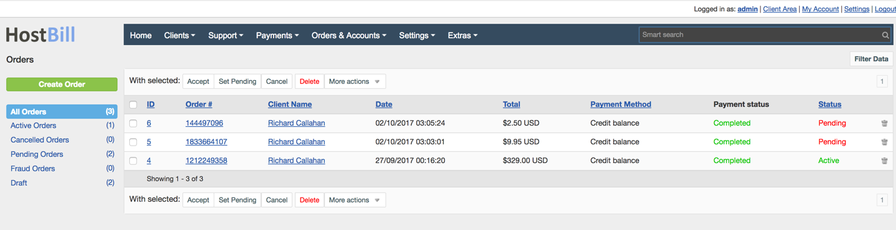
Order list
The Order list is presented as a table containing the following information:
- ID - a number which is assigned to an order once it's placed
- Order# - an individual number assigned to a given order.
- Client Name - the name of the client who has placed a certain order (or on whose behalf it has been placed by admin)
- Date - the date when the given order has been placed.
- Total - a sum of money client is obliged to pay for a given product/service
- Payment Method: - displays a payment method which has been chosen during placing the order and through which the payment is processed.
- Payment Status - can be marked as Completed (green) or Incomplete (red) depending if payment has been received or not.
- Status - the order status. It can be marked as: Pending (red), Active (green), Cancelled (grey) or Fraud (black).
Activate, cancel or delete orders
From the order list you can select orders which you want to perform the following actions on:
- Accept - once you accept the order its status will be changed to Active
- Set Pending - once you use this tab the order will be marked as Pending.
- Cancel - once you use this tab, the order will be cancelled.
- Delete - here you have the possibility to delete a given order. It can be done in two ways: delete all order related data from HostBill and terminate accounts if any or perform a soft delete order - remove only from HostBill, not from the server.
- More actions:
- Send message - here you can send a message or create a support ticket in order to contact a certain client
- Set as Fraud - if the order has been placed by mistake or it hasn't been paid for, you can set such order as Fraud.
Managing orders
HostBill gives you the opportunity to manage already placed orders. To manage the order simply click on the chosen order from the order list. You will be redirected to the order details overview, which apart from the information described above, also includes the following fields:
- Order IP - displays client IP address (from which the order was placed.) Also here you can block IP that spam your system with fake orders. The staff members can block IP addresses from here if your staff permissions allow it.
- Referral - if you activate an affiliate system, here you can assign an affiliate to the given order.
- Invoice - displays invoice ID generated for the order.

Changing order status
This option (in order details) allows you to freely set order status, without invoking any additional action. Save button will show up after you set new status.
Assign orders to your staff members
This option (in order details) allows you to assign one of your staff members or yourself to an order. If any staff member is assigned to the order, HostBill will send out notification to assigned staff, and allow them to view the order by filtering order list by ownership.
Order items
Order items section in order data overview displays the list of products/services which have been ordered. Order items section includes information which is also visible in the main overview: billing cycle, amount and status. The item name displayed is clickable and once clicked it redirects to the related account or domain section. You can also manage the order using the following tabs placed at the bottom: Accept Order, Cancel Order, Send back to Pending, Set as Fraud and Delete Order.

Order lifecycle
Order lifecycle is strictly connected with Order Scenarios. Order scenario allows you to set HostBill order processing steps to best suit your business model. You can choose and control which parts in order lifecycle should happen automatically, and which require staff review. Each order page can have different scenario set.

- Fraud Prevention- first step on each order. If you have at least one fraud prevention module activated the incoming orders will be checked for possible fraud attempt.
- Enable Invoice- this step is responsible for sending invoice to client. If you have this switched to manual in your scenario, here you will have an option to unlock and send out the invoice to the client.
- Authorize Payment- payment authorization step for gateways that support it, in most cases it will be automatically accepted.
- Capture Payment- this step indicates payment status, it is accepted when client pays for invoice related to this order.
- Provision- last step that shows account provisioning and domain registration status.
Order status changes to active after all above steps are completed successfully.
View order history
Order log section (in order details) allows you to check given order history. All updates to order status, payments and discounts are logged here.
Placing new order
Generally, orders are placed by clients through their client area. However, as an admin you have the possibility to log in as a particular client and place the order on his/her behalf. The other possibility for placing orders is doing it through admin area under Orders & Accounts → Orders → Create Order. Such ordering gives you possibility to use discounts and hidden products that are not available globally.
Order draft
While placing a new order through HostBill admin area you will need to fill in a draft form, that later can be converted into invoice.

The New Order Draft contains the following tabs:
- Draft ID - an individual number which has been assigned to a draft.
- Discount - here you can provide an extra discounts for the order either by using promotional codes or custom discounts. With custom discounts you can specify the type and value of the discount and decide whether the discount should be applied only once or be recurring.
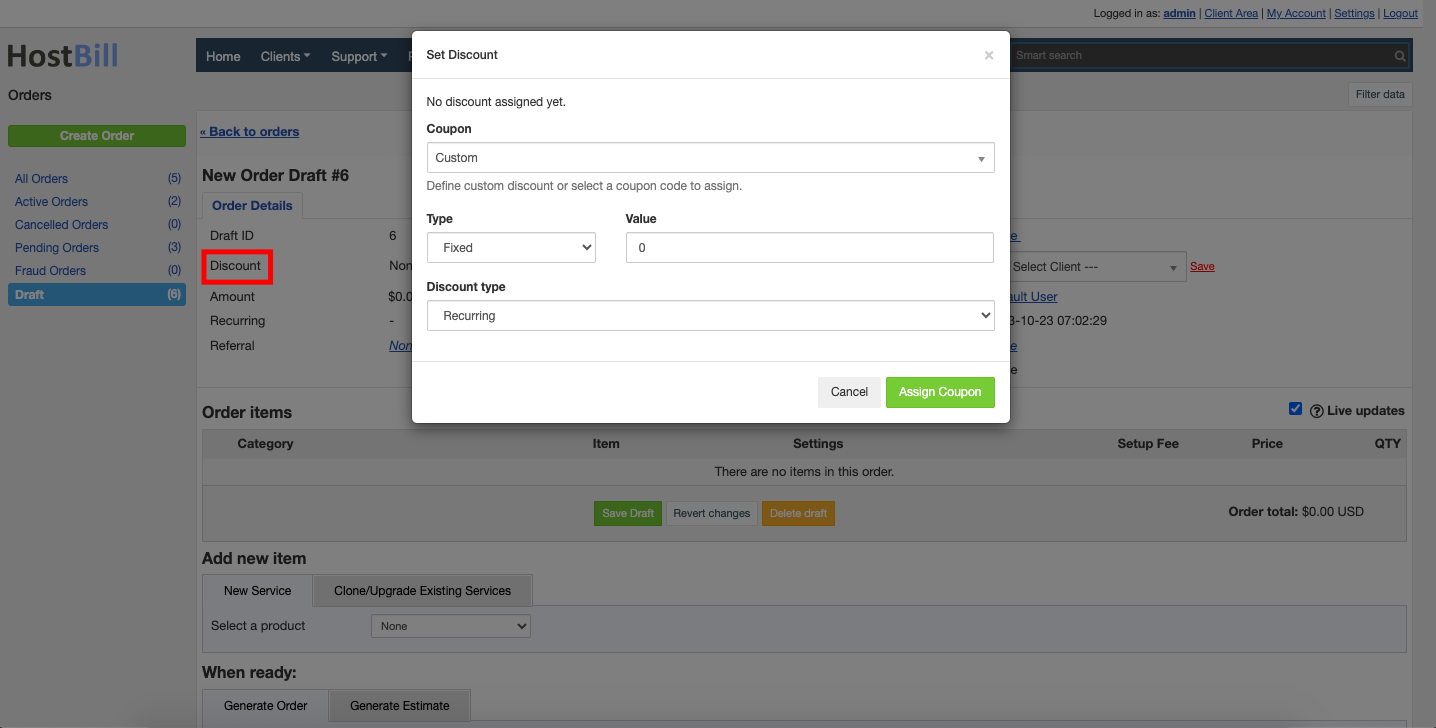
- Amount - the amount of money your client would need to pay for a given order
- Recurring - the filed is visible when the order has a recurring billing cycle.
- Referral - if affiliate system is enabled you can select the referral
- Payment method - shows a payment gateway that is used during processing the payment
- Client - you can choose the client from the drop down list.
- Staff ownership - you can select staff member to whom the order is assigned
- Order Date - the date when the order has been placed.
- Contract - the field allows to assign contract to the order
- Commitment date -
- Additional options
- Send Confirm Email if enabled HostBill will send a confirmation email to client.
- Send Invoice info to Client - if enabled HostBill will send an invoice info to client.
- Override recipients - you can select the list of recipients (from client contact list) that should get notification about given order and only selected contacts will receive notification. Otherwise all client contacts with relevant ACL will get notified
Order items
Here the following information is included:
- Category - shows products category: Service or Domain
- Item - displays the name of a product
- Settings - shows eg. billing cycle
- Amount - the amount client is obliged to pay for a given order.
Add new item
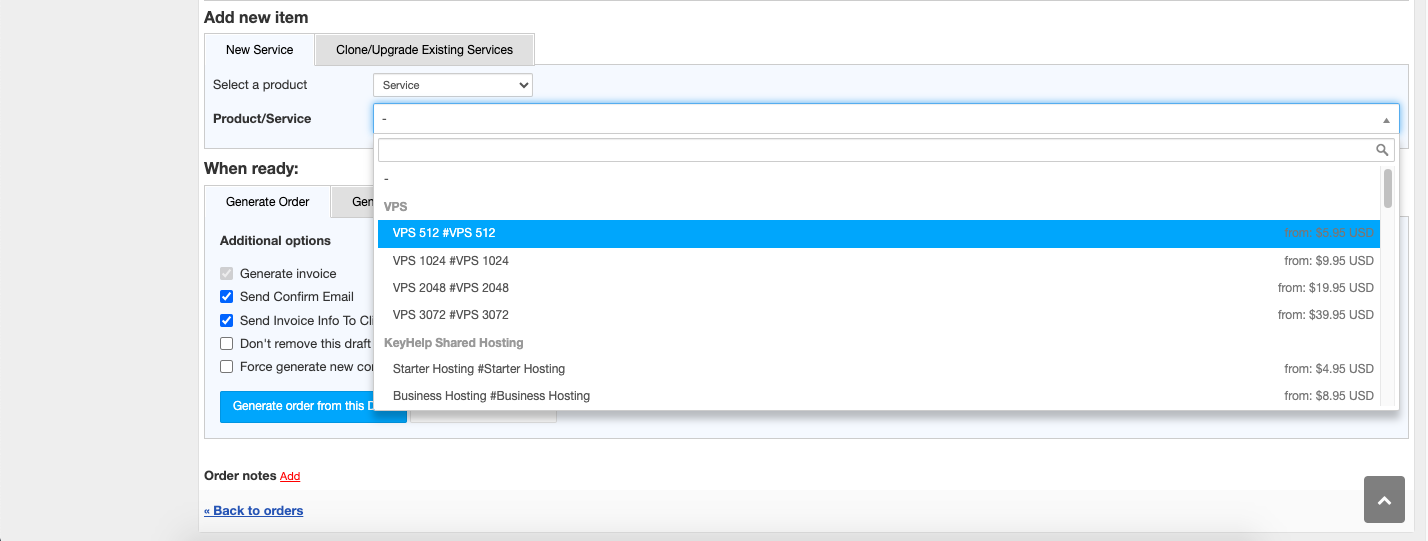
Add new item section is used for adding new items, which are divided into Services and Domains.
Here you can choose products that are available in your stock and add them to the order draft. The list also shows the lowest product price.
Also, by using More products option you can create a product/service especially for a particular client's requirements.
While creating a new order draft you can use client's existing services and
- Upgrade the service - will add to the draft an upgraded service
- Clone the service - will add to the draft the exact same service with all its components. The cloned service can be edited or the draft can be assigned to another customer.
Under order items you can:
- Save Draft - if you want to save the draft to modify it later you can save it and come back to.
- Revert Draft - you can revert any changes that have been made.
- Delate Draft - you can delate a given draft.
When ready
Under this section you can see tabs that can perform following actions:
- Generate Invoice
- Send Confirmaton Email
- Send Invoice Info To Client
- Don't remove this draft after generating order
- Force generate new contract for this order
- Generate Order from this Draft - if you have finished creating the draft you can generate Order. The order will appear under Orders&Accounts → Orders
- Generate as free order - with this option the order is generated but all items will have free billing cycle and the invoice will not be generated.
You can also Generate Estimate from Order draft with following options:
- Allow client to accept estimate in client portal
- Lock invoice generated from client-accepted order for admin review
- Send estimate to client
- Don't remove this draft after generating estimate
Order draft is a very useful tool. It gives you the possibility to create a 'rough' order which can be easily modified afterwards.
Note!
If your manually added order remains Pending you may need to check if you have attached a payment gateway to it.