HostBill can support all kind of languages, you can create your own language pack or edit those already installed.
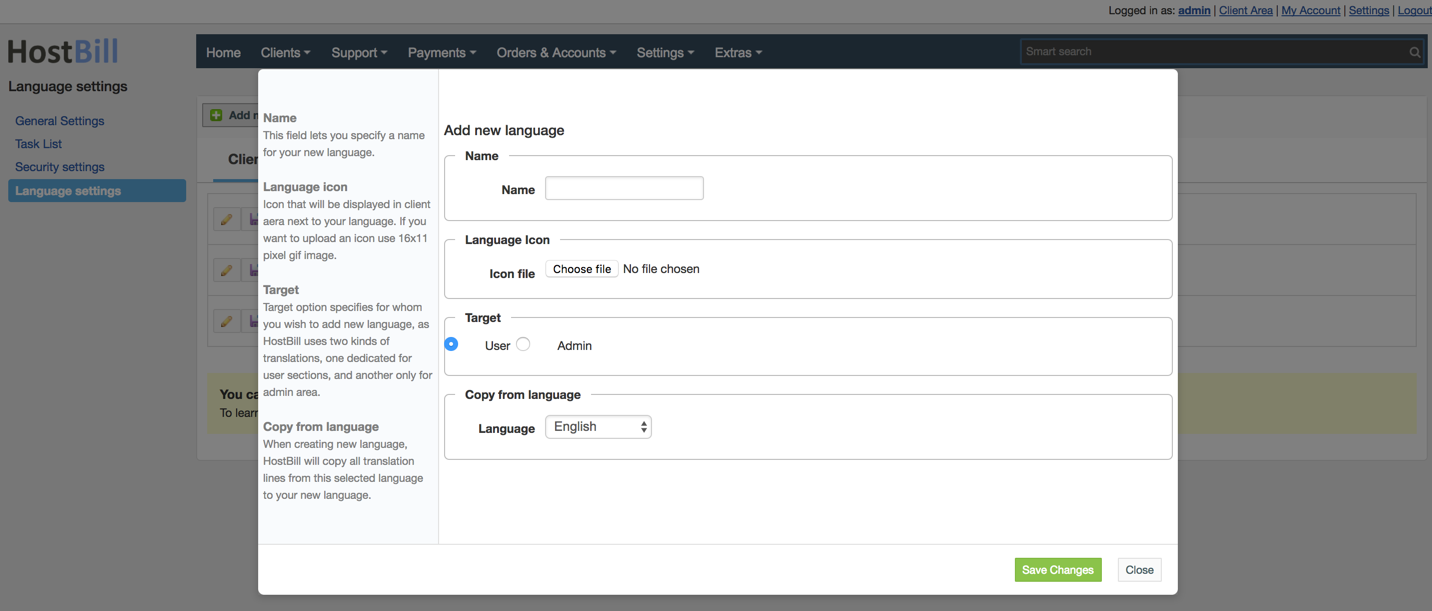
Add new language
- To add new language go to Settings >> General Settings >> Language settings
- Click on the Add new language
- In the newly appeared menu insert your language name (1), language targeted area (2), and language from witch we will copy all of the translations (3)
- Click Save Changes (4)
- When the page reload you should see your new language on the list, in category specified is step 3
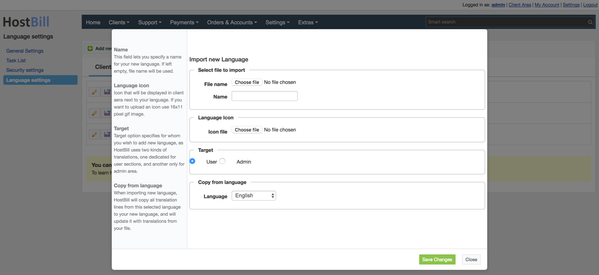
Import Language
- To import a language to HostBill go to Settings >> General Settings >> Language settings
- Click on the Import new language
- In the newly appeared menu click on the button or input area near File name (1) option and select your language file
- you can download additional language files from Here.
- you can use any custom language files prepared for Hostbil 2.9 an below.
- Chose language targeted area (3), and language from witch we will copy missing translations (4), language name (2) is optional, if left empty we will use file name for your language.
- Click Save Changes (5)
- When the page reload you should see your new language on the list, in category specified is step 4
Manage languages
You chose witch languages user or admins can use, export your languages or delete them completely.
Delete language
To delete a language, click on the [ delete ] button and accept the confirmation popup.
Export language
If you want to export languages, click on the [ export ] button, depending on your browser, download will start automaticly or you will have to specify location to with language file will be saved.
Disable/Enable language
To disable a language click on the corresponding radio button labelled Disable, to enable, click the oposite Enable radio button.
Manage translations
Translation management
You can manage translation by clicking [ edit ] button near a language you want to edit.
Add new translations
- First chose a section, 'global' section is always available in templates, other sections are dedicated to special pages eg: langedit section of admin targeted language corresponds to Language settings page.
- You can create a new custom section by clicking Custom section button.
- To add new translation lines, click on the button, a new empty line should appear.
- Enter a key word name in the first input field, this key word will be used to access your translation line.
- In the second field, enter your translated text.
- When done, click on the Save Changes button.
Note
- When adding new lines to a language, they are added globally, to all installed languages.
- When creating new custom section, you have to add at lest one translation to it or it wont be saved.

Edit translations
- To edit a translation simply click on the [ edit ] button, translation field should now be editable.
- When done, click Save Changes
Delete translations
- If you want to delete a translation line, click on the [ delete ] button.
- Translation line will be marked to deletion, and it appearance will change to light red (default).
- If you changed your mind, you can cancel this by clicking [ cancel ] button
- When done, click Save Changes
Note:
- When deleting translations, they are removed globally, from all installed languages.
- If you want to delete a section, you have to remove all translations from it.