- In HostBill go to Settings → Products & Services, and Add new order page
- From Order Types select VPS Accounts
- After creating order page add new product in it, provide name & Save changes
- In product configuration section proceed to Connect with App, select Proxmox module and App server created in previous steps.
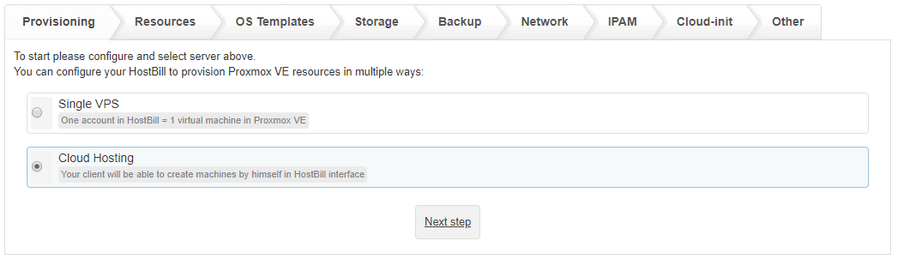
Under Provisioning Tab:
Select "Cloud Hosting"
Under Resources Tab:
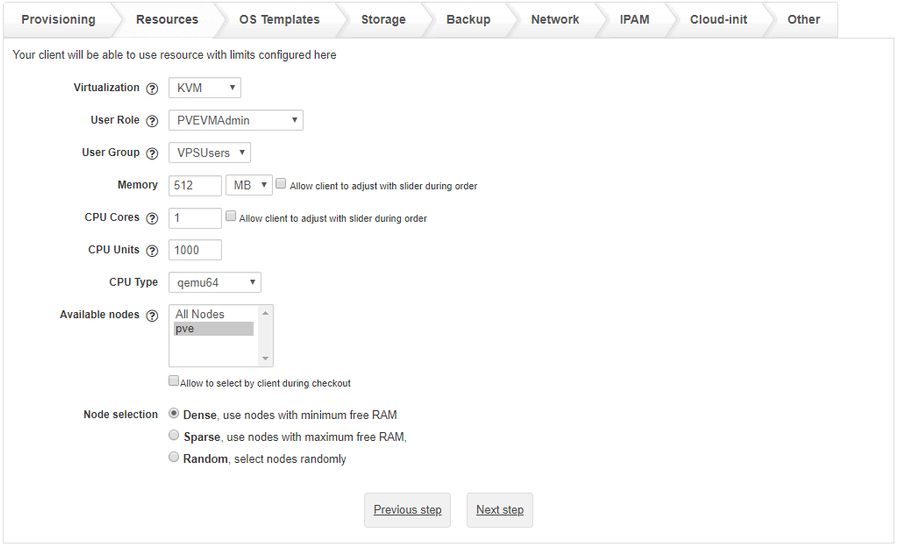
Virtualization
- Select virtualization method for this package. This will affect other options, like templates / ISO loaded under OS Templates tab
User Role
- Select PVEPoolAdmin
User Group
- Optionally select user group to assign customer in Proxmox
Memory [MB]
- Enter total amout of memory customer can allocate
- Optionally use "Allow client to adjust with slider during order" to let client adjust this limit during signup
CPU Cores
- Enter the number of cores clients will be able to use to create new VM.
- Optionally use "Allow client to adjust with slider during order"
CPU Units
- Enter the number of CPU units assigned to each VM.
- Optionally use "Allow client to adjust with slider during order"
CPU Type (KVM Only)
- Select the type of CPU used by VM
Available nodes
- Select nodes customer VMs will be created on. Use Ctrl to select multiple nodes.
- If more than one selected, HostBill will provision VM on least used Node
- Optionally use "Allow to select by client during checkout"
Node selection
- Select which policy to use when selecting nodes for provisioning.
OS Templates Section
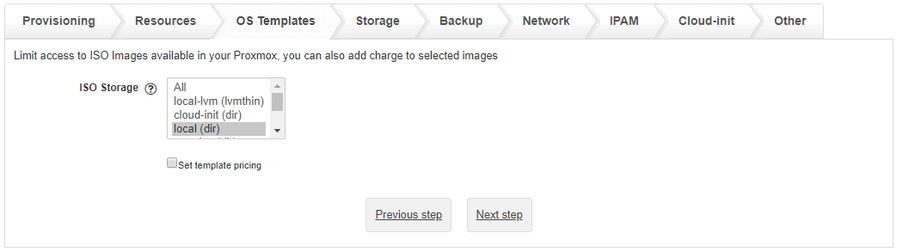
ISO Storage:
Select storage your clients will be able to choose ISO / OS templates from.
Note:
iso stores should share name/id across nodes, HostBill will assume that selected ISO is available on all nodes configured with this product
Use "Set template pricing"
To set individual prices for OS templates/ISO images.
HostBill will load OS Templates / ISO Images depending on Virtualization selected in 'Resources tab'.
For LXC / OpenVZ - it will load OS Templates
For KVM - it will load ISO images and VM Templates
Storage Section
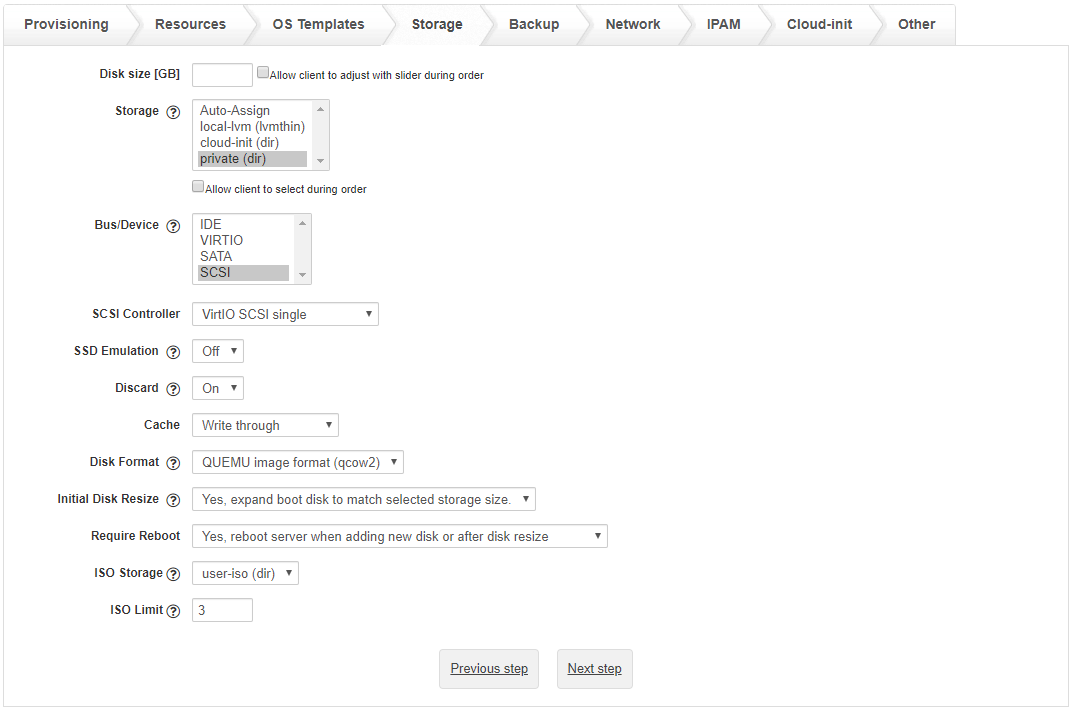
Disk size [GB]
- Enter total amount of disk space customer virtual machines can allocate
- Optionally use "Allow client to adjust with slider during order" to set prices per GB
Storage
- Customer VM's disk will be created on selected storage.
- Use Auto-assign to assign random storage
- Optionally use "Allow client to select during order" to let client decide during order / apply charge per storage
Bus/Device (KVM Only)
Select bus/device available for client.
SCSI Controller (KVM Only)
Select controller type for SCSI devices.
SSD Emulation (KVM Only)
Enable if you want drives to be presented to the guest as a solid-state drive rather than a rotational hard disk. Some guest OS will require this to be able to issue TRIM commands.
Note that this option is not supported on VirtIO drives.
Discard (KVM Only)
Select if you want to enable discard/trim on VM disks. When enabled
Cache (KVM Only)
Select cache option enabled on VM disks.
Disk Format (KVM Only)
- Raw disk image (raw)
- QUEMU image format (qcow2)
- VMWare image format (vmdk)
Disk Resize (KVM Only, cloned VM)
Select if you want to resize VM boot disk if selected Disk size is bigger than the cloned VM disk or if you want to add an additional disk.
ISO Storage (KVM Only)
Select storage location for ISO images uploaded by clients. It should be separate from OS Template ISO storage if you want to make those images private.
ISO Limit (KVM Only)
Number of ISO images that clients can upload on this account.
Backup Section
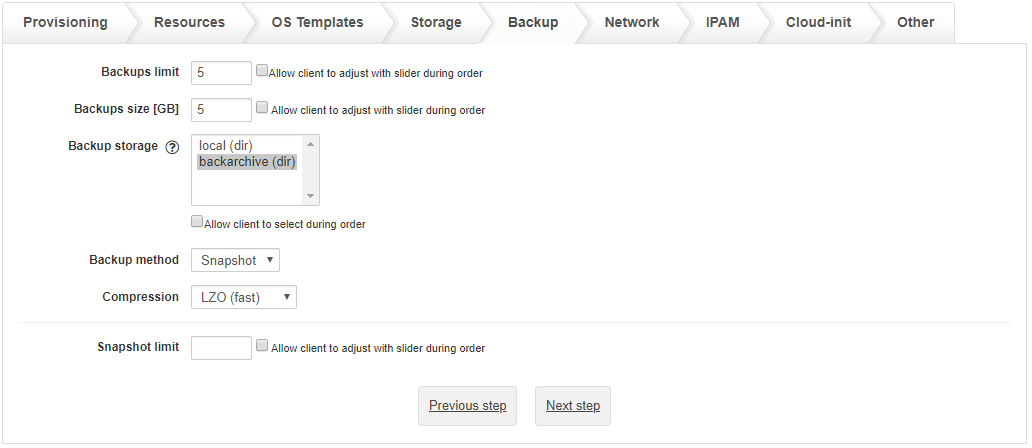
Backups limit
- Enter number of backups customer can take.
- Optionally enable "Allow client to adjust with slider during order"
Backups size [GB]
- Enter total amount of disk space customer backups can take
- Optionally use "Allow client to adjust with slider during order"
Backup Storage
- Backup will be saved to selected storage. Selecting multiple options will use random storage for each backup
- Optionally use "Allow client to select during order"
Backup method
Select from available backup methods:
- Snapshot
- Suspend
- Stop
Compression
Select from available backup compression methods:
- raw (none)
- LZO
- GZIP
Snapshot Limit
- Enter number of snapshots customer can create.
- Optionally enable "Allow client to adjust with slider during order"
Network Section
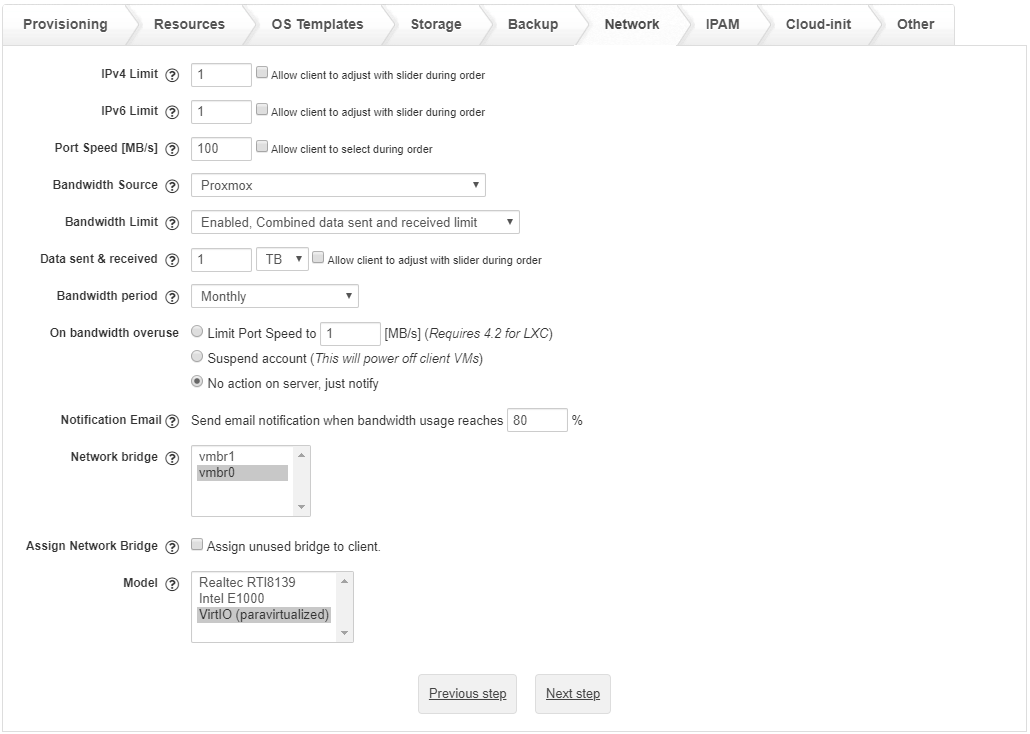
IPv4 Limit
- Number of IP v4 addresses that can be allocated.
- Optionally use "Allow client to adjust with slider during order"
IPv6 Limit
- Number of IP v6 addresses that can be allocated.
- Optionally use "Allow client to adjust with slider during order"
Port Speed [Mbps]
- Leave blank to unlimited.
- This value will be used for all Virtual Machine interfaces.
- Optionally use "Allow client to select during order"
Bandwidth Source
Select app/server from where bandwidth usage data will be collected. This also affects network usage graphs displayed in client area.
When using external app hostbill will look for ports named the same as "tap" interface on proxmox host, ie tap100i0 for VM 100 net0.
- Proxmox - default, usage data is collected from proxmox every 5 min by reading changes to netin and netout values. Usage graphs use VM rrd data and display combined usage for all interfaces.
- Other - usage is imported form selected app every hour. Graphs show usage for each interface separately.
Bandwidth Limit
Enable this option if you want to limit bandwidth used by client. Bandwidth usage is calculated monthly regardless of account billing period.
- Disabled
- Enabled, separate limits for data sent and received
- Enabled, combined data sent and received limit
When changing from separate to combined limit with cart forms enabled, you will have to migrate user selected limits using Migrate Data Sent & Received values to this field option.
Data sent
- Only when Enabled, separate limits for data sent and received is selected
- Amount of outgoing traffic that client is allowed to use without restrictions
- Optionally use "Allow client to adjust with slider during order"
Data received
- Only when Enabled, separate limits for data sent and received is selected
- Amount of incoming traffic that client is allowed to use without restrictions
- Optionally use "Allow client to adjust with slider during order"
Data sent & received
- Only when Enabled, combined data sent and received limit is selected
- Amount of incoming and outgoing traffic that client is allowed to use without restrictions
- Optionally use "Allow client to adjust with slider during order"
On bandwidth overuse
Selected action will occur when service bandwidth limit is exceeded.
- Limit Port Speed to selected speed (Mbps)
- Suspend account
- No action on server, only notify.
Notification Email
- Select if you want to send out notification for clients when their bandwidth usage reaches selected percentage.
Network mode (OpenVZ Only)
- Bridged
- Routed (venet) - this option requres IPAM plugin to assign IP address to VM
Network bridge
- Provisioning will use random bridge from the list of selected options.
- When multiple options selected clients will have an option to chose which bridge to use when adding new interface.
- When using multiple nodes make sure your bridge names are the same across all nodes
Assign Network Bridge
Enable to assign an unused bridge to Client profile, only one bridge is assigned per proxmox app.
Bridge is considered unused if not selected under Network bridge for current product and not assigned to active service.
- All Unused - allow provisioning for all unused bridges in cluster.
- Other - limit provisioning to selected options only.
Model (KVM Only)
- Select network device models available.
- Selecting more than one for cloud will allow client to choose from during VM setup
IPAM Section

If IPAM plugin is installed in HostBill you can enable this feature to automatically assign IP addresses to client virtual machine.
When using LXC virtualization IPs will be assigned using DHCP if IPAM integration is not enabled.
Use "Enable IPAM" to enable this feature.
How it works?
- Enable IPAM integration below
- Select IP list for IPv4 and IPv6 from IPAM to use with this product
- Each time new IP is requested HostBill will allocate free IP from selected IPAM list, and mark it as assigned to client virtual machine
- IP will be displayed in client area interface, and set as admin comment in IPAM to client VM
- VM interface MAC address will be added to main IP in IPAM and if DHCP integration is enabled it will be added to DHCP configuration.
- Cloud-init configuration will be automatically generated for main IP
- You can use client area details about assigned IPs as reference when configuring networking for client VM's
Default IPv4 Pool
- Select pool from which HostBill should assign IPv4 addresses for this package.
Default IPv6 Pool
- Select pool from which HostBill should assign IPv6 addresses for this package.
Vlan tag
- Enable if you want to add vlan tag to client interfaces. Vlan is set only if it is also set on IPAM list related to main IP.
IP Assignment
- Allow client to choose IPs to assign - client area will show a short list when configuring interfaces for client to select which IPs to assign. Automatic provisioning will get first IP.
- Assign first available IP address
- Assign random IP
MAC Address
Choose if you want to use predefined MAC address list or if those should be generated randomly.
- Random - New interfaces will be created with randomized MAC address. Generated MAC address will replace MAC address stored in IPAM and will be removed when IP is unassigned.
- Static - New interfaces will be created with MAC address from IPAM, assigned to first IP . If assigned IP does not include a MAC address it will be generated automatically.
Client IPs
Select which client services can share IPs with services based on this product. IPs assigned in IPAM to those services can be used for VM interface configuration in client area and do not count into IP limit.
- IPs assigned to this service - allows clients to use IPs assigned in IPAM to this service. Other client services based on this product won't have access to those IPs.
- Other options - allow clients to use IP assigned to services using selected product.
Network mapping
- Define network bridge to IPAM list mapping. If your setup includes multiple bridges this option can be used to change which IPAM list is used for each bridge. It can also be used to define which bridge should be used for unmapped lists.
Cloud-init Section (KVM Only)
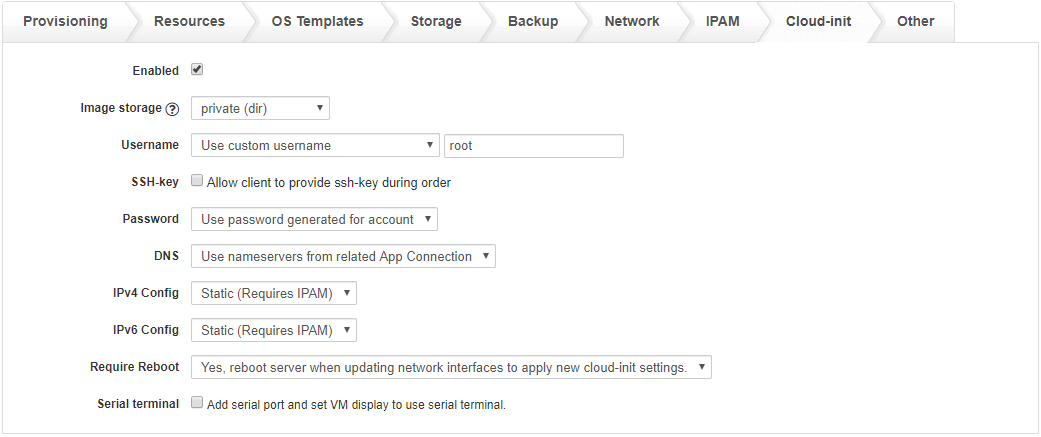
Enabled
Select if you want to enable cloud-init configuration for client VM.
Image storage
Select storage location for generated cloud-init images.
Username
Select which username to use:
- Default - defined by OS
- Use username generated for account
- Use custom username - defined in additional field
SSH Key
- Option to Allow client to provide ssh-key during order
Password
- none - password will not be set.
- Use password generated for account
DNS
- Use default settings (from proxmox)
- Use nameservers from related Hostbill App Connection
IPv4 Config
- DHCP
- Static - Configured with the use of
IPv6 Config
- DHCP
- Static - Configured with the use of IPAM
Require Reboot
- Yes - server will be rebooted if changes related to network require restart to be applied.
- No - client will have to reboot manually to apply changes.
Serial terminal
- Add serial port and set VM display to use serial terminal.
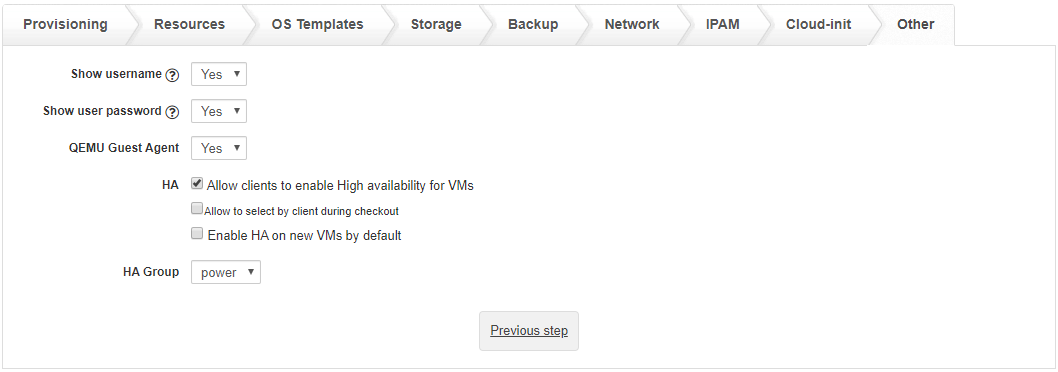
Other settings
Unprivileged container (LXC Only)
- Create new container with unprivileged option enabled.
Show Username (KVM Only)
- Display username generated for account.
- If cloud init is not used correct username has to be created manually in VM operating system.
- When cloud-init is used to set username this option is always enabled.
Show Password (KVM Only)
- Display user password generated for account in client area.
- If cloud init is not used correct (root) password has to be set manually in account details or in VM operating system.
- When cloud-init is used to set password this option is always enabled.
QEMU Guest Agent (KVM Only)
- Select if you want to enable guest agent for client VM. When enabled it provides basic information about VM network settings
HA (High-Availability)
- Allow clients to enable High availability for VMs
- Allow to select by client during checkout
- Enable HA on new VMs by default
HA Group
- Select which group to use when setting up HA for client VM