Installing HostBill
HostBill installation is fully automated and takes just seconds, more info at Installation
Connecting HostBill with LibreNMS
- Make sure that hb_api.php file taken from / includes/modules/Hosting/LibreNMS directory is copied into main LibreNMS dir (librenms of your HostBill installation directory (usually /home/hostbill/public_html/) is uploaded into main directory of your LibreNMS installation (one that is accessible from web, ie: /opt/librenms/html ).
- In HostBill go to Settings > Modules, find and activate LibreNMS hosting module
- You will be redirected to Settings > Apps to set connection with LibreNMS
- Enter LibreNMS admin credentials, use Test Connection to check if HostBill can connect
Creating your first package with billable bandwidth overages
- In HostBill go to Settings > Products & Services, and Add new order page
- From Order Types select Colocation or Dedicated Servers
- After creating order page add new product in it, provide name & Save changes
- In billing settings choose Bandwidth billing, configure your limits and pricing.
- From Connect with App section select your LibreNMS module & app.
- OPTIONAL: Under Client Functions tab enable "Bandwidth usage graphs" to show bandwidth utilisation graphs to customer for his service
- OPTIONAL: Under Client Functions tab enable "Graphs" to show any other graphs assigned to customer service
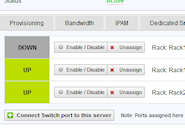
Connecting port from LibreNMS in HostBill
- In HostBill adminarea go to Account with package configured with LibreNMS module
- Proceed to "Bandwidth" tab
- Click on "Select switch/ports to connect"
- Select switch & port fetched from LibreNMS to monitor, make sure it has graph generated in LibreNMS