...
...
...
...
...
...
...
...
...
...
...
...
...
...
...
...
...
...
...
...
...
...
...
...
...
...
...
...
...
...
...
Overview
...
WebHooks plugin allows you to send notifications to external scripts. It works by sending http requests with event data to url defined in your webhook.
Installation
Proceed to Settings » Module. Search and activate "WebHooks" module.
...
Activating the module
...
- If the plugin is included in your HostBill edition you can download it from your client portal.
- If the plugin is not included in your HostBill edition you can purchase it from our marketplace and then download it from the client area.
- Once you download the plugin extract it in the main HostBill directory.
- Go to Settings → Modules, find and activate WebHooks plugin.
- Once the plugin is activated you will be directed to Settings→ Modules→ Plugins to configure the plugin.
Module configuration
...
The module does not require any further configuartion.
After activating the module you can navigate to Extras → WebHooks to manage your webhooks.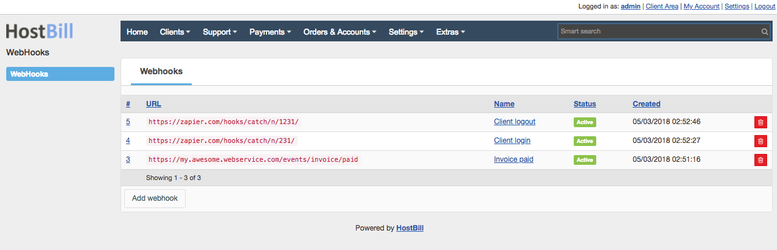
WebHook settings
...
This configuration can be changed at any time.
- Name - name or description that will identify your webhook
- URL to be called called - provide an URL to the script that will handle notifications, it does not have to be public but it has to be reachable from your HostBill installation.
- Verify SSL certificate - check this option to verify that SSL certificate is valid before sending data.
- Status - set disabled if you do not want to send notification.
- Request Content type - content type for the http request
- Secret - It it will be generated automatically after you add new webhook, it can be used to validate requests.
- Events - Select select which events will be sent to specified url


HTTP Request
...
Each request will include special headers that will allow you to validate it and with details about executed event and webhook
...
| Code Block | ||
|---|---|---|
| ||
firstname=Joe&lastname=Doe |
Request validation
...
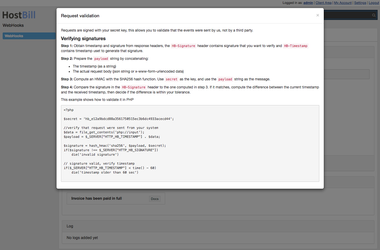
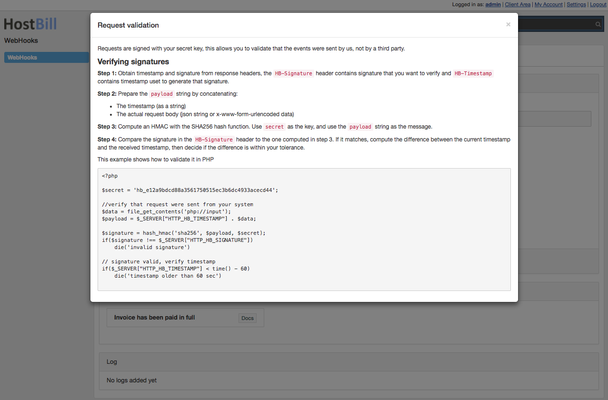
Each request is signed with your secret key, this allows you to validate that the events were sent by your HostBill installation, not by a third party.
Here are the steps required to validate request signature.
Step 1: Obtain timestamp and signature from response headers, the HB-Signature header contains signature that you want to verify and HB-Timestamp contains timestamp used to generate that signature.
...
| Code Block | ||||||||
|---|---|---|---|---|---|---|---|---|
| ||||||||
<?php

$secret = ''; // paste your Secret here

//fetch request body
$data = file_get_contents('php://input');
$payload = $_SERVER["HTTP_HB_TIMESTAMP"] . $data;

$signature = hash_hmac('sha256', $payload, $secret);

//compare signature in header with the one computed above
if($signature !== $_SERVER["HTTP_HB_SIGNATURE"])
    die('invalid signature')

// signature valid, verify timestamp
if($_SERVER["HTTP_HB_TIMESTAMP"] < time() - 60)
die('timestamp older than 60 sec') |
Note: Webhooks plugin helps you by showing sample code for each webhook you generate in webhook details.