Overview
OpenStack is a software for creating and managing cloud computing platforms for public and private clouds. OpenStack’s modular architecture allows to deploy different projects, depending on types of resources you’re virtualizing and types of cloud services you need. With multiple provisioning methods you can use OpenStack module to sell and provision automatically VPS Hosting, Cloud hosting (virtual Datacenters) or DIY Cloud and VPS packages.
Activating the module
- If the module is included in your HostBill edition you can download it from your client portal.
- If the module is not included in your HostBill edition you can purchase it from our marketplace and then download it from the client area.
- Once you download the module extract it in the main HostBill directory.
- Go to Settings → Modules → Hosting Modules, find and activate OpenStack module.
Connecting HostBill with OpenStack
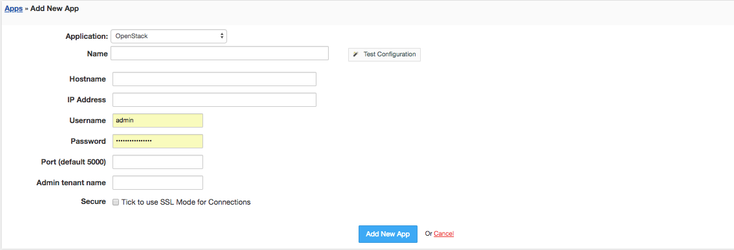
- Proceed to Settings → Apps → Add new App
- From Applications list select OpenStack
- Enter:
- Name - Name of this connection
- Hostname
- IP Address
- Username
- Password
- Admin tenant name (default to "admin"), set it in Admin tenant
- Make sure to provide valid port your Openstack Keystone operates on - its often changed from default 5000. If its not changed, enter 5000
4. Verify entered credentials by clicking Test Connection to check if HostBill can connect
5. Save Changes

Setting Cloud Package
- Proceed to Settings → Products & Services and Add new Orderpage
- From "Order Type" Select Openstack
- Pick orderpage, save changes. Add new product
- Under Connect with App Select Openstack Module
- Select app connection configured in previous steps
- Select Cloud Hosting from Provisioning Tab
- Setup package Resource limits:
- Provide total amout of Memory [MB] client can assign to their VMs
- Provide vCPU count that customer can assign to their VMs
- Enter Maximum number of instances customer can create
- From Available flavors pick what VM sizes customer can create under this plan
- Setup package Images / Snapshots limits:
- To limit use and set prices of templates tick Set template pricing - you can then edit list of templates under related forms element
- Setup package Storage limits:
- Set Storage size [GB] that client can use by all their VMs
- Provide Max volumes count that client can create in total
- Provide Max snapshots count that client can take in total
- Setup package Network limits:
- Enter Total Number of Floating IPs that client can use
- Select which Floating IPs pool to use
- Save changes
| Widget Connector | ||||||
|---|---|---|---|---|---|---|
|
For more generic product configuration details including price, automation, emails settings refer to Product Configuration article.
Setting VPS Hosting Package
- Setup new orderpage as described above, add new product
- Under Connect with App Select Openstack Module
- Select app connection configured in previous steps
- Select Single VPS from Provisioning Tab
- Setup package Resource limits:
- From Flavor pick what VM size customer machine should be crated with
- From Projects pick project that client VM will be created under
- Setup package Images / Snapshots limits:
- From OS Template list pick what template customer VM should be created with. OPtionally you can load tempaltes into dropdown available from orderpage, so client can choose it during singup
- Setup package Network limits:
- Enter Total Number of Floating IPs that client can use
- Select which Floating IPs pool to use
- Save changes
| Widget Connector | ||||||
|---|---|---|---|---|---|---|
|
Storage Limit
Configuring Client Functions
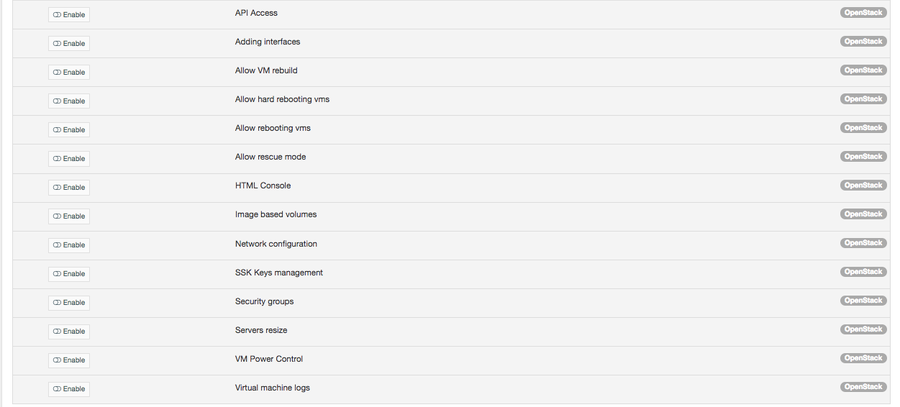
In Products & Services → Your Order Page → Your Product → Client Functions you can control what features customer will have access to in client portal, by clicking Enable/Disable next to the given option.
Use Edit button to adjust function appearance in the client portal.
For OpenStack you can enable the following client functions dedicated to this module:
- API Access - show OpenStack API access credentials - for cloud packages only.
- Adding interfaces - allow ability to add new network interfaces.
- Allow VM revuild - allow rebuilding Virtual Machines.
- Allow hard rebooting VMs - allow hard rebooting VMs.
- Allow rebooting VMs - allow rebooting VMs.
- Allow rescue mode - allow entering and disabling Rescue mode for VM.
- HTML Console - allow acces to html console.
- Image based volumes - allow creating volumes from Images.
- Network configuration - allow access to network configuration section.
- SSH Keys management - allow SSK Key management.
- Security groups - allow access to security groups configuration section - cloud packages only.
- Servers resize - allow for resizing instances.
- VM Power Control - allow VM start/stop.
- Virtual Machine logs - allow access to virtual machine logs.
As well as number of standard client functions, such as
- Change Billing Cycle
- Change Label
- Change Ownership
- Edit Forms
- Graphs
- Login Details
- Manual Service Renew
- New Direct Link
- Related Services
- Service Auto Renewal

How to access instances through SSH using root password?
This module supports two ways of settings up SSH access with password authentication: through root password injection and cloud-init scripts.
You can read more on how to enable password injection for different hypervisors here: http://docs.openstack.org/admin-guide/compute-admin-password-injection.html
To use cloud-init script, you will need to enter it in your product configuration, under "Misc" tab.
It allows you to use "$password" variable that will be replaced with actual root password when new VM is created.
User Data Scripts
It is possible to use smart templates for user data script, you can access $service, $client, $forms and $password variables to customize your script.
Please refer to this list to find out proper variable names - Available Email / Mobile Notifications Variables
You can access form components values through $forms variable, this guide illustrates how to find proper variable names - Forms: Accessing Forms elements in email templates
| Code Block | ||
|---|---|---|
| ||
#cloud-config
hostname: {$service.domain}
users:
  - name: {$forms.username.value}
	gecos: {$client.firstname} {$client.lastname}
	passwd: {$password|md5}
    sudo: ['ALL=(ALL) NOPASSWD:ALL']
    groups: sudo
    shell: /bin/bash
runcmd:
  - {$forms.recipe.variable_id}
- restart ssh |
Solving connection problems
Problem: Connection timed out
Solution: Make sure that HostBill server is able to connect to your Openstack server. After authentication Openstack returns with list of available api endpoints, HostBill will test those endpoints using admin api interface (adminURL). Make sure that url provided in error message is accessible from your server.
Problem: Admin API interface is not available for some services (eg. compute, network)
Solution: Rename includes/modules/Hosting/openstack/endpoints.php.example to endpoints.php, you can edit that file to select which url type will be used for each service.
Problem: Test connection returns: 500 Internal Server Error. Test did not completed, check your error logs for more information.
Solution: There was an error while testing connection status, check Extras → System Logs → Error logs for more information.